Love this? Save it for later!
Share the inspiration with your friends
“I wasn’t expecting to become obsessed with homemade pop tarts,” I admitted to myself one Saturday morning, flour dusting the counter and a slightly lopsided crust cooling nearby. The idea came from a random chat with my neighbor, Jim, who swore by his grandmother’s strawberry pop tarts recipe. He was fixing my fence at the time, and between hammer swings, he told me how his grandma always made these flaky hand-crimped treats that tasted way better than anything from the store.
Honestly, I didn’t think I had the patience for it—store-bought pop tarts were just so easy. But there I was, rolling out dough with my rolling pin that had seen better days, wrestling with sticky strawberry filling, and crimping edges with a fork. And you know what? It felt like magic happening in the kitchen. The smell alone—warm, buttery crust mingled with sweet, tangy strawberry—pulled me back to childhood breakfasts I never had.
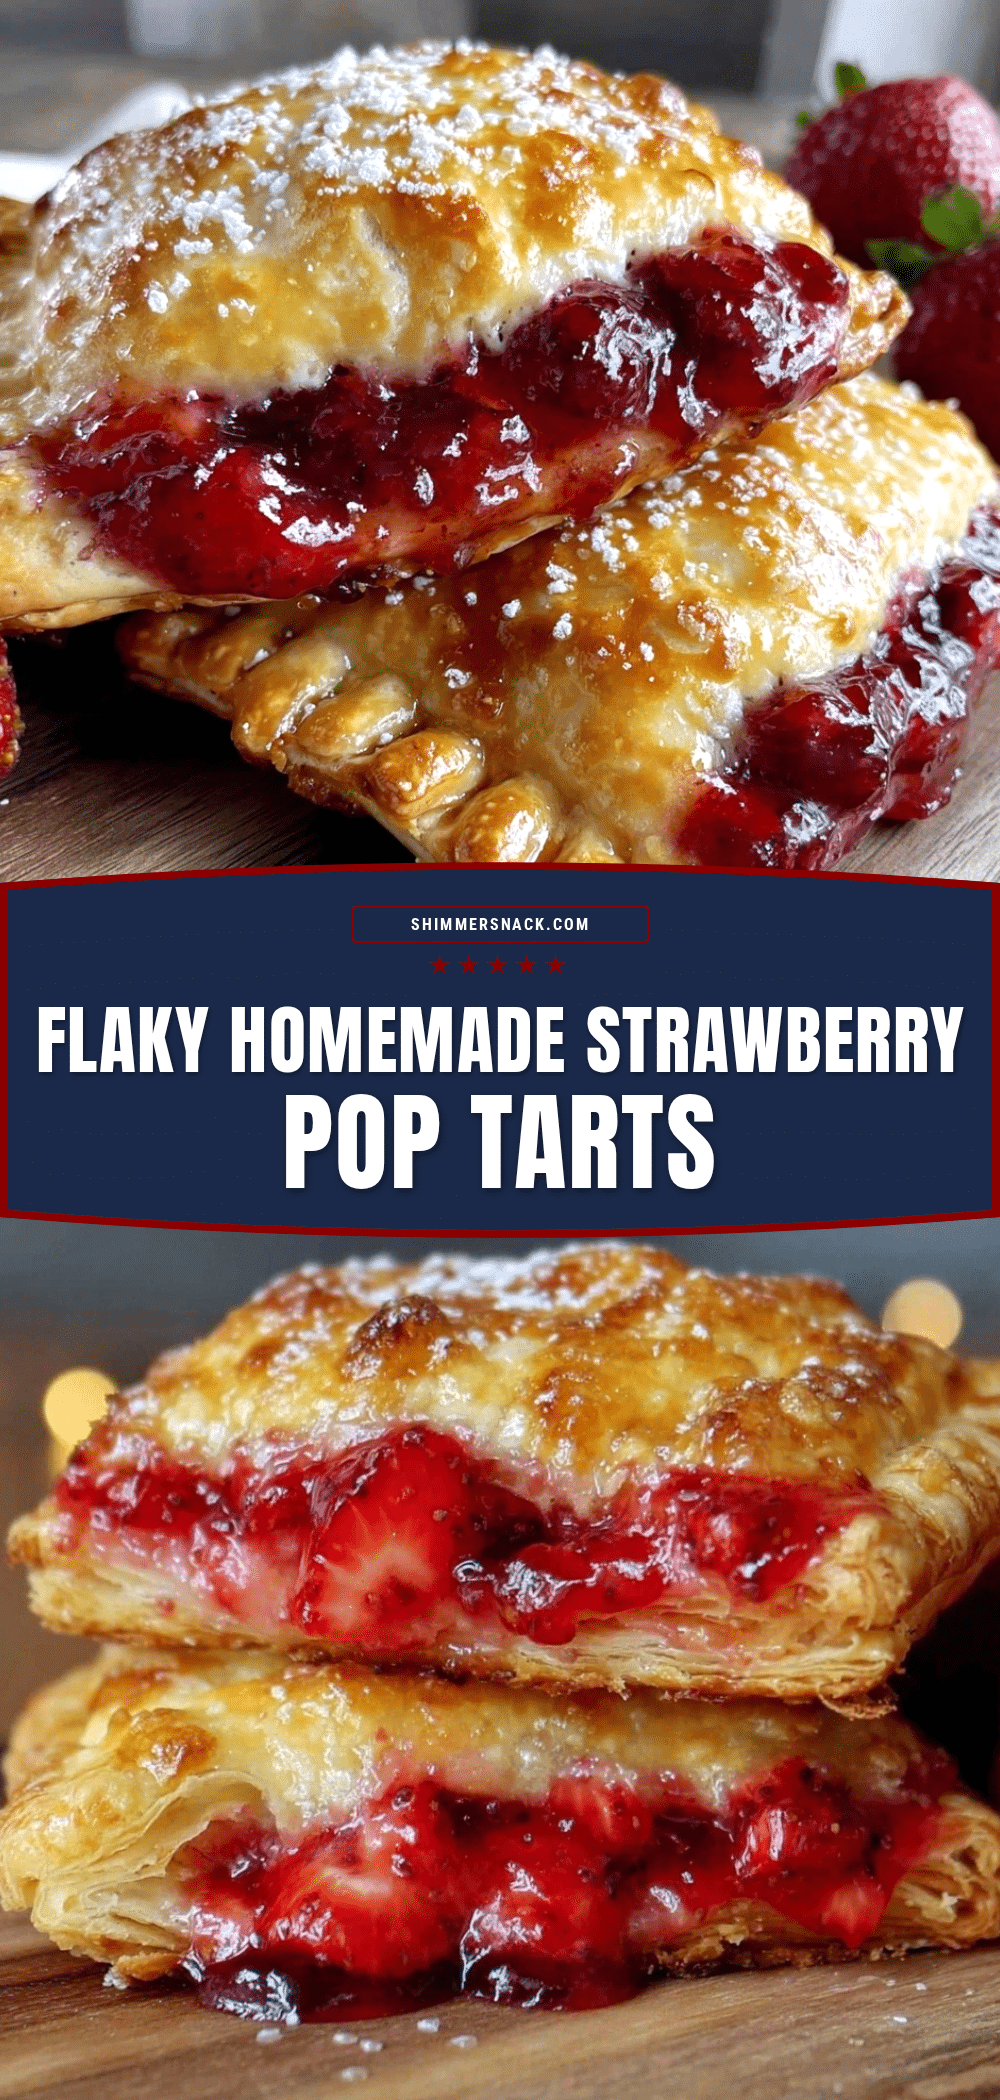
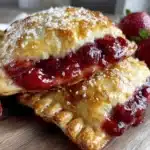
Maybe you’ve been there, staring at a box of pre-made pastries wondering if it’s truly worth the effort to make them from scratch. Let me tell you, these homemade strawberry pop tarts with flaky hand-crimped crust are worth every bit of the fuss. I made a mess, forgot to set the timer once, and had jam bubbling over the edges, but somehow that imperfection made it feel more like a real kitchen adventure. These pop tarts stuck with me because they’re simple, nostalgic, and honestly, a little bit special. And I can’t wait for you to try making them yourself.
Why You’ll Love This Recipe
This homemade strawberry pop tarts recipe isn’t just another breakfast idea—it’s a little slice of joy you can make at home. After testing this recipe over several weekends, I can say it’s reliable, approachable, and downright delicious. Here’s why you’ll want to keep this one in your recipe box:
- Quick & Easy: You can whip these up in under an hour, perfect when you want a special breakfast without spending all morning in the kitchen.
- Simple Ingredients: No need for fancy or hard-to-find items. Most are pantry staples you already have, plus fresh or frozen strawberries.
- Perfect for Breakfast or Snack Time: These pop tarts are great for cozy weekend mornings, kids’ lunchboxes, or even a sweet afternoon pick-me-up.
- Crowd-Pleaser: They get rave reviews from picky eaters and adults alike, thanks to the flaky crust and luscious strawberry filling.
- Unbelievably Delicious: The buttery, flaky crust combined with the sweet-tart strawberry jam creates a texture and flavor that’s next-level comfort food.
What sets this recipe apart is the flaky hand-crimped crust. Instead of the usual pre-made doughs, you get to roll out your own flaky layers, which, honestly, makes all the difference in texture. Plus, the strawberry filling is just the right balance of sweet and tangy—no overpowering sugar, just pure fruit flavor that wakes up your taste buds. I’ve also tossed around with a few tweaks, like brushing the crust with egg wash for that golden shine or sprinkling a little sugar on top for crunch. Trust me, these little touches make a big difference.
Whether you’re impressing guests or just treating yourself to a nostalgic morning, these strawberry pop tarts bring that perfect homemade charm. It’s comfort food that makes you close your eyes with the first bite and smile. Honestly, once you try them, you might find yourself making them again and again.
What Ingredients You Will Need
This recipe uses simple, wholesome ingredients that come together beautifully to deliver a flaky crust and rich strawberry filling without any fuss. Most are pantry staples, and a few fresh items bring everything to life. Here’s the breakdown:
- For the Crust:
- 2 ½ cups (315g) all-purpose flour – I prefer King Arthur for consistent results
- 1 teaspoon granulated sugar (adds a hint of sweetness)
- 1 teaspoon salt
- 1 cup (226g) unsalted butter, cold and cubed – the key to flakiness
- ⅓ cup (80ml) ice water (plus extra if needed)
- For the Filling:
- 1 ½ cups (about 350g) fresh or frozen strawberries, diced
- ½ cup (100g) granulated sugar
- 2 tablespoons cornstarch (helps thicken the filling)
- 1 tablespoon lemon juice (brightens the flavor)
- ¼ teaspoon salt
- For Assembly:
- 1 large egg, beaten (for egg wash to get that golden crust)
- Optional: coarse sugar for sprinkling on top
If you want a gluten-free option, you can swap the all-purpose flour with a gluten-free baking blend, but the texture will be slightly different. For dairy-free, use a vegan butter substitute that’s solid and cold. I’ve tried both and still loved the results.
For the strawberry filling, if fresh strawberries are out of season, frozen works just as well — just make sure to thaw and drain excess liquid. Sometimes, I like to add a pinch of cinnamon to the filling for a subtle warmth. It’s a small twist, but it adds a cozy vibe, especially in cooler months.
Equipment Needed
- Rolling pin – any basic rolling pin works, but a wooden one feels classic and helps with even rolling
- Mixing bowls – medium and large sizes for dough and filling
- Pastry cutter or two knives – to cut cold butter into the flour (a food processor can also be used if you prefer)
- Baking sheet – lined with parchment paper to prevent sticking
- Fork – for crimping the edges of the pop tarts
- Measuring cups and spoons – for precise ingredient amounts
- Small saucepan – for cooking down the strawberry filling
- Pastry brush – to apply egg wash evenly
If you don’t have a pastry cutter, two butter knives work just fine to cut the butter into the flour. I’ve also used a fork to mix in the butter when in a pinch, but it takes a bit longer. For budget-friendly baking sheets, aluminum pans from local stores do the job well without breaking the bank.
Maintaining your rolling pin is easy—just wipe it clean after use and avoid soaking in water. I’ve had mine for years, and it still rolls out dough beautifully every time.
Preparation Method

- Make the Crust Dough (15 minutes): In a large bowl, whisk together the all-purpose flour, sugar, and salt. Add the cold, cubed butter and use a pastry cutter or two knives to cut the butter into the flour mixture until it resembles coarse crumbs with some pea-sized pieces. (If you prefer, pulse in a food processor in short bursts.) Slowly add ice water, starting with ⅓ cup, mixing gently with a fork until the dough just starts to come together. If it’s too dry, add water a teaspoon at a time. Gather the dough into a ball, divide it in half, flatten each into a disk, wrap tightly in plastic wrap, and refrigerate for at least 30 minutes.
- Prepare the Strawberry Filling (20 minutes): While the dough chills, combine diced strawberries, sugar, cornstarch, lemon juice, and salt in a small saucepan over medium heat. Cook, stirring frequently, until the mixture thickens and bubbles, about 8–10 minutes. Remove from heat and let cool completely. (If the filling seems too runny once cool, cook a bit longer to thicken.)
- Roll Out the Dough (10 minutes): Preheat your oven to 375°F (190°C). On a lightly floured surface, roll out one disk of dough into a 12×9-inch rectangle about 1/8 inch thick. Repeat with the second disk. (Hint: Keep the dough chilled if it starts to soften.)
- Assemble the Pop Tarts (10 minutes): Cut each rolled dough sheet into six equal rectangles (about 4×3 inches). Place half the rectangles on the prepared baking sheet. Spoon about 1 tablespoon of the cooled strawberry filling into the center of each. Brush the edges of these rectangles lightly with beaten egg. Top each with a second rectangle of dough, pressing the edges gently to seal. Use a fork to crimp the edges all around, making sure the filling won’t leak out.
- Final Touches & Bake (20 minutes): Brush the tops of the pop tarts with the beaten egg wash for a shiny, golden finish. Optional: sprinkle a pinch of coarse sugar on each. Bake in the preheated oven for 20–25 minutes until golden brown and puffed. Watch closely near the end to prevent over-browning.
- Cool & Serve (10 minutes): Let the pop tarts cool on the baking sheet for about 10 minutes before transferring to a wire rack. They’re best warm, but still delicious at room temperature.
If you notice the filling bubbling out during baking, the edges might not be sealed tight enough—don’t worry, I’ve been there! Just patch it up with a bit of extra dough next time. Also, if the crust feels tough after baking, it might be overworked dough or too thin in spots; roll gently and evenly for best results.
Cooking Tips & Techniques
Getting that flaky hand-crimped crust just right takes a few little tricks I’ve learned after some trial and error. First, keeping the butter cold is non-negotiable. The bits of butter in the dough melt during baking, creating those beautiful flaky layers. I like to pop the dough back in the fridge if it starts warming up too much while I’m working with it.
When rolling out, flour your surface lightly but don’t overdo it. Too much flour can dry the dough and make it tough. Rolling in one direction with gentle even pressure helps keep the dough uniform and prevents tears.
For the filling, stirring constantly while cooking prevents lumps and scorching. If you want a smoother jam-like filling, you can mash the strawberries slightly before cooking or blend half the mixture after it cools.
Seal those edges really well with egg wash and fork crimping to avoid messy leaks. If you’re feeling fancy, you can use a pastry wheel for decorative edges, but honestly, the fork gives a charming rustic look.
Timing is key—don’t open the oven door too often during baking, or the pop tarts might deflate. Setting a timer helps because it’s easy to get distracted, especially if you’re juggling other breakfast prep (been there!).
Variations & Adaptations
- Flavor Swaps: Try swapping the strawberry filling for blueberry, raspberry, or even a cinnamon apple mixture. Each fruit brings its own twist, and the method stays the same.
- Dietary Adaptations: Use almond flour in place of all-purpose flour to make a gluten-free crust, or swap butter for a plant-based alternative for dairy-free pop tarts. Just keep the butter cold and solid for best texture.
- Cooking Methods: Instead of baking, you can try pan-frying the pop tarts in a skillet over medium heat with a little butter for a golden crust and slightly different texture. It’s a fun twist if you don’t want to heat up the oven.
- Sweet or Savory: While strawberry is classic sweet, I’ve experimented with a savory version using tomato jam and herbs inside the same flaky crust. It’s surprisingly good!
- Personal Variation: I once added a thin layer of cream cheese under the strawberry filling for a tangy contrast, and it quickly became a weekend favorite around here.
Serving & Storage Suggestions
Serve these homemade strawberry pop tarts warm or at room temperature. They pair beautifully with a cup of coffee or a cold glass of milk. For breakfast, I like to plate them with fresh berries or a dollop of whipped cream for a little extra indulgence.
To store, place cooled pop tarts in an airtight container. They keep well at room temperature for 1–2 days. For longer storage, refrigerate them for up to 5 days or freeze for up to a month. When freezing, wrap each pop tart individually in plastic wrap and then place in a freezer bag.
Reheat frozen or refrigerated pop tarts in a toaster oven or regular oven at 350°F (175°C) for about 10 minutes to bring back that fresh-baked crispness. Avoid microwaving if possible, as it can make the crust soggy.
Flavors develop a bit over time, especially if you let the filling sit overnight. The strawberry taste deepens and melds beautifully with the crust, making leftovers a treat in their own right.
Nutritional Information & Benefits
Each homemade strawberry pop tart contains approximately 250–300 calories, depending on size and exact ingredients. They provide a good balance of carbohydrates from the flour and natural sugars in the fruit, with some fat from the butter for satisfying richness.
Strawberries are a great source of vitamin C and antioxidants, adding a touch of nourishment to this indulgent treat. By making your own filling, you can control the sugar level, keeping it moderate and avoiding preservatives found in store-bought versions.
This recipe can be adapted to fit gluten-free or dairy-free diets, making it accessible to many. While it’s a sweet treat, the homemade aspect means you can tailor it to your wellness goals without sacrificing flavor or texture.
Conclusion
Making homemade strawberry pop tarts with flaky hand-crimped crust isn’t just about breakfast—it’s about taking a little time to create something comforting, nostalgic, and delicious. This recipe is approachable enough for bakers of any skill level and flexible enough to let you make it your own.
I love these pop tarts because they remind me that the best treats come from simple ingredients and a little patience. Plus, there’s something deeply satisfying about biting into a warm, buttery crust with sweet strawberry goodness inside. I hope this recipe inspires you to try making pop tarts at home—you might just find yourself hooked like I did.
If you give this recipe a go, drop a comment below and share your favorite variations or any kitchen adventures you had while making them. Happy baking!
FAQs
Can I use store-bought pie crust instead of making my own dough?
Yes, you can use pre-made pie crust for convenience, but the homemade flaky crust will give you a better texture and fresher flavor.
How do I prevent the filling from leaking during baking?
Make sure to brush the edges of the dough with beaten egg and press them firmly together before crimping with a fork. This creates a good seal to keep the filling inside.
Can I make these pop tarts ahead of time?
Absolutely! You can prepare and bake them a day ahead. They store well at room temperature or in the fridge and can be reheated before serving.
What’s the best way to roll out the dough evenly?
Roll from the center outward with gentle, even pressure, turning the dough a quarter turn every few rolls. This prevents sticking and keeps the dough uniform.
Can I use other fruits for the filling?
Yes, you can substitute strawberries with blueberries, raspberries, apples, or any fruit you like. Just adjust the sugar and thickener to suit the fruit’s natural sweetness and juiciness.
Pin This Recipe!
Homemade Strawberry Pop Tarts
These homemade strawberry pop tarts feature a flaky hand-crimped crust and a sweet-tart strawberry filling, perfect for a nostalgic breakfast or snack.
- Prep Time: 15 minutes
- Cook Time: 20 minutes
- Total Time: 1 hour 15 minutes
- Yield: 12 pop tarts (6 servings, 2 pop tarts per serving) 1x
- Category: Breakfast
- Cuisine: American
Ingredients
- 2 ½ cups (315g) all-purpose flour
- 1 teaspoon granulated sugar
- 1 teaspoon salt
- 1 cup (226g) unsalted butter, cold and cubed
- ⅓ cup (80ml) ice water, plus extra if needed
- 1 ½ cups (about 350g) fresh or frozen strawberries, diced
- ½ cup (100g) granulated sugar
- 2 tablespoons cornstarch
- 1 tablespoon lemon juice
- ¼ teaspoon salt
- 1 large egg, beaten (for egg wash)
- Optional: coarse sugar for sprinkling on top
Instructions
- Make the Crust Dough (15 minutes): In a large bowl, whisk together the all-purpose flour, sugar, and salt. Add the cold, cubed butter and use a pastry cutter or two knives to cut the butter into the flour mixture until it resembles coarse crumbs with some pea-sized pieces. Slowly add ice water, starting with ⅓ cup, mixing gently with a fork until the dough just starts to come together. If it’s too dry, add water a teaspoon at a time. Gather the dough into a ball, divide it in half, flatten each …
- Prepare the Strawberry Filling (20 minutes): While the dough chills, combine diced strawberries, sugar, cornstarch, lemon juice, and salt in a small saucepan over medium heat. Cook, stirring frequently, until the mixture thickens and bubbles, about 8–10 minutes. Remove from heat and let cool completely.
- Roll Out the Dough (10 minutes): Preheat your oven to 375°F (190°C). On a lightly floured surface, roll out one disk of dough into a 12×9-inch rectangle about 1/8 inch thick. Repeat with the second disk.
- Assemble the Pop Tarts (10 minutes): Cut each rolled dough sheet into six equal rectangles (about 4×3 inches). Place half the rectangles on the prepared baking sheet. Spoon about 1 tablespoon of the cooled strawberry filling into the center of each. Brush the edges of these rectangles lightly with beaten egg. Top each with a second rectangle of dough, pressing the edges gently to seal. Use a fork to crimp the edges all around.
- Final Touches & Bake (20 minutes): Brush the tops of the pop tarts with the beaten egg wash for a shiny, golden finish. Optional: sprinkle a pinch of coarse sugar on each. Bake in the preheated oven for 20–25 minutes until golden brown and puffed.
- Cool & Serve (10 minutes): Let the pop tarts cool on the baking sheet for about 10 minutes before transferring to a wire rack. Serve warm or at room temperature.
Notes
Keep the butter cold for a flaky crust. Chill dough before rolling. Brush edges with egg wash and crimp well to prevent filling leaks. Avoid over-flouring the surface to keep dough tender. Reheat in toaster oven or regular oven to maintain crispness; avoid microwaving.
Nutrition
- Serving Size: 2 pop tarts
- Calories: 275
- Sugar: 14
- Sodium: 210
- Fat: 14
- Saturated Fat: 8
- Carbohydrates: 33
- Fiber: 2
- Protein: 3
Keywords: homemade pop tarts, strawberry pop tarts, flaky crust, breakfast pastry, hand-crimped crust, strawberry filling, easy breakfast, homemade pastries


