Love this? Save it for later!
Share the inspiration with your friends
I had this whole thing planned out. A pristine white cake stand, soft afternoon light, a batch of cupcakes that looked like they belonged in a fancy bakery window. Then my friend Sarah asked me to bring dessert to her Halloween party, and she added, almost as an afterthought, “Nothing too scary, though. My five-year-old nephew will be there.”
So there I was, stuck between wanting to make something genuinely spooky and needing it to be kid-friendly. Not too gory, not too weird, but still festive. I spent a week testing recipes, and let me tell you, I created some real disasters. Cupcakes that looked like they’d been through a blender. Frosting that refused to set. At one point, I had black food coloring absolutely everywhere—my hands, my counter, my dog’s nose. It was a mess.
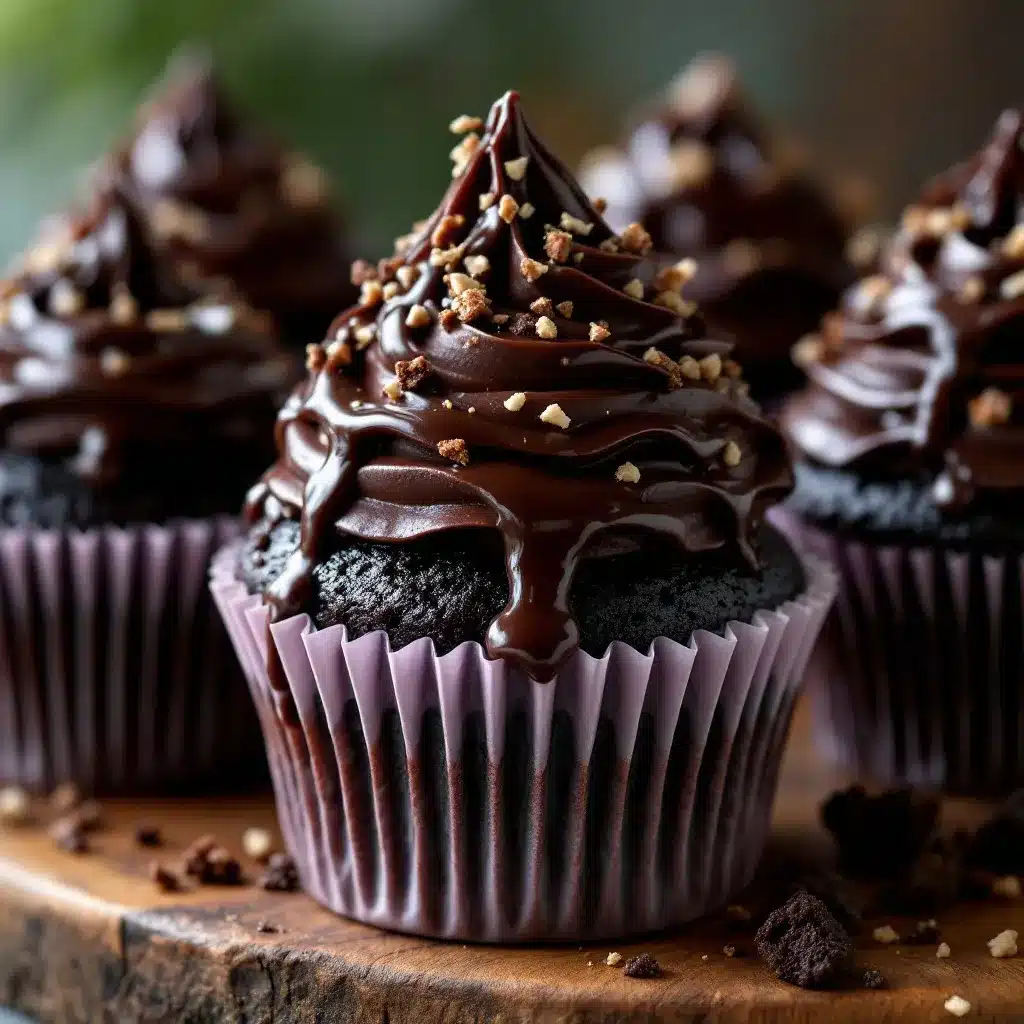
But then I stumbled onto something. A deep, dark velvet cake that wasn’t just black for show—it actually tasted like something. The color came from a combination of cocoa powder and just the right amount of black coloring, so it wasn’t bitter or artificial. And the ganache drip? Pure accident. I was trying to fix a cracked frosting top, poured warm ganache over it, and watched it cascade down the sides in these perfect little rivulets. Honestly, I almost cried. Not from frustration this time, but because it was exactly what I’d been chasing.
These black velvet Halloween cupcakes with ganache drip are now my go-to for every October gathering. They look dramatic and impressive—like something you’d pay twelve dollars for at a fancy bakery—but they’re secretly simple to pull off. The cake is moist and tender, the cream cheese frosting is tangy and smooth, and that glossy ganache just takes it over the top. Maybe you’ve been there, staring at a Pinterest board full of impossibly perfect Halloween desserts, wondering if you could actually pull one off. You can. This is the one.
Why You’ll Love This Recipe
I’ve made these black velvet Halloween cupcakes more times than I can count, and every single time, they disappear. Here’s what makes them stand out from every other Halloween dessert recipe out there:
- Stunning Visuals with Minimal Effort: The black velvet cake paired with white cream cheese frosting and a dark chocolate ganache drip creates a dramatic, professional look. But there’s no piping bags full of intricate designs or fondant work. Just a few simple techniques that look way harder than they are.
- Deep, Rich Flavor: These aren’t just “black” cupcakes that taste like nothing. The cocoa powder gives them a subtle chocolate base that pairs perfectly with the tangy cream cheese frosting. The ganache adds another layer of richness. Every bite has purpose.
- Perfect for Halloween Parties: Whether you’re hosting a costume party, bringing treats to a school event, or just want something fun for a cozy night in, these fit the bill. They’re festive without being overly gory or scary. Kids love them. Adults love them. Everyone wins.
- Simple Ingredients: Nothing weird here. Butter, sugar, flour, eggs, cocoa powder, cream cheese, heavy cream, chocolate chips. You probably have most of this in your kitchen right now. The only special addition is black food coloring, and you can find that at any grocery store or online.
- Make-Ahead Friendly: The cupcakes stay moist for days. The frosting holds up beautifully in the fridge. You can even prep everything the night before and assemble the day of. Less stress, more fun.
What really sets this recipe apart is the texture. The cake is incredibly tender—almost velvety, as the name suggests—thanks to a technique I picked up from years of trial and error. The cream cheese frosting is stabilized just enough to hold its shape but stays soft and spreadable. And that ganache drip? It sets to a perfect, fudge-like consistency that cracks slightly when you bite into it. It’s the kind of dessert that makes people close their eyes after the first bite. I’ve seen it happen.
What Ingredients You Will Need
This recipe uses simple, everyday ingredients to create something that looks and tastes bakery-quality. Most of these are pantry staples, so you likely won’t need a special trip to the store. Let me walk you through each one and share a few tips I’ve learned along the way.
For the Black Velvet Cupcakes
- All-purpose flour, 2 1/2 cups (315g): Standard all-purpose flour works perfectly here. No need for cake flour or anything fancy. Just measure it correctly—spoon it into your measuring cup and level it off with a knife. Scooping directly can pack the flour and make your cupcakes dense.
- Unsweetened cocoa powder, 1/2 cup (45g): I use Hershey’s Special Dark cocoa powder for a deeper color and richer flavor. Regular unsweetened cocoa works too, but the dark variety gives you that almost-black base that makes the food coloring work better. You’ll need less coloring overall.
- Granulated sugar, 2 cups (400g): Standard white sugar. This amount might seem high, but remember—black velvet cake needs the sugar to balance the cocoa and the tanginess of the buttermilk. Don’t reduce it unless you want a less tender crumb.
- Baking soda, 1 1/2 teaspoons: This is your leavening agent. Make sure it’s fresh—test it by dropping a bit into vinegar. If it fizzes vigorously, you’re good.
- Salt, 1 teaspoon: Just regular table salt. It balances the sweetness and enhances the chocolate flavor.
- Vegetable oil, 1 cup (240ml): This is what keeps the cupcakes incredibly moist. I use canola or any neutral oil. Don’t substitute melted butter here—oil gives a softer, more tender crumb that stays moist for days.
- Buttermilk, 1 cup (240ml), room temperature: Buttermilk reacts with the baking soda to create lift and adds a subtle tang. If you don’t have buttermilk, you can make a quick substitute: add 1 tablespoon of lemon juice or white vinegar to a cup of regular milk, let it sit for 5 minutes, and use it as is.
- Eggs, 2 large, room temperature: Room temperature eggs incorporate better into the batter and create a more even texture. Take them out of the fridge about 30 minutes before you start.
- White vinegar, 1 teaspoon: This might seem odd, but the vinegar reacts with the baking soda to create extra lift. You won’t taste it at all. I promise.
- Vanilla extract, 2 teaspoons: Pure vanilla extract adds warmth and depth. Avoid imitation vanilla if you can—it has a harsh, artificial taste that stands out in a simple recipe like this.
- Black gel food coloring, 2-3 teaspoons: This is the key to getting that deep, dramatic black color. Liquid food coloring won’t cut it—you’d need half the bottle and the batter would get watery. Gel coloring is concentrated and gives you a true black without affecting the texture. I recommend the AmeriColor brand, but any gel works. Start with 2 teaspoons and add more if needed.
For the Cream Cheese Frosting
- Cream cheese, 8 ounces (226g), softened: Full-fat cream cheese is non-negotiable here. Low-fat versions have too much water and will make your frosting runny. Let it soften at room temperature for at least 30 minutes before you start.
- Unsalted butter, 1/2 cup (113g), softened: Use unsalted butter so you control the salt level. Softened to room temperature—not melted, not cold. It should give slightly when you press it.
- Powdered sugar, 4 cups (480g): Sift it if you want a super smooth frosting, but honestly, I rarely bother. Just whisk it well. The cornstarch in powdered sugar helps stabilize the frosting.
- Vanilla extract, 2 teaspoons: Again, pure vanilla. It brightens the tangy cream cheese flavor beautifully.
- Pinch of salt: Just a tiny pinch to balance the sweetness.
For the Ganache Drip
- Semi-sweet chocolate chips, 1/2 cup (90g): I prefer Ghirardelli or Guittard for a smooth, shiny ganache. Chocolate chips are convenient, but if you have a chocolate bar, chop it up and use that instead—it melts more evenly.
- Heavy cream, 1/3 cup (80ml): Heavy cream or heavy whipping cream. This is not the place for milk or half-and-half. The fat content is crucial for the right consistency.
- Optional: black food coloring, a tiny drop: If you want a black ganache drip instead of dark brown, add a tiny drop of black gel coloring. Be careful—too much can make the ganache seize.
For Decoration (Optional but Fun)
- Halloween sprinkles, candy eyes, or edible glitter: Whatever fits your vibe. I love using orange and purple sprinkles against the black cake. Candy eyes are always a hit with kids.
Equipment Needed
You don’t need a professional bakery setup for these black velvet Halloween cupcakes. Here’s what I use and what you can substitute if you’re working with a basic kitchen:
- Standard 12-cup muffin pan: I have two, so I can bake all 24 cupcakes at once. If you only have one, just bake in batches. Let the pan cool completely between batches.
- Cupcake liners: Use good-quality paper liners. Cheap ones tend to peel away from the cake. I like the ones from Wilton or If You Care. For Halloween, grab some with orange, purple, or black patterns.
- Large mixing bowls (at least 2): One for dry ingredients, one for wet. Glass or metal works fine.
- Whisk: For mixing dry ingredients and smoothing out the batter.
- Electric hand mixer or stand mixer: You can mix the cupcake batter by hand with a whisk, but the frosting really benefits from electric mixing. A hand mixer is perfectly fine. If you’re using a stand mixer, use the paddle attachment.
- Rubber spatula: For scraping down the bowl and folding ingredients.
- Cooling rack: Essential for letting cupcakes cool completely before frosting. If you don’t have one, you can use a baking sheet lined with paper towels.
- Piping bag or zip-top bag: For piping the frosting. A zip-top bag with the corner snipped off works perfectly if you don’t have a piping bag. I use a Wilton 1M tip for the classic swirl, but you can just snip the bag and pipe a simple round dollop.
- Small microwave-safe bowl: For melting the ganache. Glass measuring cups work great.
- Spoon or offset spatula: For spreading the ganache drip. A regular butter knife works too.
Preparation Method
Let’s get into the actual process. I’ve broken this down into clear steps with all the little details I’ve learned from making these dozens of times. Take your time, and don’t rush the cooling steps—they really matter.
Step 1: Preheat and Prep
Preheat your oven to 350°F (175°C). Line your muffin pans with cupcake liners. This recipe makes about 24 cupcakes, so have two pans ready or plan to bake in batches. I like to set out all my ingredients first—it makes the process so much smoother. Make sure your buttermilk and eggs are at room temperature. If you forgot to take them out early, place the eggs in a bowl of warm water for 5 minutes and microwave the buttermilk for 10-15 seconds.
Step 2: Mix the Dry Ingredients
In a large bowl, whisk together the flour, cocoa powder, sugar, baking soda, and salt. Whisk for about 30 seconds to aerate everything and break up any lumps. Set this aside. The cocoa powder can be clumpy, so make sure it’s fully incorporated.
Step 3: Combine the Wet Ingredients
In a separate large bowl, whisk together the vegetable oil, buttermilk, eggs, vinegar, and vanilla extract. Whisk until everything is smooth and well combined. The mixture will look a bit thin—that’s normal. Now add the black gel food coloring. Start with 2 teaspoons and whisk it in. The batter will look gray at this point. Don’t panic. Add another teaspoon if you want a deeper black. Remember, the color will darken slightly as the cupcakes bake.
Step 4: Combine Wet and Dry
Pour the wet ingredients into the dry ingredients. Use a rubber spatula to fold everything together gently. Mix just until you don’t see any more streaks of flour. Overmixing will develop the gluten and make your cupcakes tough. A few small lumps are fine. The batter will be thin—almost like a pancake batter. That’s exactly what you want.
Step 5: Fill the Liners
Use a cookie scoop or a measuring cup to fill each liner about 2/3 full. I use a 2-tablespoon scoop, and it’s perfect. Don’t overfill, or the cupcakes will dome too much and make it hard to frost evenly. If you have a kitchen scale, each liner should have about 60-65 grams of batter.
Step 6: Bake
Bake at 350°F (175°C) for 18-20 minutes. Start checking at 18 minutes. The cupcakes are done when a toothpick inserted into the center comes out with just a few moist crumbs—not wet batter. The tops should spring back when lightly touched. Let them cool in the pan for 5 minutes, then transfer to a cooling rack to cool completely. This is important: do not frost warm cupcakes. The frosting will melt and slide right off. I’ve made that mistake, and it’s heartbreaking.
Step 7: Make the Cream Cheese Frosting
While the cupcakes are cooling, make the frosting. In a large bowl, beat the softened cream cheese and butter together with an electric mixer on medium speed until smooth and creamy—about 2 minutes. Scrape down the sides of the bowl. Add the vanilla extract and the pinch of salt, and beat again. Gradually add the powdered sugar, one cup at a time, beating on low speed after each addition. Once all the sugar is in, increase the speed to medium-high and beat for about 2 minutes until the frosting is light, fluffy, and spreadable. Don’t overbeat, or the frosting can become too soft. If it seems too thin, refrigerate it for 15 minutes to firm up.
Step 8: Frost the Cupcakes
Once the cupcakes are completely cool, it’s time to frost. Fit a piping bag with a large star tip (like Wilton 1M) and fill it with the cream cheese frosting. Pipe a generous swirl onto each cupcake. Start from the outside and work your way in, lifting up at the end to create a peak. If you don’t have a piping bag, just use a zip-top bag with the corner snipped off, or even a butter knife to spread the frosting in a smooth dome. Place the frosted cupcakes in the refrigerator for 15-20 minutes to let the frosting firm up. This helps the ganache drip stay on top rather than soaking in.
Step 9: Make the Ganache Drip
Place the chocolate chips in a small microwave-safe bowl. Heat the heavy cream in a separate microwave-safe bowl or measuring cup until it’s just simmering—about 45-60 seconds in the microwave. Pour the hot cream over the chocolate chips. Let it sit for 2 minutes without stirring. Then gently whisk until smooth and glossy. If you want a black ganache, add a tiny drop of black gel food coloring and stir. Let the ganache cool for 5-10 minutes. It should be warm but not hot—about the consistency of warm honey. If it’s too thick, add a teaspoon more cream. If it’s too thin, let it cool a bit longer.
Step 10: Add the Ganache Drip
Take the chilled, frosted cupcakes out of the fridge. Use a small spoon to drizzle the ganache over the center of each cupcake. Let it flow naturally over the edges. You can guide it with the back of the spoon if you want specific drip patterns. Work quickly—the ganache will start to set as it cools. Once all the cupcakes have their drip, add any decorations like Halloween sprinkles or candy eyes while the ganache is still wet so they stick. Let the ganache set completely at room temperature, about 15 minutes.
Cooking Tips & Techniques
Over the years, I’ve learned a few things the hard way. Here are the tips that make these black velvet Halloween cupcakes turn out perfectly every time.
Getting the Right Black Color: This is the most common question I get. Use gel food coloring, not liquid. Liquid coloring will make your batter watery and you’ll need way too much. Start with 2 teaspoons of black gel, mix it in, and see how it looks. Remember that the color deepens as the cupcakes bake. If you want an even darker color, add up to 1 more teaspoon. I’ve found that using dark cocoa powder helps too—it gives you a head start on the color so you need less artificial coloring.
Room Temperature Ingredients Matter: I know it’s tempting to use cold eggs and cold buttermilk straight from the fridge, but room temperature ingredients emulsify better and create a more tender crumb. Take everything out 30 minutes before you start. If you forget, place the eggs in warm water for 5 minutes and microwave the buttermilk for 10 seconds.
Don’t Overmix the Batter: Mix until the flour is just incorporated. A few lumps are fine. Overmixing develops gluten and makes the cupcakes dense and tough. You want them light and velvety.
The Toothpick Test is Your Friend: Oven temperatures vary. Start checking at 18 minutes. If the toothpick comes out clean, they’re done. If it has wet batter, give them another 2 minutes. Overbaked cupcakes are dry, so err on the side of slightly underdone. They’ll continue to cook a bit in the hot pan.
Chill Before Ganache: This is a non-negotiable step. If you pour warm ganache over room temperature cream cheese frosting, the ganache will melt the frosting and create a mess. Pop the frosted cupcakes in the fridge for at least 15 minutes. The cold frosting will set the ganache almost immediately, giving you those perfect drips.
Ganache Consistency: The perfect ganache for dripping should be thick but pourable. If it’s too thin, it will run all the way down the cupcake and pool at the bottom. If it’s too thick, it won’t drip at all. Let it cool for 5-10 minutes after mixing, then test it on a spoon. It should slowly drip off. If it doesn’t, let it cool a bit more. If it’s already too thick, reheat it in the microwave for 5 seconds.
Variations & Adaptations
One of the best things about this recipe is how adaptable it is. Here are some ways I’ve changed it up over the years:
Dietary Variations:
- Gluten-Free: Substitute the all-purpose flour with a good 1:1 gluten-free baking flour. I’ve used Bob’s Red Mill and King Arthur with great results. Add 1/4 teaspoon of xanthan gum if your blend doesn’t already include it. The texture will be slightly more delicate, but still delicious.
- Dairy-Free: Use a plant-based buttermilk (add lemon juice to almond or oat milk) and dairy-free cream cheese. Miyoko’s is my favorite for frosting. Use coconut cream instead of heavy cream for the ganache.
- Egg-Free: You can substitute each egg with a flax egg (1 tablespoon ground flaxseed + 3 tablespoons water, let it sit for 5 minutes). The cupcakes will be slightly denser but still tasty.
Flavor Twists:
- Peppermint Chocolate: Add 1/2 teaspoon of peppermint extract to the ganache. The minty-chocolate combo is amazing for a winter holiday version.
- Orange Chocolate: Add 1 tablespoon of orange zest to the cupcake batter and a drop of orange oil to the ganache. It gives a subtle, sophisticated flavor.
- Spiced Pumpkin: Replace the buttermilk with pumpkin puree and add 1 teaspoon of pumpkin pie spice to the dry ingredients. This creates a fall-themed version that’s perfect for Thanksgiving.
Different Occasions:
- Valentine’s Day: Use red food coloring instead of black for a red velvet version. Top with heart-shaped sprinkles.
- Birthday Parties: Skip the Halloween decorations and use colorful sprinkles. The black cake with rainbow sprinkles is surprisingly fun.
- Christmas: Add a drop of green food coloring to the cream cheese frosting and top with crushed candy canes.
Different Frosting Options:
- If cream cheese frosting isn’t your thing, a classic American buttercream works beautifully. Just beat 1 cup of butter with 4 cups of powdered sugar, 2 teaspoons of vanilla, and a pinch of salt.
- For a lighter option, try a whipped cream frosting stabilized with a bit of gelatin or instant pudding mix.
Serving & Storage Suggestions
These black velvet Halloween cupcakes are best served at room temperature. The cake is most tender, the frosting is perfectly creamy, and the ganache has that fudge-like bite. If you’ve refrigerated them, let them sit out for about 20 minutes before serving.
Presentation Ideas:
- Arrange them on a black or dark purple cake stand for maximum Halloween drama.
- Add some fake spiderwebs or plastic spiders around the base for a spooky touch.
- Sprinkle a few orange and purple sprinkles on top just before serving.
- For a party, place them on a platter with some candy corn and mini pumpkins.
What to Serve With Them:
- A glass of cold milk is the classic pairing. The richness of the cupcake balances perfectly with the milk.
- For an adult gathering, a dark stout beer or a bourbon cocktail complements the chocolate notes beautifully.
- A hot cup of coffee or espresso is also fantastic—the bitterness cuts through the sweetness.
Storage Instructions:
- Store unfrosted cupcakes in an airtight container at room temperature for up to 3 days.
- Frosted cupcakes should be stored in the refrigerator in an airtight container for up to 5 days. The cream cheese frosting needs to stay chilled.
- You can freeze unfrosted cupcakes for up to 3 months. Wrap each one individually in plastic wrap, then place them in a freezer bag. Thaw at room temperature before frosting.
- I don’t recommend freezing frosted cupcakes—the texture of the cream cheese frosting changes when thawed.
Reheating Tips:
- If you prefer your cupcakes warm, microwave an unfrosted cupcake for 10-15 seconds. Add the frosting after warming.
- For frosted cupcakes, just let them come to room temperature. Don’t microwave them—the frosting will melt.
Flavor Development: Honestly, these cupcakes taste even better the next day. The flavors meld together, the cake becomes even more moist, and the frosting sets perfectly. If you can, make them a day ahead. Your future self will thank you.
Nutritional Information & Benefits
Let’s be real—these are indulgent cupcakes. They’re a treat, not a health food. But here’s what you need to know if you’re keeping track:
Estimated Nutritional Values (per cupcake, with frosting and ganache):
- Calories: 380-420
- Fat: 22g
- Saturated Fat: 10g
- Carbohydrates: 48g
- Sugar: 35g
- Protein: 4g
- Sodium: 220mg
Health Highlights:
- The cocoa powder contains antioxidants called flavonoids, which can support heart health. So there’s that.
- Cream cheese provides a small amount of calcium and protein.
- Using vegetable oil instead of butter in the cake reduces the saturated fat content slightly.
Dietary Considerations:
- Contains gluten, dairy, and eggs. See the variations section for adaptations.
- Can be made gluten-free and dairy-free with substitutions.
- Not suitable for low-carb or keto diets due to the sugar content.
- If you’re watching your sugar intake, you can reduce the sugar in the frosting by 1/2 cup, but the texture will be slightly less stable.
My Take: I believe in balance. These cupcakes are for celebrations, for moments when you want something special. They’re not an everyday snack, and that’s okay. Enjoy them fully when you make them, savor every bite, and don’t stress about the numbers. Food is about joy, connection, and creating memories. These cupcakes deliver on all three.
Conclusion
These black velvet Halloween cupcakes with ganache drip are everything I want in a holiday dessert. They’re dramatic and impressive, but they don’t require hours of complicated work. The cake is impossibly moist and tender, the cream cheese frosting is tangy and smooth, and that glossy ganache drip just makes the whole thing feel special.
What I love most about this recipe is how it brings people together. I’ve made them for Halloween parties, for birthday dinners, for no reason at all except that I wanted something beautiful to eat. Every time, someone asks for the recipe. Every time, someone takes a bite and their eyes go wide. That’s the magic of a really good dessert—it doesn’t just taste good, it makes people feel something.
So here’s my challenge to you: make these your own. Add your favorite sprinkles. Experiment with different food coloring for different holidays. Try the peppermint version for Christmas or the orange version for fall. The base recipe is solid, but the possibilities are endless.
I’d love to hear how yours turn out. Drop a comment below and tell me about your Halloween plans, or tag me in your photos if you share them on social media. Did you try a variation? Did your kids help decorate? Did you eat three in one sitting? (No judgment here—I’ve been there.) Let’s make this Halloween the most delicious one yet.
Happy baking, and don’t forget to save one for yourself before they disappear!
Frequently Asked Questions
Can I make these cupcakes without a mixer?
Absolutely. You can whisk the cupcake batter by hand—it’s actually better to mix it gently anyway. For the frosting, you’ll want a hand mixer or a strong arm. Cream cheese frosting needs to be beaten to get that light, fluffy texture. You can do it with a whisk, but it will take some effort and patience.
How far in advance can I make these?
You have options. Bake the cupcakes up to 3 days ahead and store them unfrosted at room temperature. Make the frosting up to 2 days ahead and keep it in the fridge—just let it soften at room temperature before piping. The ganache is best made fresh on the day you’re serving. If you want to assemble everything the day before, go for it. The flavors actually meld together beautifully overnight.
Why did my ganache turn out too thick or too thin?
Ganache consistency depends on the ratio of chocolate to cream and the temperature. If it’s too thick, add a teaspoon of warm cream and stir. If it’s too thin, let it cool for a few more minutes or add a few more chocolate chips. The ideal temperature for dripping is when the ganache is warm but not hot—about 90°F. It should flow slowly off a spoon.
Can I use a different type of food coloring?
I recommend gel food coloring for the best results. Liquid food coloring will work, but you’ll need a lot more, and it can make the batter too thin. Natural food coloring options like activated charcoal or black cocoa powder can give a dark gray or charcoal color, but they won’t give you a true black. If you’re avoiding artificial colors, try using dark cocoa powder and accept that the color will be more of a very dark brown.
How do I get even, consistent drips on every cupcake?
Practice makes perfect, but here’s a trick: chill the frosted cupcakes well, then use a small spoon to drizzle the ganache over the center. Let it flow naturally. If you want more control, use a squeeze bottle—you can direct the flow precisely. Work in a cool room; warm kitchens can cause the ganache to run too much. And don’t worry if they’re not all identical. The slight variations make them look homemade and charming.
Pin This Recipe!
Best Black Velvet Cupcakes with Easy Ganache Drip
Deep, dark velvet cupcakes with a tender crumb, tangy cream cheese frosting, and a glossy chocolate ganache drip. Perfect for Halloween parties and surprisingly simple to make.
- Prep Time: 30 minutes
- Cook Time: 20 minutes
- Total Time: 1 hour 50 minutes (includes cooling and setting time)
- Yield: 24 cupcakes
- Category: Dessert
- Cuisine: American
Ingredients
- All-purpose flour, 2 1/2 cups (315g)
- Unsweetened cocoa powder, 1/2 cup (45g)
- Granulated sugar, 2 cups (400g)
- Baking soda, 1 1/2 teaspoons
- Salt, 1 teaspoon
- Vegetable oil, 1 cup (240ml)
- Buttermilk, 1 cup (240ml), room temperature
- Eggs, 2 large, room temperature
- White vinegar, 1 teaspoon
- Vanilla extract, 2 teaspoons
- Black gel food coloring, 2-3 teaspoons
- Cream cheese, 8 ounces (226g), softened
- Unsalted butter, 1/2 cup (113g), softened
- Powdered sugar, 4 cups (480g)
- Vanilla extract, 2 teaspoons (for frosting)
- Pinch of salt (for frosting)
- Semi-sweet chocolate chips, 1/2 cup (90g)
- Heavy cream, 1/3 cup (80ml)
- Optional: black food coloring (for ganache)
- Halloween sprinkles, candy eyes, or edible glitter (optional)
Instructions
- Preheat oven to 350°F (175°C). Line muffin pans with cupcake liners. Ensure buttermilk and eggs are at room temperature.
- In a large bowl, whisk together flour, cocoa powder, sugar, baking soda, and salt for about 30 seconds.
- In a separate large bowl, whisk together vegetable oil, buttermilk, eggs, vinegar, and vanilla extract until smooth. Add black gel food coloring (start with 2 teaspoons) and whisk until combined.
- Pour wet ingredients into dry ingredients. Fold gently with a rubber spatula until just combined (a few lumps are fine). Batter will be thin.
- Fill each liner about 2/3 full (about 60-65g batter per liner).
- Bake for 18-20 minutes, until a toothpick inserted in the center comes out with a few moist crumbs. Cool in pan for 5 minutes, then transfer to a cooling rack to cool completely.
- For frosting: Beat softened cream cheese and butter together on medium speed until smooth and creamy (about 2 minutes). Add vanilla and salt. Gradually add powdered sugar, one cup at a time, beating on low. Increase speed to medium-high and beat for 2 minutes until light and fluffy. Refrigerate if too soft.
- Once cupcakes are completely cool, pipe or spread cream cheese frosting onto each cupcake. Refrigerate frosted cupcakes for 15-20 minutes.
- For ganache: Place chocolate chips in a small microwave-safe bowl. Heat heavy cream until just simmering (45-60 seconds in microwave). Pour hot cream over chocolate chips. Let sit for 2 minutes, then whisk until smooth. Add a tiny drop of black food coloring if desired. Let cool 5-10 minutes until warm honey consistency.
- Remove chilled cupcakes from fridge. Drizzle ganache over the center of each cupcake, letting it flow naturally over the edges. Add decorations while ganache is wet. Let set at room temperature for about 15 minutes.
Notes
Use gel food coloring for best black color. Room temperature ingredients are crucial for tender crumb. Chill frosted cupcakes before adding ganache to prevent melting. Ganache should be warm honey consistency for perfect drips. Cupcakes taste even better the next day.
Nutrition
- Serving Size: 1 cupcake
- Calories: 400
- Sugar: 35
- Sodium: 220
- Fat: 22
- Saturated Fat: 10
- Carbohydrates: 48
- Fiber: 2
- Protein: 4
Keywords: black velvet cupcakes, Halloween cupcakes, ganache drip, cream cheese frosting, chocolate ganache, Halloween dessert, black cupcakes


