Love this? Save it for later!
Share the inspiration with your friends
Frantically digging through the fridge ten minutes before everyone was supposed to arrive when I realized I had completely forgotten to make an appetizer. A block of cream cheese stared back at me, half a bag of shredded cheddar sat next to it, and I spotted a lone bag of pretzel sticks hiding behind the pickles. Desperation kicked in. I grabbed everything, mashed the cream cheese and cheddar together with my hands (no time for a mixer), rolled it into a vaguely oval shape, and started sticking pretzel sticks into it like some kind of deranged craft project.
My husband walked in, looked at the lumpy cheese blob with pretzels sticking out at awkward angles, and said, “Is that a football?” Honestly, it looked more like a sad potato at that point. But I shaped it a little more, added some pretzel laces across the top, and threw it on a plate with crackers. Within fifteen minutes, that ugly little cheese ball was completely gone. People were actually fighting over the last cracker, scraping up every bit of cheese from the plate.
That chaotic moment birthed this easy mini football-shaped cheese ball with pretzel laces recipe. It is now my go-to for every game day gathering, tailgate party, and Super Bowl watch party. No fancy techniques, no complicated ingredients—just creamy, savory cheese shaped into everyone’s favorite sporty shape with crunchy pretzel details. It is the kind of appetizer that disappears before you even sit down.
Why You’ll Love This Recipe
Let me tell you why this little football cheese ball has become my most-requested party appetizer. I have tested this recipe at least a dozen times, tweaking the ratios, trying different cheese blends, and perfecting the shaping technique so you do not have to.
- Quick & Easy: Comes together in under 15 minutes with zero cooking required. Perfect for those “oh no, I forgot to make something” moments we all have.
- Simple Ingredients: You probably already have cream cheese, cheddar, and pretzels in your kitchen right now. No specialty grocery runs needed.
- Perfect for Game Day: This football-shaped appetizer is literally designed for Super Bowl parties, tailgates, and any football-themed gathering. It is basically mandatory viewing snack food.
- Crowd-Pleaser: Kids love the fun shape, adults love the creamy, savory flavor. It gets rave reviews every single time.
- Unbelievably Delicious: The combination of tangy cream cheese, sharp cheddar, and salty pretzels is next-level comfort food. You will catch yourself sneaking bites while nobody is looking.
What makes this recipe different from all the other cheese ball recipes out there? It is the perfect size for a small gathering—not a massive, overwhelming cheese ball that sits half-eaten. The pretzel laces add both visual appeal and that irresistible salty crunch. Plus, the shaping technique I developed after multiple failures (trust me, my first attempts were hilariously misshapen) ensures you get a recognizable football every time.
This recipe is not just good—it is the kind of appetizer that makes people close their eyes after the first bite. It is comfort food reimagined for game day: faster, simpler, but with the same soul-soothing satisfaction. Perfect for impressing guests without stress, or turning a simple snack into something memorable.
What Ingredients You Will Need
This recipe uses simple, everyday ingredients to deliver bold, savory flavor and that perfect creamy-crunchy texture. Most of these are pantry and fridge staples you probably already have on hand.
- Cream cheese: 8 ounces, softened to room temperature. This is the base of your cheese ball, providing that smooth, spreadable texture. I recommend Philadelphia brand for consistent results—it really does make a difference. Let it sit out for at least 30 minutes before mixing.
- Sharp cheddar cheese: 1 cup, finely shredded. Use freshly shredded cheese from a block if possible—the pre-shredded bags have anti-caking agents that can affect texture. Sharp cheddar gives the best flavor punch.
- Garlic powder: ½ teaspoon. Adds savory depth without overwhelming the cheese. Do not use fresh garlic here—it can make the cheese ball watery over time.
- Onion powder: ½ teaspoon. Complements the garlic and rounds out the flavor profile.
- Worcestershire sauce: 1 teaspoon. This is the secret ingredient that adds umami and complexity. Trust me on this one.
- Salt: ¼ teaspoon, or to taste. Go easy here since the pretzels and cheese both have salt.
- Black pepper: ⅛ teaspoon, freshly ground.
- Pretzel sticks: About 12-15 sticks. These form the laces on top of your football. I like the thick, crunchy pretzel sticks for sturdiness—Snyder’s of Hanover works great.
- Optional coating: ¼ cup finely chopped pecans or walnuts, or 2 tablespoons everything bagel seasoning. This adds texture and visual appeal to the outside of the cheese ball. Totally optional but highly recommended.
- For serving: Assorted crackers, pretzel chips, celery sticks, and carrot sticks.
Ingredient Selection Tips: Look for block cream cheese, not the spreadable tub variety—the block version has a firmer texture that holds its shape better. For the cheddar, I prefer a good sharp or extra-sharp variety for maximum flavor impact. If you want a milder cheese ball, use mild cheddar or even Monterey Jack.
Substitution Guidance: Use dairy-free cream cheese and vegan cheddar shreds for a dairy-free version. For a lower-fat option, use Neufchâtel cheese instead of cream cheese. If you do not have Worcestershire sauce, a splash of soy sauce or tamari works in a pinch. Gluten-free pretzel sticks are available and work perfectly for those avoiding gluten.
Equipment Needed
You do not need fancy kitchen gadgets for this recipe—that is part of its charm. Here is what you will need:
- Mixing bowl: A medium-sized bowl for combining the ingredients. Any bowl will work.
- Hand mixer or stand mixer: Makes combining the cream cheese and seasonings much easier, but a sturdy spatula and some elbow grease work too. I have made this with both methods, and honestly, the hand-mixed version has a slightly more rustic texture that I kind of prefer.
- Rubber spatula: For scraping every last bit of cheesy goodness from the bowl.
- Plastic wrap: Essential for shaping and chilling the cheese ball. Do not skip this—it keeps your hands clean and helps form a smooth shape.
- Cutting board or flat surface: For shaping the cheese ball into a football shape.
- Sharp knife or kitchen shears: For cutting the pretzel sticks to the right length for the laces.
- Serving platter or board: Something cute to display your football cheese ball on. I love using a small wooden board or a slate cheese board.
Budget-Friendly Options: If you do not have a hand mixer, a fork works perfectly fine for mashing and combining the cream cheese and seasonings. No plastic wrap? Use a clean kitchen towel or even a zip-top bag cut open. Get creative—this recipe is forgiving.
Preparation Method
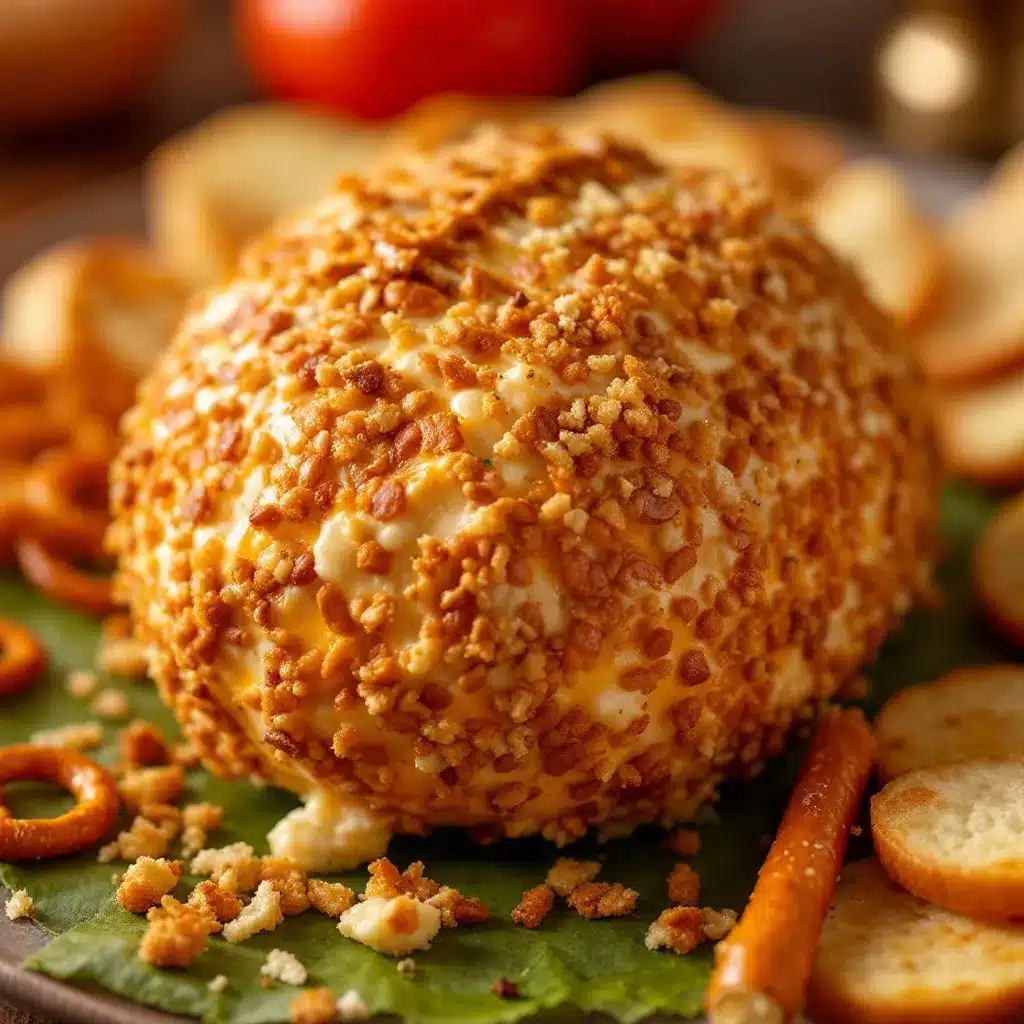
Let me walk you through exactly how to make this adorable football cheese ball. I have included all my hard-learned tips so you avoid the mistakes I made the first few times.
- Soften the cream cheese: Take your 8-ounce block of cream cheese out of the refrigerator at least 30 minutes before starting. It should be soft to the touch but not melty. In a hurry? Microwave it for 10-15 seconds on low power—but watch it carefully because cream cheese can go from soft to melted really fast.
- Combine the base ingredients: In your mixing bowl, add the softened cream cheese, ½ teaspoon garlic powder, ½ teaspoon onion powder, 1 teaspoon Worcestershire sauce, ¼ teaspoon salt, and ⅛ teaspoon black pepper. Beat with a hand mixer on medium speed until smooth and creamy, about 1-2 minutes. Scrape down the sides of the bowl with your spatula.
- Add the cheddar: Add 1 cup of finely shredded sharp cheddar cheese to the cream cheese mixture. Mix on low speed just until combined. Do not overmix—you want some small bits of cheddar visible for texture. If you are mixing by hand, fold the cheese in with a spatula until evenly distributed.
- Taste and adjust: Here is the step I never skip. Take a tiny taste of the mixture (on a clean spoon, not your finger—food safety matters). Does it need more salt? More garlic? Adjust now before you shape it. I usually add an extra pinch of garlic powder because I am obsessed with garlic.
- Chill the mixture: Cover the bowl with plastic wrap and refrigerate for at least 30 minutes. This step is non-negotiable. A chilled mixture holds its shape much better when you form the football. I have tried skipping this step, and my cheese ball turned into a sad, flat blob. Learn from my mistakes.
- Prepare your work surface: Lay out a large piece of plastic wrap on your cutting board. If you are using an optional coating (chopped nuts or everything bagel seasoning), spread it on a plate now so it is ready to go.
- Shape the football: Scoop the chilled cheese mixture onto the center of the plastic wrap. Use your hands to form it into a rough oval shape—kind of like a potato. Then, shape one end slightly narrower than the other to create that classic football silhouette. The plastic wrap helps you shape without getting cheese all over your hands. Aim for about 5-6 inches long and 3-4 inches wide at the center.
- Wrap and chill again: Wrap the plastic wrap tightly around the shaped cheese ball, twisting the ends to secure. Refrigerate for at least 1 hour, or up to 24 hours. This second chill is crucial for the football shape to set firmly.
- Add the coating (optional): If you are using a coating, unwrap the chilled cheese ball and gently roll it in the chopped nuts or everything bagel seasoning. Press lightly so the coating sticks. Use your hands to gently reshape if needed.
- Create the pretzel laces: Take your pretzel sticks and cut them into shorter pieces. You will need about 6-8 pieces for the laces. Cut them to about 1-1.5 inches long—they should span the width of the cheese ball. Also cut one longer piece (about 2 inches) for the center lace.
- Assemble the laces: Place the cheese ball on your serving platter. Gently press the pretzel pieces into the top of the cheese ball in a ladder pattern—two parallel lines with short cross pieces. Start with the center long piece, then add the shorter cross pieces evenly spaced. Press gently so they stay in place without breaking.
- Final chill: Pop the assembled cheese ball back in the fridge for 15-20 minutes before serving. This helps everything set and makes the pretzels less likely to fall out when people start digging in.
Sensory Cues: The mixture should feel smooth and creamy when fully combined, with small flecks of cheddar visible. When shaped, the cheese ball should feel firm but slightly pliable—like cold butter. The pretzels should press in easily without cracking the cheese surface.
Cooking Tips & Techniques
After making this recipe more times than I care to count (and failing spectacularly a few times), here are my best tips for cheese ball success.
Temperature is everything. If your cream cheese is too cold, you will end up with lumpy, difficult-to-mix cheese ball base. Too warm, and it will be too soft to shape properly. Room temperature cream cheese (about 68-70°F) is the sweet spot. I learned this the hard way when I tried to rush the process and ended up with a sticky, unshapeable mess that looked nothing like a football.
Do not skip the chilling steps. I know, I know—you want to serve this immediately. But trust me, the two chilling stages are what separate a perfect football cheese ball from a sad, misshapen blob. The first chill firms up the mixture for easier shaping. The second chill sets the shape so your pretzel laces stay put.
Use a light touch with the pretzels. Pretzel sticks are sturdy but they can still snap if you push too hard. Gently press them into the cheese ball at a slight angle, wiggling just a tiny bit as you go. If a pretzel breaks, no worries—just use the broken piece or grab another stick.
Shape with confidence. Do not be precious about the football shape. A slightly imperfect football is actually more charming and looks homemade in the best way. My first few attempts looked more like eggs or potatoes, but nobody cared once they tasted it. The pretzel laces do a lot of the heavy lifting in terms of making it recognizable.
Make ahead for best results. This cheese ball actually tastes better if you make it a day ahead. The flavors meld together overnight, creating a more complex, savory taste. Just add the pretzel laces right before serving so they stay crunchy.
Multitasking strategy: While the cheese ball is chilling, you can prepare your serving platter, arrange crackers, and make any other appetizers. I often make this alongside a batch of easy 10-minute buffalo chicken football dip for the ultimate game day spread.
Variations & Adaptations
One of the best things about this recipe is how easy it is to customize. Here are some of my favorite variations.
Spicy Football Cheese Ball: Add 1-2 tablespoons of finely chopped pickled jalapeños (drained well) and ¼ teaspoon of cayenne pepper to the cream cheese mixture. The heat pairs beautifully with the cool, creamy cheese. For extra heat, use pepper jack cheese instead of cheddar. I make this version for my spice-loving friends, and it disappears even faster than the original.
Herb & Garlic Football: Add 2 tablespoons of fresh chopped chives, 1 tablespoon of fresh parsley, and 1 teaspoon of fresh dill to the mixture. This version feels lighter and fresher—perfect for spring game days or brunch gatherings. I served this at a baby shower (the football shape was a hit with the dad-to-be), and everyone asked for the recipe.
Bacon Ranch Football: Add ¼ cup of cooked, crumbled bacon and 1 tablespoon of ranch seasoning mix to the cream cheese. This is the ultimate crowd-pleaser. The smoky bacon and tangy ranch are a match made in appetizer heaven. I recommend using thick-cut bacon for maximum crunch.
Dairy-Free Adaptation: Use dairy-free cream cheese (I like Kite Hill or Miyoko’s) and vegan cheddar shreds. The texture will be slightly softer, so chill it a bit longer between steps. The taste is still fantastic, and nobody will miss the dairy.
Different Coatings: Instead of nuts or everything bagel seasoning, try crushed pretzels, crushed potato chips, or even crushed pork rinds for a keto-friendly option. The coating adds texture and visual interest, so do not skip it entirely.
Mini Football Bites: Instead of one large football, shape the mixture into 8-10 smaller footballs (about 1.5 inches each). Use small pretzel stick pieces for the laces. These are perfect for parties where guests might want to grab and go without cutting into a larger cheese ball.
Serving & Storage Suggestions
This football cheese ball is best served slightly chilled—straight from the fridge is perfect. Let it sit at room temperature for about 10 minutes before serving to soften slightly for easier spreading.
Complementary Dishes: This cheese ball pairs beautifully with a variety of dippers and accompaniments. I love serving it with buttery crackers, pretzel chips, celery sticks, carrot sticks, and apple slices. The sweet-tart apples are a surprisingly perfect contrast to the savory cheese. For a full game day spread, serve it alongside creamy cheeseburger potato soup and football sugar cookies with royal icing for dessert.
Beverage Pairings: This cheese ball loves a cold beer—an IPA or a light lager works beautifully. For wine drinkers, a crisp Sauvignon Blanc or unoaked Chardonnay cuts through the richness. Non-alcoholic options include sparkling water with lemon or a crisp apple cider.
Storage Instructions: Leftover cheese ball (if you have any—it rarely lasts) can be wrapped tightly in plastic wrap and stored in the refrigerator for up to 5 days. The pretzel laces will soften over time, so if you are storing leftovers, remove the pretzels first and add fresh ones when you serve it again.
Freezing Instructions: You can freeze the unbaked cheese ball (without the pretzel laces) for up to 1 month. Wrap it tightly in plastic wrap, then foil, and place in a freezer bag. Thaw overnight in the refrigerator, then add fresh pretzel laces before serving. The texture will be slightly softer after freezing, but the flavor remains excellent.
Make-Ahead Note: This cheese ball actually improves with time. The flavors meld and deepen overnight, making it even more delicious the next day. I always make mine the day before a party—it saves stress and tastes better.
Nutritional Information & Benefits
Here is the approximate nutritional breakdown for one serving (based on 8 servings per cheese ball, without crackers):
| Nutrient | Amount Per Serving |
|---|---|
| Calories | 185 |
| Total Fat | 16g |
| Saturated Fat | 9g |
| Cholesterol | 45mg |
| Sodium | 320mg |
| Total Carbohydrates | 4g |
| Dietary Fiber | 0g |
| Sugars | 1g |
| Protein | 7g |
| Calcium | 150mg |
Health Benefits: Cream cheese and cheddar provide a good amount of calcium, which is essential for strong bones and teeth. The protein content makes this a satisfying snack that keeps you full longer. If you use the nut coating, you will add healthy fats and a touch of fiber. For a lighter option, serve with vegetable sticks instead of crackers to increase your veggie intake.
Dietary Considerations: This recipe is naturally low-carb and keto-friendly (about 3g net carbs per serving without crackers). It is also vegetarian. For gluten-free, use gluten-free pretzel sticks. For dairy-free, use the substitutions mentioned above. Always check your ingredient labels if you have specific dietary needs or allergies.
My Wellness Perspective: I believe in balance—this cheese ball is a treat, and treats are part of a happy, healthy life. I serve it alongside plenty of veggies so everyone can choose their dipper. Moderation and enjoyment go hand in hand.
Conclusion
This easy mini football-shaped cheese ball with pretzel laces is the game day appetizer you did not know you needed. It is fun, festive, and ridiculously easy to make. The creamy, savory cheese paired with crunchy, salty pretzels is a combination that never fails to impress. Plus, it is shaped like a football—how perfect is that for Super Bowl parties and tailgates?
I encourage you to make this your own. Experiment with different cheese blends, try the spicy version, or make a batch of mini football bites for your next gathering. The beauty of this recipe is its flexibility—it works with whatever you have on hand and whatever flavors you love.
Honestly, this cheese ball has become my signature party dish. Every time I bring it somewhere, someone asks for the recipe. It is that good. And the best part? It takes less than 15 minutes of active prep time. You can spend more time enjoying the game and less time stressing in the kitchen.
I would love to hear how your football cheese ball turns out! Drop a comment below and let me know what variations you tried, or tag me in your photos on social media. Did you add bacon? Go spicy? Make mini versions? Tell me all about it. And if you are looking for more game day inspiration, do not miss my cozy slow cooker pumpkin chili—it is the perfect companion to this cheese ball for your ultimate tailgate menu.
Now go make that cheese ball. Your game day guests will thank you.
Frequently Asked Questions
Can I make this cheese ball ahead of time?
Absolutely! This is actually one of the best make-ahead appetizers. Prepare the cheese ball (without the pretzel laces) up to 24 hours in advance. Wrap it tightly in plastic wrap and refrigerate. Add the pretzel laces just before serving to keep them crunchy.
Can I use low-fat cream cheese?
Yes, but the texture will be slightly softer and the flavor less rich. Neufchâtel cheese (often labeled as ⅓ less fat cream cheese) works better than fat-free cream cheese, which can be too soft to shape properly. If using low-fat, expect to chill the mixture a bit longer between steps.
How do I keep the pretzel laces from getting soggy?
Add the pretzel laces right before serving—not during the chilling process. The moisture from the cheese will soften the pretzels over time, so fresh pretzels just before serving ensures maximum crunch. If you have leftovers, remove the pretzels before storing and add fresh ones when you serve again.
Can I use a different shape besides a football?
Of course! This cheese ball base is incredibly versatile. Shape it into a pumpkin for fall gatherings (use a pretzel stick as the stem), a heart for Valentine’s Day, or a simple round ball for everyday snacking. The possibilities are endless—get creative with your shapes and decorations.
What if my cheese ball mixture is too soft to shape?
Do not panic—this happens to everyone. Simply pop the mixture back in the refrigerator for another 20-30 minutes until it firms up. If it is still too soft after chilling, you may have over-softened the cream cheese. Add a tablespoon of finely shredded cheddar and mix it in to help absorb some moisture, then chill again.
Pin This Recipe!

Easy Mini Football Cheese Ball Recipe with Pretzel Laces

A fun, festive, and ridiculously easy football-shaped cheese ball with crunchy pretzel laces, perfect for game day gatherings, tailgate parties, and Super Bowl watch parties.
- Prep Time: 15 minutes
- Cook Time: 0 minutes
- Total Time: 1 hour 45 minutes (includes chilling)
- Yield: 8 servings 1x
- Category: Appetizer
- Cuisine: American
Ingredients
- 8 ounces cream cheese, softened to room temperature
- 1 cup finely shredded sharp cheddar cheese
- ½ teaspoon garlic powder
- ½ teaspoon onion powder
- 1 teaspoon Worcestershire sauce
- ¼ teaspoon salt
- ⅛ teaspoon black pepper, freshly ground
- 12–15 pretzel sticks
- ¼ cup finely chopped pecans or walnuts (optional coating)
- 2 tablespoons everything bagel seasoning (optional coating)
- Assorted crackers, pretzel chips, celery sticks, and carrot sticks (for serving)
Instructions
- Soften the cream cheese: Take the 8-ounce block of cream cheese out of the refrigerator at least 30 minutes before starting. It should be soft to the touch but not melty. In a hurry, microwave it for 10-15 seconds on low power.
- Combine the base ingredients: In a mixing bowl, add the softened cream cheese, ½ teaspoon garlic powder, ½ teaspoon onion powder, 1 teaspoon Worcestershire sauce, ¼ teaspoon salt, and ⅛ teaspoon black pepper. Beat with a hand mixer on medium speed until smooth and creamy, about 1-2 minutes. Scrape down the sides of the bowl with a spatula.
- Add the cheddar: Add 1 cup of finely shredded sharp cheddar cheese to the cream cheese mixture. Mix on low speed just until combined. Do not overmix—you want some small bits of cheddar visible for texture. If mixing by hand, fold the cheese in with a spatula until evenly distributed.
- Taste and adjust: Take a tiny taste of the mixture (on a clean spoon). Adjust seasoning if needed.
- Chill the mixture: Cover the bowl with plastic wrap and refrigerate for at least 30 minutes.
- Prepare your work surface: Lay out a large piece of plastic wrap on a cutting board. If using an optional coating, spread it on a plate now.
- Shape the football: Scoop the chilled cheese mixture onto the center of the plastic wrap. Use your hands to form it into a rough oval shape, then shape one end slightly narrower than the other to create a classic football silhouette. Aim for about 5-6 inches long and 3-4 inches wide at the center.
- Wrap and chill again: Wrap the plastic wrap tightly around the shaped cheese ball, twisting the ends to secure. Refrigerate for at least 1 hour, or up to 24 hours.
- Add the coating (optional): Unwrap the chilled cheese ball and gently roll it in the chopped nuts or everything bagel seasoning. Press lightly so the coating sticks. Use your hands to gently reshape if needed.
- Create the pretzel laces: Take the pretzel sticks and cut them into shorter pieces. You will need about 6-8 pieces for the laces, cut to about 1-1.5 inches long. Also cut one longer piece (about 2 inches) for the center lace.
- Assemble the laces: Place the cheese ball on a serving platter. Gently press the pretzel pieces into the top of the cheese ball in a ladder pattern—two parallel lines with short cross pieces. Start with the center long piece, then add the shorter cross pieces evenly spaced.
- Final chill: Refrigerate the assembled cheese ball for 15-20 minutes before serving.
Notes
Temperature is everything: cream cheese should be at room temperature (68-70°F). Do not skip the chilling steps—they are crucial for shaping. Add pretzel laces right before serving to keep them crunchy. The cheese ball can be made up to 24 hours ahead (without laces). For a dairy-free version, use dairy-free cream cheese and vegan cheddar shreds. For gluten-free, use gluten-free pretzel sticks.
Nutrition
- Serving Size: 1 serving (without c
- Calories: 185
- Sugar: 1
- Sodium: 320
- Fat: 16
- Saturated Fat: 9
- Carbohydrates: 4
- Protein: 7
Keywords: football cheese ball, game day appetizer, Super Bowl snack, tailgate food, easy cheese ball, pretzel laces, party appetizer


