Love this? Save it for later!
Share the inspiration with your friends
I did not trust brown butter. For years, it felt like one of those things food bloggers put in everything just to sound fancy—like truffle oil or edible glitter. And honeynut squash? I picked one up at the farmers’ market mostly because it was cute. Smaller than a butternut, orange like a sunset, and honestly, I had no idea what to do with it. It sat on my counter for three days while I made other things. Pasta. Salad. Even a quick batch of football sugar cookies for a game day party.
Then the weather shifted. You know that first real cold snap where the air smells like frost and woodsmoke? That happened. I wanted something warm, something that felt like a hug in a bowl. The honeynut squash was still there, looking at me. So I caved. I browned the butter (holding my breath the whole time), tossed in some sage, and roasted the squash until the edges turned dark and caramelized.
The first bite stopped me mid-chew. The nuttiness from the brown butter, the earthy crunch of crispy sage, the sweet, almost honeyed flesh of the squash—it worked. Not in a “this is fine” way. In a “why have I been sleeping on this” way. Now I make it every single week during fall. It is simple enough for a Tuesday night and pretty enough for Thanksgiving. And yes, I finally trust brown butter.
Why You’ll Love This Recipe
This isn’t just roasted squash. It is roasted squash that tastes like you spent an hour in the kitchen when really it takes about 35 minutes. The brown butter does all the heavy lifting here—it transforms a simple vegetable into something deeply savory and slightly sweet, with a toasty aroma that fills your whole house.
- Quick & Easy: From start to table in about 35 minutes. Minimal chopping, minimal cleanup.
- Simple Ingredients: Honeynut squash, butter, fresh sage, salt, and pepper. That is literally it. No weird specialty items.
- Perfect for Fall Entertaining: This dish looks stunning on a holiday table but is easy enough for a random weeknight side.
- Crowd-Pleaser: I have served this to picky kids, vegetable skeptics, and hardcore meat-and-potatoes types. Empty pan every time.
- Unbelievably Delicious: The crispy sage leaves are like little flavor bombs. You will want to make extra just to snack on.
What makes this recipe different from every other roasted squash out there is the technique. Instead of just tossing the squash in oil and hoping for the best, you brown the butter first. That step—watching the butter foam and turn golden and smell like toasted hazelnuts—changes everything. The milk solids caramelize and cling to the squash as it roasts, creating a crust that is almost candied but still savory. It is comfort food that feels a little bit fancy but never fussy.
And honestly? This is the kind of dish that makes you close your eyes after the first bite. Not because it is complicated, but because it is so perfectly right.
What Ingredients You Will Need
This recipe relies on a handful of high-quality ingredients to deliver maximum flavor with minimum effort. Here is what you need and why each one matters.
- Honeynut Squash (2 medium, about 1.5 pounds total): These are smaller and sweeter than butternut squash, with thinner skin that does not require peeling. Look for ones that feel heavy for their size with firm, unblemished skin. If you cannot find honeynut, butternut squash works too—just peel and cube it first.
- Unsalted Butter (4 tablespoons, 56g): Use unsalted so you can control the salt level. The butter gets browned, which means the milk solids toast and develop that signature nutty flavor. I prefer European-style butter like Kerrygold for extra richness, but any good unsalted butter works.
- Fresh Sage Leaves (12-15 large leaves): Do not use dried sage here. Fresh sage crisps up beautifully in the brown butter and adds an earthy, slightly peppery note that pairs perfectly with the sweet squash. You can find fresh sage in the produce section near other fresh herbs.
- Kosher Salt (1 teaspoon): I use Diamond Crystal kosher salt. If you use Morton’s, reduce to ¾ teaspoon as it is saltier. The salt helps balance the sweetness of the squash and the richness of the butter.
- Freshly Ground Black Pepper (½ teaspoon): Freshly ground makes a difference here. The floral, pungent notes cut through the richness of the brown butter.
- Optional: Flaky Sea Salt for Finishing (like Maldon): Not required, but that final sprinkle of crunchy salt right before serving adds a lovely texture contrast and a pop of salinity that makes everything sing.
- Optional: Maple Syrup (1 tablespoon): If your honeynut squash is not as sweet as you would like, a tiny drizzle of maple syrup before roasting enhances the natural caramelization. I only add this if the squash tastes a bit flat.
That is it. Seven ingredients (five if you skip the optional ones) and most of them are probably in your kitchen right now. The magic happens in the technique, not the shopping list.
Equipment Needed
You do not need a fancy kitchen to pull this off. Here is what you will need:
- Large Rimmed Baking Sheet: A half-sheet pan (18×13 inches) works perfectly. The rim catches any butter that might pool. If you do not have a rimmed sheet, a 9×13 baking dish works in a pinch.
- Small Skillet or Saucepan: For browning the butter. A light-colored pan is ideal so you can see the butter change color. Stainless steel or nonstick both work.
- Chef’s Knife: Honeynut squash are small but dense. A sharp chef’s knife makes cutting them in half safe and easy. I use an 8-inch Wusthof.
- Cutting Board: Any sturdy board works. Just make sure it is stable—squash can be slippery.
- Mixing Bowl: For tossing the squash with the brown butter and sage.
- Spatula or Wooden Spoon: For stirring the butter as it browns and for flipping the squash halfway through roasting.
- Measuring Spoons: For the salt and pepper. Eyeballing is fine once you have made this a few times, but measure until you know what works for your taste.
If you are new to browning butter, do not stress. The first time I tried it, I burned it so badly I had to open all the windows and start over. That is why I recommend using a light-colored pan—you can actually see what is happening instead of guessing.
Preparation Method
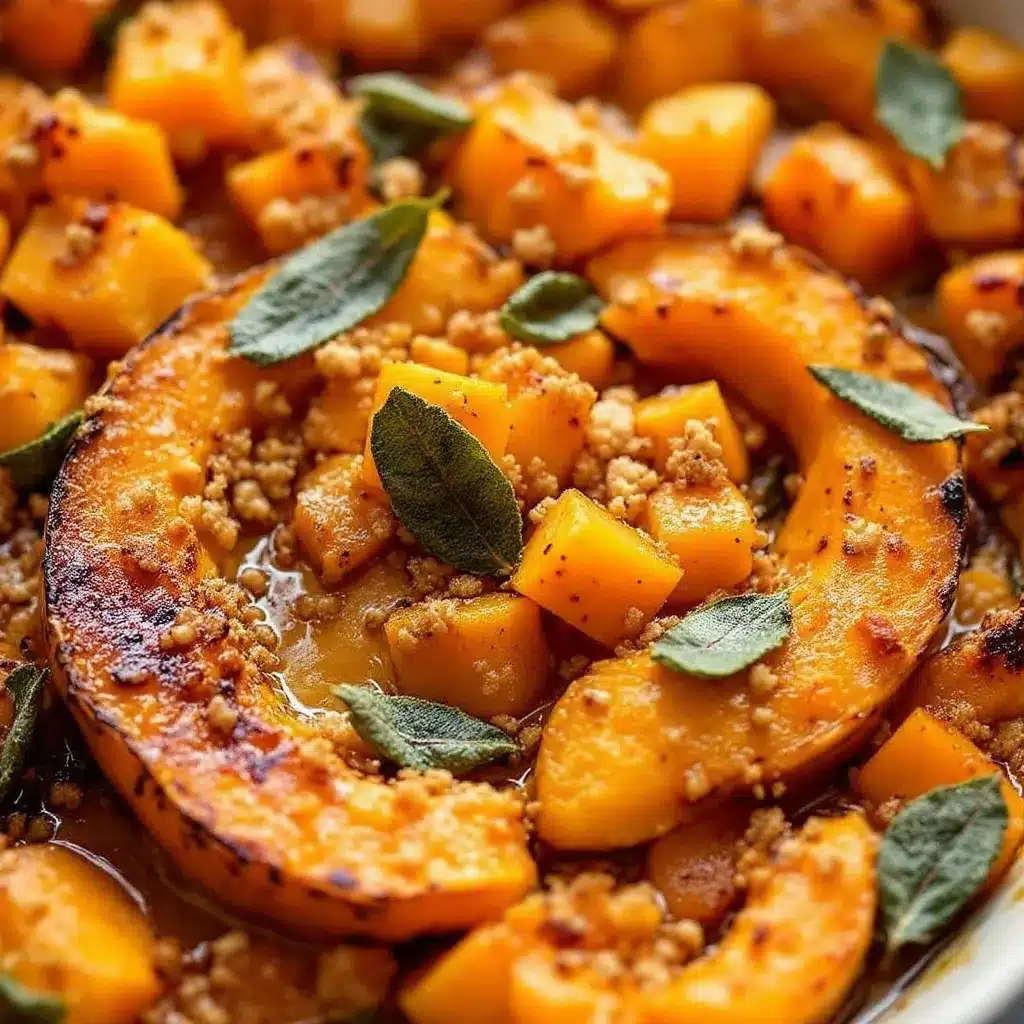
Let me walk you through this step by step. I have made this dish probably thirty times by now, so I have learned all the little tricks that make it work perfectly every time.
- Preheat your oven to 400°F (200°C). Place a rack in the middle position. Give your oven time to come fully to temperature—at least 15 minutes. A properly hot oven is crucial for getting those caramelized edges.
- Prepare the honeynut squash. Using a sharp chef’s knife, carefully cut each squash in half lengthwise from stem to tip. Scoop out the seeds and stringy bits with a spoon. You can save the seeds to roast later if you want, but I usually toss them. Do not peel the squash—the skin is thin enough to eat once roasted, and it helps the squash hold its shape. Cut each half crosswise into 1-inch thick half-moons. Try to keep the pieces similar in size so they cook evenly.
- Start browning the butter. Place the 4 tablespoons of unsalted butter in a small skillet or saucepan over medium heat. Let it melt completely, then continue cooking. The butter will foam up, then subside, then foam again. Swirl the pan occasionally. Watch for the milk solids at the bottom to turn golden brown—this takes about 3-4 minutes. The moment the butter smells nutty and toasty and looks like warm honey, remove it from the heat immediately. If you see black specks, you have gone too far (but do not worry, just start over).
- Crisp the sage leaves. While the butter is still hot, drop the fresh sage leaves into the pan. They will sizzle and crisp up in about 15-20 seconds. Use tongs or a fork to transfer them to a paper towel-lined plate. They will continue to crisp as they cool. Set them aside for garnish.
- Toss the squash with brown butter. Place the cut squash pieces in a large mixing bowl. Pour the warm brown butter over them (reserve the crispy sage for later). Add the kosher salt and black pepper. Toss everything together with your hands or a spatula until every piece is evenly coated. Make sure to scrape all that browned goodness from the bottom of the butter pan into the bowl.
- Arrange on the baking sheet. Spread the squash pieces in a single layer on your rimmed baking sheet. Do not crowd them—give each piece a little space. If they are piled on top of each other, they will steam instead of caramelize. If needed, use two baking sheets. Drizzle any remaining brown butter from the bowl over the top.
- Roast for 20-25 minutes. Place the baking sheet in the preheated oven. Roast for 10 minutes, then flip each piece using a spatula. Return to the oven and roast for another 10-15 minutes. You are looking for deep golden-brown edges and a fork-tender center. The squash should look caramelized and slightly shrunken. If your pieces are smaller, start checking at 18 minutes total.
- Finish and serve. Remove the baking sheet from the oven. Transfer the roasted squash to a serving platter. Crumble the crispy sage leaves over the top. If using, sprinkle with flaky sea salt. Serve immediately while the squash is still warm and the edges are at their crispiest.
One thing I learned the hard way: do not skip the flipping step. The first few times I made this, I was too lazy to flip halfway through, and the bottoms got much darker than the tops. Flipping ensures even caramelization and that every piece gets that gorgeous brown butter crust on both sides.
Cooking Tips & Techniques
After making this dish more times than I can count, here are the things I wish someone had told me from the start.
Watch the butter like a hawk. Brown butter goes from perfect to burnt in about 30 seconds. The first time I attempted this, I walked away to answer a text message and came back to a pan of blackened, acrid-smelling butter. Start over. It happens to everyone. Keep your eyes on the pan, and when the foam subsides and you see golden specks forming at the bottom, pull it off the heat immediately. The residual heat will continue cooking it slightly, so err on the side of pulling it too early rather than too late.
Dry the sage leaves thoroughly. Wet sage leaves will splatter in the hot butter and may not crisp up properly. Pat them dry with a paper towel before dropping them in. Also, make sure the butter is hot enough—if it is not sizzling when the sage hits the pan, the leaves will absorb the butter and turn soggy instead of crispy.
Cut the squash evenly. This is the most important step for consistent cooking. If some pieces are ½ inch thick and others are 1½ inches thick, you will end up with burnt edges and raw centers. Take the extra 30 seconds to make sure your pieces are uniform. I aim for about 1-inch thick half-moons.
Do not overcrowd the pan. If your squash pieces are touching or overlapping, they will steam and release moisture instead of caramelizing. Use two baking sheets if you need to. The caramelization is what gives this dish its deep, complex flavor—do not sacrifice it for convenience.
Use a metal spatula for flipping. Thin metal spatulas slide under the squash pieces without disturbing the caramelized crust. Plastic or silicone spatulas are too thick and will scrape off all that beautiful browning. I learned this after ruining a batch by using a rubber spatula that just pushed the squash around instead of flipping it cleanly.
Timing is everything. This dish is best served immediately. The crispy edges start to soften after about 10 minutes on the plate. If you are making this for a holiday meal, time it so the squash comes out of the oven right as everyone is sitting down. You can prep everything ahead—cut the squash, wash and dry the sage, measure the butter—and then just execute when you are ready to serve.
Variations & Adaptations
One of the best things about this recipe is how adaptable it is. Here are some ways I have tweaked it over the years.
Vegan Version: Replace the butter with a high-quality vegan butter or coconut oil. The flavor will be different but still delicious. For the sage, you can crisp it in the vegan butter or just sprinkle fresh sage leaves over the squash before roasting. I have used Miyoko’s European-style cultured vegan butter with great results.
Spicy Twist: Add ¼ teaspoon of red pepper flakes to the brown butter along with the sage. The heat cuts through the richness beautifully. I made this version for a Friendsgiving potluck and it disappeared faster than the turkey.
Sweet and Savory: Drizzle 1 tablespoon of maple syrup or honey over the squash before roasting. The sugar helps the caramelization and adds another layer of sweetness. This is my go-to version when I am serving this as a holiday side dish alongside roasted turkey or ham.
Different Squash Options: If you cannot find honeynut squash, butternut squash is the best substitute. Peel and cube it into 1-inch pieces. Acorn squash also works well, though it is less sweet. Delicata squash is another excellent option and also has edible skin. Each squash will have a slightly different cooking time, so start checking at 15 minutes.
Nutty Addition: Toss ¼ cup of chopped pecans or walnuts onto the baking sheet during the last 5 minutes of roasting. They toast up beautifully in the brown butter and add a lovely crunch. I tried this on a whim one night and now I do it almost every time.
Balsamic Glaze Finish: Drizzle a good aged balsamic glaze over the finished dish right before serving. The acidity cuts through the richness and adds a beautiful visual contrast. This is my favorite way to dress it up for company.
Herb Variations: If you do not have sage, fresh thyme or rosemary work beautifully. Use about 1 tablespoon of fresh thyme leaves or 2 teaspoons of chopped fresh rosemary. The flavor profile shifts but remains just as delicious.
Serving & Storage Suggestions
This dish is incredibly versatile in how you serve it. Here is what works best.
Serving Temperature: Serve warm, ideally within 5 minutes of coming out of the oven. The edges are at their crispiest right after roasting. If the dish sits too long, the caramelized exterior will soften. That said, it is still delicious at room temperature—I have been known to eat leftovers straight from the fridge.
Presentation: Arrange the squash pieces on a warm platter in a single layer or slightly overlapping. Crumble the crispy sage leaves over the top. If you made the flaky salt version, sprinkle that on last. A few extra fresh sage leaves around the edges of the platter add a nice visual touch.
Complementary Dishes: This squash pairs beautifully with roasted chicken, pork chops, or seared salmon. For a vegetarian meal, serve it alongside a hearty grain salad or creamy polenta. It also works wonderfully as part of a holiday spread alongside dishes like prime rib roast with garlic herb butter or a cozy slow cooker pumpkin chili for a cozy fall dinner.
Drink Pairings: A dry Riesling or an oaked Chardonnay complements the nutty brown butter beautifully. For red wine drinkers, a light Pinot Noir works. Non-alcoholic options include a warm apple cider or a sparkling water with a squeeze of lemon.
Storage Instructions: Store leftovers in an airtight container in the refrigerator for up to 4 days. The squash will soften significantly, but the flavor remains excellent. I do not recommend freezing this dish—the texture changes too much upon thawing.
Reheating Methods: For best results, reheat in a 350°F oven for 5-7 minutes. This helps restore some of the crispy edges. The microwave works in a pinch but will make the squash quite soft. If using the microwave, reheat in 30-second intervals until warmed through.
How Flavors Develop: Honestly, this dish is even better the next day. The brown butter flavor permeates the squash overnight, and the sweetness becomes more pronounced. I often make a double batch specifically for leftovers. Cold, straight from the fridge, it makes an amazing addition to salads or grain bowls.
Nutritional Information & Benefits
Here is the estimated nutritional breakdown for one serving (about half a honeynut squash with butter and sage):
| Nutrient | Amount per Serving |
|---|---|
| Calories | 185 |
| Total Fat | 12g |
| Saturated Fat | 7g |
| Cholesterol | 30mg |
| Sodium | 290mg |
| Total Carbohydrates | 22g |
| Dietary Fiber | 4g |
| Sugars | 8g |
| Protein | 2g |
| Vitamin A | 290% DV |
| Vitamin C | 35% DV |
| Potassium | 580mg |
Honeynut squash is packed with vitamin A (over 200% of your daily needs in one serving), which supports eye health and immune function. It is also a great source of vitamin C and potassium. The brown butter adds richness, but the overall dish is still relatively light compared to many holiday sides.
Dietary Considerations: This recipe is naturally gluten-free and vegetarian. To make it vegan, substitute the butter with vegan butter or coconut oil. It is not low-carb due to the squash, but the carbs come from whole food sources with plenty of fiber. The main allergens are dairy (butter) and, if you add the nut variation, tree nuts.
I love that this dish feels indulgent but is actually built around a vegetable. It is the kind of recipe that makes you feel good about eating your veggies, even when they are swimming in brown butter.
Conclusion
This crispy brown butter honeynut squash with sage has become my go-to fall side dish for a reason. It is simple enough for a Tuesday night, impressive enough for Thanksgiving, and flexible enough to adapt to whatever you have on hand. The brown butter does the heavy lifting, transforming a humble squash into something that tastes like you spent way more effort than you actually did.
I love that this recipe taught me to trust a technique I had been avoiding for years. Brown butter is not fussy or pretentious—it is just a simple way to add deep, nutty flavor to almost anything. And honeynut squash? It is not just a cute butternut alternative. It is genuinely sweeter, creamier, and more flavorful than its bigger cousin.
Try this recipe as written, then tweak it to make it your own. Add maple syrup if you like things sweet. Toss in red pepper flakes if you want heat. Throw some pecans on top for crunch. The base is solid, and the possibilities are endless.
I would love to hear how it turns out for you. Drop a comment below and let me know if you tried any variations, or tag me in your photos if you share them online. And if you are looking for more easy, vegetable-forward recipes, check out this crispy baked zucchini fritters or this grilled peach and burrata salad for more seasonal inspiration.
Happy cooking, and do not forget to watch that butter.
Frequently Asked Questions
Can I use butternut squash instead of honeynut?
Absolutely. Butternut squash is the best substitute. Just peel it and cube it into 1-inch pieces. You may need to roast it for an extra 5-8 minutes since butternut is denser. The flavor will be slightly less sweet, so consider adding a drizzle of maple syrup.
How do I know when the brown butter is done?
Look for three signs: the butter will smell nutty and toasty (like toasted hazelnuts), the foam will subside, and you will see golden-brown specks forming at the bottom of the pan. The moment you see those specks, remove the pan from the heat. It happens fast, so do not walk away.
Can I make this ahead of time?
You can prep the ingredients ahead—cut the squash, wash and dry the sage, measure the butter. But the actual roasting should happen right before serving. The crispy edges start to soften after about 10 minutes. Leftovers are still delicious but will not have the same crunch.
Why did my sage leaves turn soggy instead of crispy?
Two likely reasons: either the butter was not hot enough when you added the sage, or the sage leaves were wet. Make sure to pat the leaves completely dry with a paper towel before dropping them in. Also, let the butter get fully browned before adding the sage—it should sizzle immediately on contact.
Can I double this recipe?
Yes, but use two baking sheets instead of one. Overcrowding the pan will cause the squash to steam instead of caramelize. You may also need to roast for an extra 5 minutes since the oven will have more mass to heat. Rotate the pans halfway through for even cooking.
Easy Brown Butter Honeynut Squash with Crispy Sage
Roasted honeynut squash with nutty brown butter and crispy sage leaves. A simple, elegant fall side dish that comes together in about 35 minutes.
- Prep Time: 10 minutes
- Cook Time: 25 minutes
- Total Time: 35 minutes
- Yield: 4 servings 1x
- Category: Side Dish
- Cuisine: American
Ingredients
- 2 medium honeynut squash (about 1.5 pounds total)
- 4 tablespoons unsalted butter (56g)
- 12–15 large fresh sage leaves
- 1 teaspoon kosher salt (Diamond Crystal; use ¾ teaspoon if using Morton’s)
- ½ teaspoon freshly ground black pepper
- Optional: flaky sea salt for finishing (like Maldon)
- Optional: 1 tablespoon maple syrup
Instructions
- Preheat oven to 400°F (200°C). Place a rack in the middle position.
- Cut each squash in half lengthwise, scoop out seeds and stringy bits. Cut each half crosswise into 1-inch thick half-moons. Do not peel.
- In a small skillet or saucepan over medium heat, melt the butter. Continue cooking until it foams, subsides, then foams again and the milk solids turn golden brown and smell nutty (about 3-4 minutes). Remove from heat immediately.
- Drop the sage leaves into the hot butter; they will sizzle and crisp in 15-20 seconds. Transfer to a paper towel-lined plate.
- Place squash pieces in a large mixing bowl. Pour the warm brown butter over them (reserve crispy sage). Add salt and pepper. Toss until evenly coated.
- Arrange squash in a single layer on a rimmed baking sheet. Do not overcrowd. Drizzle any remaining brown butter from the bowl over the top.
- Roast for 10 minutes, then flip each piece. Roast for another 10-15 minutes until deep golden-brown edges and fork-tender.
- Transfer to a serving platter. Crumble crispy sage over the top. Sprinkle with flaky sea salt if using. Serve immediately.
Notes
Watch the butter carefully—it goes from perfect to burnt in about 30 seconds. Dry sage leaves thoroughly before adding to butter. Cut squash evenly for consistent cooking. Do not overcrowd the pan; use two baking sheets if needed. Use a metal spatula for flipping to preserve the caramelized crust. Best served immediately; edges soften after about 10 minutes.
Nutrition
- Serving Size: 1 serving (about hal
- Calories: 185
- Sugar: 8
- Sodium: 290
- Fat: 12
- Saturated Fat: 7
- Carbohydrates: 22
- Fiber: 4
- Protein: 2
Keywords: brown butter, honeynut squash, crispy sage, roasted squash, fall side dish, easy, vegetarian, gluten-free


