Love this? Save it for later!
Share the inspiration with your friends
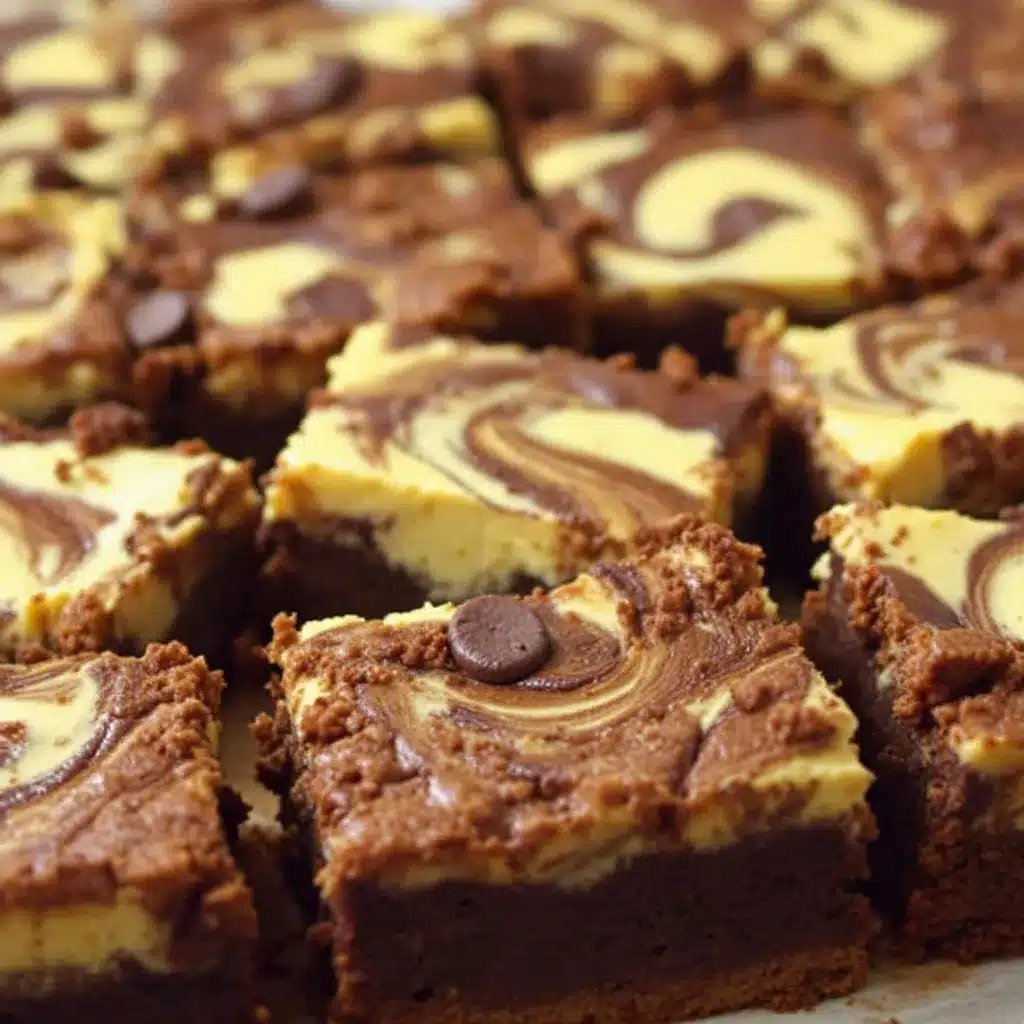
I need a brownie that understands the assignment. Not just chocolate, not just pumpkin, but that perfect middle ground where both flavors get to be the star without one showing off. And honestly, I want a cheesecake swirl in there too, because why stop at two desserts when you can have three? The Ultimate Pumpkin Cheesecake Swirl Brownie is that exact moment of clarity—rich, fudgy chocolate, a layer of creamy cheesecake, and that unmistakable pumpkin spice warmth that makes fall feel official. No dry corners, no muddled flavors, just layers that actually taste like what they’re supposed to be.
The first time I made these, I was testing a theory. Could pumpkin and chocolate actually be friends without one overpowering the other? Turns out, they can, as long as you give them a little structure. The brownie base is dense and dark, the cheesecake swirl is tangy and smooth, and the pumpkin layer brings that cozy spice hit that makes you close your eyes for a second. It’s the kind of dessert that works for a casual Tuesday night or a Thanksgiving table where everyone’s already eyeing the pie.
These brownies aren’t complicated, but they do ask for a little patience. The swirled effect looks impressive, but it’s really just a few dollops and a butter knife. That’s the thing about this recipe—it looks like you fussed, but you didn’t. And that’s exactly how I like my desserts to behave.
Why You’ll Love This Recipe
These Ultimate Pumpkin Cheesecake Swirl Brownies are the kind of dessert that makes people think you spent hours in the kitchen. Spoiler: you didn’t. Here’s why they’ll become your go-to fall bake:
- Triple-Layer Perfection : Fudgy brownie, creamy cheesecake, spiced pumpkin—three desserts in one bar, no compromise.
- Simple Pantry Ingredients : No weird specialty items. You probably already have pumpkin puree, cream cheese, and basic baking staples in your kitchen.
- Perfect for Fall Gatherings : Whether it’s a tailgate, a Friendsgiving, or just a cozy weekend treat, these brownies fit right in. They’d look great next to a batch of Chewy Pumpkin Snickerdoodle Cookies on any dessert table.
- Crowd-Pleasing Flavor Combo : Even the chocolate-purists in your life will reach for a second one. The pumpkin isn’t shouting for attention—it’s just there, warm and welcome.
- Impressive Swirl Technique : That beautiful marbled top looks bakery-level, but it’s just a few strategic dollops and a quick drag through the batter. Zero skill required.
What makes these different from other pumpkin brownies is the texture balance. The brownie base is intentionally fudgy—not cakey—so it holds up against the creamy cheesecake and pumpkin layers. I tested this about five times to get that ratio right, and trust me, it’s worth the extra cream cheese.
There’s something about the first bite. The chocolate hits first, then the tangy cheesecake, then that slow warmth of cinnamon and nutmeg. It’s the kind of dessert that makes you slow down and actually taste what you’re eating. And honestly, that’s rare.
What Ingredients You Will Need
This recipe keeps things straightforward. Each layer has a specific job, and the ingredients work together to create that perfect bite. Here’s what you’ll need:
For the Brownie Layer
- 1/2 cup (113g) unsalted butter , melted and slightly cooled (I use salted butter in a pinch and just skip the added salt)
- 1 cup (200g) granulated sugar (adds sweetness and helps create that crackly top)
- 2 large eggs , room temperature (cold eggs will seize the melted butter)
- 1 teaspoon vanilla extract
- 1/3 cup (40g) unsweetened cocoa powder (I prefer Dutch-process for a deeper, darker chocolate flavor)
- 1/2 cup (65g) all-purpose flour
- 1/4 teaspoon salt
- 1/4 teaspoon baking powder (just enough for a little lift without making it cakey)
For the Cheesecake Layer
- 8 oz (226g) cream cheese , softened (full-fat is best here—low-fat can get watery)
- 1/4 cup (50g) granulated sugar
- 1 large egg yolk (the yolk adds richness; save the white for another recipe)
- 1/2 teaspoon vanilla extract
For the Pumpkin Layer
- 1/2 cup (120g) pumpkin puree (not pumpkin pie filling—make sure it’s 100% pure pumpkin)
- 1/4 cup (50g) granulated sugar
- 1 large egg
- 1 tablespoon all-purpose flour (helps stabilize the pumpkin so it doesn’t make the brownies soggy)
- 1 teaspoon pumpkin pie spice (or make your own: 1/2 tsp cinnamon, 1/4 tsp ginger, 1/8 tsp nutmeg, 1/8 tsp cloves)
- 1/4 teaspoon cinnamon (extra warmth because why not)
I like using Libby’s pumpkin puree—it’s consistently thick and not watery. If your pumpkin puree looks a bit loose, pat it dry with a paper towel before mixing. That little step prevents the dreaded soggy brownie situation.
Equipment Needed
You don’t need a fancy kitchen for these brownies, but a few specific tools make the process smoother:
- 8×8-inch baking pan (metal pans give the best edges; glass works but may need a few extra minutes in the oven)
- Parchment paper (non-negotiable for easy lifting and clean slices)
- Large mixing bowls (one for brownie batter, one for cheesecake, one for pumpkin)
- Hand mixer or stand mixer (for the cheesecake layer—you can do it by hand if your cream cheese is super soft, but a mixer makes it silky)
- Spatula (rubber or silicone for scraping every last bit of batter)
- Butter knife or skewer (for the swirling magic)
- Measuring cups and spoons (precise measurements matter for the pumpkin layer especially)
- Cooling rack (lets the brownies cool evenly so the cheesecake sets properly)
I’ve made these in a glass pan before, and they turned out fine, but the edges were softer than I like. Metal pans give that slightly crisp edge that contrasts beautifully with the creamy center. If you’re using glass, reduce the oven temperature by 25°F and check a few minutes early.
Preparation Method
Step 1: Prep Your Pan and Oven
Preheat your oven to 350°F (175°C). Line your 8×8-inch pan with parchment paper, leaving a couple inches of overhang on two sides. This creates handles for lifting the brownies out later. Lightly grease the parchment if you’re nervous about sticking, though most parchment is non-stick enough on its own.
Step 2: Make the Brownie Batter
In a large bowl, whisk together the melted butter and granulated sugar until smooth and glossy—about 1 minute. Add the eggs one at a time, whisking well after each. Stir in the vanilla. The mixture should look thick and slightly shiny at this point.
Sift the cocoa powder, flour, salt, and baking powder over the wet ingredients. Fold gently with a spatula until just combined. Do not overmix. A few streaks of flour are fine; overworking the batter will make the brownies tough. The batter will be thick and fudgy—that’s exactly what you want.
Step 3: Make the Cheesecake Layer
In a medium bowl, beat the softened cream cheese with a hand mixer until smooth and fluffy—about 2 minutes. Add the sugar and beat until combined. Mix in the egg yolk and vanilla until everything is silky and uniform. Scrape down the sides of the bowl. Set aside.
If your cream cheese isn’t fully softened, you’ll end up with lumps. Microwave it for 10-second intervals if you forgot to take it out of the fridge. I’ve done that more times than I’d like to admit.
Step 4: Make the Pumpkin Layer
In a separate bowl, whisk together the pumpkin puree, sugar, egg, flour, pumpkin pie spice, and cinnamon. The mixture should be smooth and slightly thick. Taste it—yes, raw egg and all. It should taste warmly spiced and not too sweet. Adjust the spices if you want more kick.
Step 5: Assemble the Layers
Spread about two-thirds of the brownie batter into the prepared pan. It will be thick, so use a spatula to push it into the corners evenly. This bottom layer should be about 1/2-inch thick.
Spoon the cheesecake mixture over the brownie layer in dollops. Then spoon the pumpkin mixture over the cheesecake in dollops. Don’t worry about spreading them perfectly—the swirling will take care of that.
Drop the remaining brownie batter in small spoonfuls over the top. Now for the fun part: take a butter knife or skewer and drag it through the layers in a figure-eight pattern. Don’t over-swirl or you’ll lose the distinct layers. About 6-8 passes is plenty.
Step 6: Bake to Perfection
Bake for 35-40 minutes, or until the edges are set and the center has a slight jiggle—like a cheesecake. A toothpick inserted into the center should come out with a few moist crumbs, not wet batter. The brownie layer will continue to set as it cools.
Let the brownies cool completely in the pan on a wire rack. This is crucial. If you cut them while warm, the cheesecake layer will ooze everywhere and you’ll have a delicious but messy situation. I speak from experience. After about 2 hours at room temperature, refrigerate for another hour for cleaner slices.
Cooking Tips & Techniques
After making these brownies more times than I can count, here are the things I wish I’d known from the start:
Room temperature ingredients matter. Cold eggs and cold cream cheese don’t blend smoothly into melted butter or sugar. They seize up and create lumps that won’t bake out. Set everything out 30 minutes before you start mixing.
Don’t over-swirl. I know it’s tempting to keep dragging that knife through the batter, but too much swirling turns the layers into one muddy mess. You want distinct ribbons of cheesecake and pumpkin, not a brownish-orange blend. Less is genuinely more here.
Watch the bake time. Every oven runs differently. My old oven needed a full 40 minutes; my current one is done at 35. Start checking at 30 minutes. The brownies are done when the edges pull away slightly from the pan and the center has a gentle wobble.
Patience with cooling is non-negotiable. I once cut into these after 20 minutes because I couldn’t wait. The cheesecake layer was still soft, and the brownies fell apart. Let them cool completely, then refrigerate. Cold brownies cut like a dream and taste just as good at room temperature after a few minutes on the counter.
Use good cocoa powder. The brownie layer is simple, so the quality of your cocoa matters. Dutch-process cocoa gives a deeper, more sophisticated chocolate flavor. Natural cocoa works fine but will be slightly less intense.
Variations & Adaptations
One of the best things about this recipe is how flexible it is. Here are some ways I’ve tweaked it depending on what I had on hand or who I was feeding:
Gluten-Free Version : Swap the all-purpose flour in the brownie and pumpkin layers with a 1:1 gluten-free baking flour. I’ve used Bob’s Red Mill with great results. The texture is slightly more delicate, so let them cool completely before slicing.
Dairy-Free Adaptation : Use vegan butter and dairy-free cream cheese. Miyoko’s is my go-to for cream cheese—it’s tangy and spreads well. The texture will be slightly less firm, so expect a creamier cheesecake layer.
Extra Chocolate Kick : Fold 1/2 cup of semi-sweet chocolate chips into the brownie batter before layering. The little pockets of melted chocolate are a nice surprise against the creamy cheesecake. I’ve also used dark chocolate chunks for a more intense hit.
Spice It Up : Add a pinch of cayenne pepper or chipotle powder to the brownie batter. The heat plays beautifully with the sweet pumpkin and tangy cheesecake. It’s unexpected but works, especially if you’re serving these at a fall gathering with a little edge.
Mini Version : Divide the batter into a lined muffin tin for individual brownie bites. Bake for 18-22 minutes instead. These are perfect for lunchboxes or parties where you want portion control. I’ve made them for my daughter’s school bake sale, and they disappeared fast.
If you’re in the mood for more pumpkin treats, these brownies pair beautifully with a warm mug of Easy Homemade Pumpkin Chai Latte for the ultimate fall afternoon.
Serving & Storage Suggestions
These brownies are versatile when it comes to serving. Here’s how to get the most out of them:
Serving Temperature : I prefer them slightly chilled or at room temperature. Straight from the fridge, the cheesecake layer is firm and almost like a cheesecake bar. At room temperature, the brownie layer softens and the whole thing feels more decadent. Try both and see which you prefer.
Presentation Ideas : Dust the tops with a little powdered sugar or a sprinkle of cinnamon before serving. For a more indulgent moment, warm a brownie for 10 seconds in the microwave and top with a scoop of vanilla ice cream. The warm-cold contrast is incredible.
Pairings : These brownies are rich enough to stand alone, but they’re also great with a cup of coffee, a glass of cold milk, or a scoop of cinnamon ice cream. For a holiday brunch, serve them alongside Baked Pumpkin Spice Donuts with Maple Glaze for a full pumpkin spread.
Storage Instructions : Store leftover brownies in an airtight container in the refrigerator for up to 5 days. Layer them with parchment paper if stacking to prevent sticking. They actually taste better on day two—the flavors meld and deepen overnight.
Freezing : These freeze beautifully. Wrap individual brownies tightly in plastic wrap, then place them in a freezer-safe bag. They’ll keep for up to 3 months. Thaw in the refrigerator overnight or at room temperature for about 30 minutes. I always keep a stash in the freezer for unexpected guests or late-night cravings.
Reheating : For that just-baked experience, warm a brownie in a 300°F oven for 5-7 minutes. The microwave works too—15 seconds on medium power—but the texture won’t be quite as crisp on the edges.
Nutritional Information & Benefits
These brownies are a treat, and I’m not going to pretend otherwise. But here’s the honest breakdown:
- Estimated per serving (1 brownie, makes 16) : Calories: 245, Fat: 14g, Carbs: 28g, Protein: 4g, Sugar: 20g
- Pumpkin Puree : Adds vitamin A, fiber, and a little moisture without extra fat. It’s not a health food, but it’s not empty calories either.
- Cream Cheese : Provides calcium and a little protein. Full-fat cream cheese gives the best texture, but you can use reduced-fat if you prefer.
- Dark Cocoa Powder : Contains antioxidants and a little iron. Using Dutch-process cocoa also means less acidity, which is easier on sensitive stomachs.
These brownies are vegetarian and can be made gluten-free or dairy-free with the substitutions mentioned earlier. They contain eggs, dairy, and gluten in their standard form. If you’re serving a crowd with allergies, the gluten-free version has been a hit at my house.
I’m not a nutritionist, and I don’t pretend these are a health food. But I do believe that a balanced life includes room for a really good brownie. And this one, with its layers and swirls and that perfect fudgy bite, is worth every single calorie.
Conclusion
These Ultimate Pumpkin Cheesecake Swirl Brownies are the kind of recipe that earns a permanent spot in your fall rotation. They’re impressive enough for holiday gatherings but simple enough for a random Wednesday when you just need something good. The layers work together in a way that feels intentional and satisfying—chocolate, cheesecake, pumpkin, all in one neat little square.
I love that this recipe doesn’t ask for much. No complicated techniques, no obscure ingredients, no special equipment. Just a little patience with cooling and a willingness to trust the swirl. And honestly, the first time you pull that parchment paper up and see those beautiful layers, you’ll feel like a baking genius.
I’d love to hear how these turn out for you. Did you try a variation? Add chocolate chips? Serve them with ice cream? Drop a comment below and let me know—I read every single one, and I’m always looking for new ideas to test in my kitchen. And if you’re looking for another cozy fall dessert, check out these Chewy Pumpkin Snickerdoodle Cookies for more seasonal sweetness.
Happy baking, friends. May your brownies be fudgy, your swirls be beautiful, and your kitchen smell like autumn.
Frequently Asked Questions
Can I use pumpkin pie filling instead of pumpkin puree?
No, stick with 100% pure pumpkin puree. Pumpkin pie filling already has sugar and spices added, which will throw off the sweetness and texture of the pumpkin layer. The extra liquid in pie filling can also make the brownies soggy.
Why did my cheesecake layer crack?
Cracking usually happens from overbaking or sudden temperature changes. Bake until the center has a slight jiggle, and let the brownies cool gradually in the pan on a wire rack. Don’t open the oven door repeatedly during baking—that temperature fluctuation can cause cracking too.
Can I make these brownies ahead of time?
Absolutely. These brownies actually taste better the next day after the flavors have melded. Bake them a day ahead, cool completely, and store in the refrigerator. Let them sit at room temperature for 15 minutes before serving for the best texture.
How do I get clean slices without the layers smearing?
Chill the brownies in the refrigerator for at least 2 hours before slicing. Use a sharp knife and wipe it clean between each cut. For the cleanest slices, run the knife under hot water and dry it before each cut—the heat helps glide through the layers.
Can I double this recipe for a 9×13 pan?
Yes, double all ingredients and bake in a greased 9×13-inch pan. Increase the bake time to 40-45 minutes, checking for doneness with a toothpick. The layers will be slightly thinner, but the flavor and texture hold up beautifully.
PrintUltimate Pumpkin Cheesecake Swirl Brownies: Best Easy Fall Dessert
Rich, fudgy chocolate brownies with a creamy cheesecake layer and a spiced pumpkin swirl. This triple-layer dessert is perfect for fall gatherings and looks bakery-level impressive with minimal effort.
- Prep Time: 20 minutes
- Cook Time: 35 minutes
- Total Time: 55 minutes
- Yield: 16 servings 1x
- Category: Dessert
- Cuisine: American
Ingredients
- 1/2 cup (113g) unsalted butter, melted and slightly cooled
- 1 cup (200g) granulated sugar
- 2 large eggs, room temperature
- 1 teaspoon vanilla extract
- 1/3 cup (40g) unsweetened cocoa powder (preferably Dutch-process)
- 1/2 cup (65g) all-purpose flour
- 1/4 teaspoon salt
- 1/4 teaspoon baking powder
- 8 oz (226g) cream cheese, softened
- 1/4 cup (50g) granulated sugar (for cheesecake layer)
- 1 large egg yolk
- 1/2 teaspoon vanilla extract (for cheesecake layer)
- 1/2 cup (120g) pumpkin puree (100% pure pumpkin)
- 1/4 cup (50g) granulated sugar (for pumpkin layer)
- 1 large egg (for pumpkin layer)
- 1 tablespoon all-purpose flour (for pumpkin layer)
- 1 teaspoon pumpkin pie spice
- 1/4 teaspoon cinnamon
Instructions
- Preheat oven to 350°F (175°C). Line an 8×8-inch baking pan with parchment paper, leaving overhang on two sides. Lightly grease parchment if desired.
- Make the brownie batter: In a large bowl, whisk melted butter and 1 cup sugar until smooth and glossy, about 1 minute. Add eggs one at a time, whisking well after each. Stir in 1 teaspoon vanilla. Sift cocoa powder, 1/2 cup flour, salt, and baking powder over the wet ingredients. Fold gently with a spatula until just combined (do not overmix). Set aside.
- Make the cheesecake layer: In a medium bowl, beat softened cream cheese with a hand mixer until smooth and fluffy, about 2 minutes. Add 1/4 cup sugar and beat until combined. Mix in egg yolk and 1/2 teaspoon vanilla until silky. Set aside.
- Make the pumpkin layer: In a separate bowl, whisk together pumpkin puree, 1/4 cup sugar, 1 egg, 1 tablespoon flour, pumpkin pie spice, and cinnamon until smooth and slightly thick.
- Assemble: Spread about two-thirds of the brownie batter into the prepared pan (about 1/2-inch thick). Spoon cheesecake mixture over the brownie layer in dollops. Spoon pumpkin mixture over the cheesecake in dollops. Drop remaining brownie batter in small spoonfuls over the top. Use a butter knife or skewer to drag through the layers in a figure-eight pattern (6-8 passes).
- Bake for 35-40 minutes, until edges are set and center has a slight jiggle. A toothpick inserted into the center should come out with a few moist crumbs. Cool completely in the pan on a wire rack (about 2 hours), then refrigerate for at least 1 hour before slicing.
Notes
Room temperature ingredients are crucial for smooth layers. Do not over-swirl; 6-8 passes is enough. Cool completely before slicing to prevent the cheesecake layer from oozing. For cleaner slices, chill for at least 2 hours and wipe the knife between cuts. For a gluten-free version, use a 1:1 gluten-free baking flour. For dairy-free, use vegan butter and dairy-free cream cheese.
Nutrition
- Serving Size: 1 brownie
- Calories: 245
- Sugar: 20
- Sodium: 180
- Fat: 14
- Saturated Fat: 8
- Carbohydrates: 28
- Fiber: 2
- Protein: 4
Keywords: pumpkin cheesecake brownies, fall dessert, pumpkin brownies, cheesecake swirl brownies, easy brownie recipe


