Love this? Save it for later!
Share the inspiration with your friends
That first crack of the black cocoa hitting the mixing bowl — the kind that poofs up like a tiny, edible thundercloud — still takes me straight back to my friend Jenna’s kitchen three Octobers ago. We were both covered in flour, she was convinced we’d created something that looked like a science experiment gone wrong, and I was absolutely certain we were onto something. The batter was this deep, almost unsettling shade of charcoal, and honestly? I loved it immediately. We were chasing that perfect Halloween treat — something that looked dramatic and spooky but tasted like pure, buttery comfort. Not a gimmick, you know? Something you’d actually want to eat again.
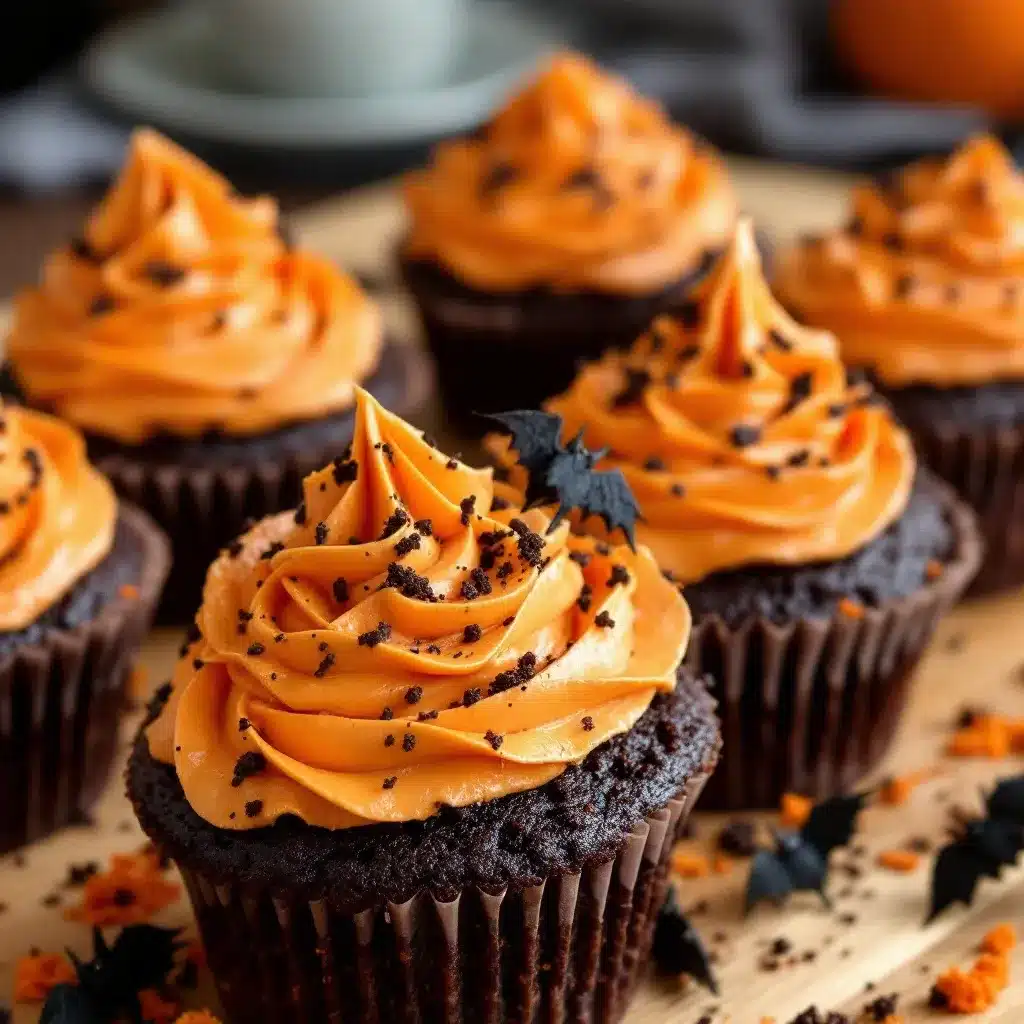
These Perfect Black Velvet Halloween Cupcakes with Orange Frosting are the result of that messy, happy afternoon. They’re not just black food coloring dumped into a box mix. The black cocoa gives them a rich, almost Oreo-like flavor that’s miles away from anything artificial. And that orange frosting? It’s not just for looks. It’s a creamy, tangy-sweet swirl that cuts through the deep chocolate perfectly. Every time I make these, I remember that first bite — the way we both went quiet for a second, then just started laughing. That’s the kind of recipe this is. It’s for the Halloween party where you want to impress, the trunk-or-treat where you want the best-looking booth, or just a Tuesday night in October when you need a little magic.
Why You’ll Love This Recipe
I’ve tested this recipe more times than I care to count. I’ve tried different cocoas, different frostings, different tricks for getting that perfect black color without it tasting like a chemistry set. Here’s what makes this version the one you’ll come back to year after year.
- Rich, Not Gimmicky Flavor: The black cocoa powder is the secret. It gives these cupcakes a deep, almost nostalgic chocolate flavor — think the dark cookie part of an Oreo, but softer and more tender. No bitter aftertaste, no weird artificial notes.
- That Perfect Black Color: Forget wasting half a bottle of liquid food coloring. This recipe uses a smart combination of black cocoa and a small amount of gel food coloring to get that dramatic, true black velvet look without ruining the texture.
- Silky, Sturdy Orange Frosting: This isn’t a runny, overly sweet buttercream. It’s a cream cheese-based orange frosting that pipes beautifully, holds its shape, and has a bright, citrusy pop that balances the rich cake perfectly.
- Simple Ingredients, No Fuss: You probably have most of these in your pantry right now. No weird extracts, no specialty flours. Just good, honest ingredients that work together.
- Perfect for Halloween (and Beyond!): Obviously, these are a showstopper for any October gathering. But honestly? I’ve made them for a “black and orange” themed birthday party and even a gothic-themed baby shower (yes, that’s a thing, and it was amazing).
I’ve made the mistake of using too much black cocoa before — trust me, it can get bitter fast. This recipe has the perfect balance. It’s the kind of cupcake where people take one bite, get that surprised look on their face, and say, “Wait, this is actually really good.” Not just “good for a Halloween cupcake.” Just… really good.
What Ingredients You Will Need
This recipe uses simple, wholesome ingredients to deliver that dramatic black velvet look and rich flavor without any fuss. Most of these are pantry staples, and I’ve included notes on where you can make smart swaps.
For the Black Velvet Cupcakes
- 1 ½ cups all-purpose flour (spooned and leveled — don’t scoop directly from the bag or you’ll get too much)
- ½ cup black cocoa powder (I prefer The Cocoa Trader or King Arthur Flour brands for the deepest color and richest flavor)
- 1 teaspoon baking soda
- ½ teaspoon salt
- 1 cup granulated sugar
- ½ cup vegetable oil (or any neutral oil like canola or avocado)
- 2 large eggs, room temperature
- 1 teaspoon vanilla extract
- 1 cup buttermilk, room temperature (adds incredible tenderness — don’t skip it!)
- 1 tablespoon white vinegar (reacts with the baking soda for lift)
- 1-2 teaspoons black gel food coloring (I use Americolor Super Black — start with 1 teaspoon, add more if needed)
For the Orange Cream Cheese Frosting
- 8 ounces cream cheese, softened (full-fat is best for stability and flavor)
- ½ cup unsalted butter, softened
- 3-4 cups powdered sugar, sifted
- 2 tablespoons heavy cream (or milk, but cream gives it a luxurious texture)
- 1 teaspoon vanilla extract
- 1-2 teaspoons orange extract (start with 1, taste, then add more for a punchier flavor)
- Orange gel food coloring (a tiny drop — you want a vibrant Halloween orange, not neon)
- Optional: Orange zest for a more natural citrus kick
I’ve learned the hard way that liquid food coloring is a nightmare for frosting — it thins it out and makes it runny. Gel coloring is your best friend here. A little goes a long way, and it won’t mess with your consistency. Also, if you’re out of buttermilk, you can make a quick substitute by adding 1 tablespoon of lemon juice or vinegar to a cup of milk and letting it sit for 5 minutes. Works like a charm.
Equipment Needed
- 12-cup muffin tin (standard size)
- Paper cupcake liners (black or orange ones look amazing, but any color works)
- Two mixing bowls (one medium, one large)
- Whisk and spatula
- Electric hand mixer or stand mixer (for the frosting — you can do it by hand, but your arm will thank you for the mixer)
- Cooling rack
- Piping bag with a large star tip (like Wilton 1M) or a sturdy zip-top bag with the corner snipped off
- Measuring cups and spoons
If you don’t have a piping bag, honestly? A zip-top bag works perfectly. Just snip about half an inch off the corner, and you’re good to go. I’ve used that trick more times than I can count when I’ve misplaced my piping bags mid-baking spree.
Preparation Method
Let’s get to the fun part. Here’s how to make these show-stopping cupcakes. I’ve broken it down into clear steps, with all the little notes I wish someone had told me the first time.
Step 1: Prep Your Oven and Pan
Preheat your oven to 350°F (175°C). Line your muffin tin with 12 cupcake liners. This might seem obvious, but I’ve forgotten to line the pan before and had to scrape batter out of a hot tin — not fun. Do it now.
Step 2: Mix the Dry Ingredients
In a medium bowl, whisk together the flour, black cocoa powder, baking soda, and salt. Make sure there are no lumps — black cocoa can be clumpy, so really get in there with your whisk. Set this aside.
Step 3: Mix the Wet Ingredients
In a large bowl, whisk together the sugar and vegetable oil until well combined. It should look like a thick paste. Add the eggs one at a time, whisking well after each. Stir in the vanilla extract. Now, add the buttermilk and vinegar, and whisk until smooth. The batter will look a little thin at this point — that’s normal.
Step 4: Combine and Color
Gradually add the dry ingredients to the wet ingredients, stirring gently with a spatula or whisk until just combined. Do not overmix! A few small lumps are fine. Now, add your black gel food coloring. Start with 1 teaspoon and stir it in. The batter will look like a dark gray. If you want it truly black (and let’s be honest, for Halloween, you do), add another ½ to 1 teaspoon. I usually end up using about 1 ½ teaspoons for a deep, dramatic black.
Step 5: Fill and Bake
Divide the batter evenly among the 12 cupcake liners, filling each about ⅔ full. An ice cream scoop makes this super easy and mess-free. Bake for 18-22 minutes, or until a toothpick inserted into the center of a cupcake comes out clean or with just a few moist crumbs. The tops should spring back when lightly touched. Let them cool in the pan for 5 minutes, then transfer to a cooling rack to cool completely. Do not frost warm cupcakes! The frosting will melt into a sad puddle.
Step 6: Make the Orange Frosting
While the cupcakes cool, make the frosting. In a large bowl using an electric mixer, beat the softened cream cheese and butter together until smooth and creamy — about 2 minutes. Scrape down the sides. Add the vanilla extract and orange extract, and beat until combined. Gradually add the powdered sugar, 1 cup at a time, beating on low speed until incorporated. Add the heavy cream and beat on medium-high speed for about 2 minutes until the frosting is light and fluffy. Add a tiny drop of orange gel food coloring and beat until you get that perfect Halloween orange. Taste it — if you want more orange flavor, add another ½ teaspoon of extract.
Step 7: Pipe and Decorate
Once the cupcakes are completely cool, pipe the frosting onto each one using a large star tip. Start from the outside and work your way in, creating a nice swirl. If you want to get extra festive, top each with a candy spider ring, a sprinkling of black sanding sugar, or a small candy pumpkin. The contrast of the black cake and bright orange frosting is just stunning.
Cooking Tips & Techniques
I’ve messed up this recipe in just about every way possible so you don’t have to. Here are the lessons I learned the hard way.
Don’t overmix the batter. I know, I know, everyone says this. But with black cocoa, it’s especially important. Overmixing can make the cupcakes tough and dense instead of tender and light. Mix until the flour just disappears — a few streaks are fine.
Room temperature ingredients matter. Cold eggs and cold buttermilk won’t emulsify properly with the oil and sugar. You’ll end up with a lumpy batter and a less tender crumb. Take them out of the fridge about 30 minutes before you start baking. Forgot? Put the eggs in a bowl of warm water for 5 minutes, and microwave the buttermilk for 10 seconds.
Watch the baking time closely. My oven runs a little hot, so I start checking at 16 minutes. Cupcakes are done when a toothpick comes out clean, but don’t overbake them — they’ll dry out. You want them moist and tender, not crumbly.
Chill the frosting if it gets too soft. If your kitchen is warm, the cream cheese frosting can get a little loose. Just pop the bowl in the fridge for 10-15 minutes, then beat it again for a minute. It’ll firm right up and pipe beautifully.
Use a light hand with the food coloring. Black gel coloring is potent. Start with less than you think you need, stir it in, and then assess. You can always add more, but you can’t take it out. And be careful — it stains countertops and clothes instantly. Ask me how I know.
Variations & Adaptations
One of the best things about this recipe is how easy it is to make it your own. Here are a few ways I’ve adapted it over the years.
Gluten-Free Version: Substitute the all-purpose flour with a 1:1 gluten-free baking flour blend (I like Bob’s Red Mill). The texture will be slightly more delicate, but they’re still delicious. Add an extra tablespoon of buttermilk to help with moisture.
Dairy-Free Version: Use a dairy-free cream cheese (like Kite Hill or Violife) and substitute the butter with a high-quality vegan butter stick. Use almond milk or oat milk with a teaspoon of vinegar for the buttermilk. The frosting won’t be quite as stiff, so chill it well before piping.
Spooky Spiderweb Design: Instead of a solid orange swirl, pipe a white cream cheese frosting base, then pipe small concentric circles of orange frosting on top. Use a toothpick to drag lines from the center outward to create a web effect. It’s easier than it sounds and looks incredible.
Chocolate Orange Twist: Add ½ cup of mini chocolate chips to the batter before baking. The little bursts of chocolate pair beautifully with the orange frosting. It’s like a fancy chocolate orange candy in cupcake form.
Less Sweet Option: If you prefer a less sweet cupcake, reduce the sugar in the cake batter to ¾ cup. The frosting will still be sweet, but the cake itself will be more balanced. I’ve done this for friends who don’t have a huge sweet tooth, and it works great.
Serving & Storage Suggestions
These cupcakes are best served at room temperature. The cake is tender and moist, and the frosting is creamy and soft — straight from the fridge, the frosting will be a bit too firm. If you’ve refrigerated them, let them sit out for about 20 minutes before serving.
For a Halloween party, arrange them on a black or orange platter. They look amazing on a cake stand with some fake spiderwebs draped around the base. I once served them alongside some perfect game day football sugar cookies with royal icing for a spooky sports-themed party, and the spread was a hit.
Storage: Store any leftover cupcakes in an airtight container in the refrigerator for up to 4 days. The cream cheese frosting needs to be kept cold. If you’re stacking them, place a sheet of wax paper between layers to prevent the frosting from smudging.
Freezing: You can freeze the unfrosted cupcakes for up to 3 months. Wrap each one tightly in plastic wrap, then place them in a freezer-safe bag. When you’re ready to serve, thaw them at room temperature (still wrapped to prevent condensation) and then frost them fresh. The frosting itself doesn’t freeze well — it can get grainy — so always make that fresh.
Reheating: If you want a warm cupcake (which I highly recommend), pop an unfrosted cupcake in the microwave for about 10 seconds. Then add the frosting. The contrast of the warm, fudgy cake and the cool, creamy frosting is next-level.
The flavors actually get better after a day in the fridge — the black cocoa deepens and the orange flavor melds into the cake. So if you can, make them a day ahead. Your future self will thank you.
Nutritional Information & Benefits
Let’s be real — these are a treat, not a health food. But knowing what’s in them can help you enjoy them mindfully. Here’s an approximate breakdown per cupcake (frosted):
- Calories: 380-420
- Fat: 22g
- Carbohydrates: 48g
- Protein: 5g
- Fiber: 2g
- Sugar: 35g
Health Benefits (sort of): Black cocoa powder is actually rich in antioxidants called flavonoids, which are good for heart health. The cream cheese provides a bit of calcium and protein. And hey, the orange extract has no artificial dyes — it’s a natural flavor. So while I wouldn’t call these a health food, they’re made with real ingredients, and that counts for something.
Dietary Considerations: As written, this recipe contains gluten, dairy, and eggs. See the variations section above for gluten-free and dairy-free adaptations. They are nut-free as written, making them a good option for school parties where nut allergies are a concern.
I’m a big believer in balance. Enjoying a well-made cupcake on a special occasion is part of a happy life. Just don’t eat three in one sitting — unless it’s Halloween, in which case, all bets are off.
Conclusion
These Perfect Black Velvet Halloween Cupcakes with Orange Frosting are everything I want in a holiday treat — dramatic, delicious, and surprisingly easy to pull off. They’re the kind of recipe that makes people stop and stare, then take a bite and smile. That’s the sweet spot, right there.
I love that they’re not just a one-trick pony. The black cocoa gives them a depth of flavor that makes them worth baking even when it’s not October. And that orange frosting? It’s become my go-to for any citrus-forward dessert. I’ve even used it on a batch of chewy pumpkin snickerdoodle cookies for a fall party, and it was incredible.
I’d love to hear how yours turn out. Did you add a spooky decoration? Did you try a different flavor combo? Drop a comment below and let me know. And if you share them on social media, tag me — I want to see your gorgeous black and orange creations. Happy Halloween, and happy baking!
Frequently Asked Questions
Can I use regular cocoa powder instead of black cocoa?
You can, but the color won’t be as dramatic. Regular cocoa will give you a dark brown cupcake, not black. To get a true black color with regular cocoa, you’d need a lot of food coloring, which can affect the taste. Black cocoa is worth seeking out for this recipe.
How do I get my frosting to be a vibrant orange without using too much dye?
Use orange gel food coloring, not liquid. Start with a tiny drop on a toothpick and mix it in. You can always add more. The gel is concentrated, so a little goes a long way. Also, using a cream cheese base helps the color pop better than plain buttercream.
Can I make these cupcakes ahead of time for a party?
Absolutely! Bake the cupcakes up to 2 days in advance and store them unfrosted in an airtight container at room temperature. Make the frosting the day you plan to serve them. Frost them a few hours before the party and store them in the fridge. Let them sit at room temperature for 20 minutes before serving.
What if I don’t have buttermilk?
No problem! Make a quick buttermilk substitute by adding 1 tablespoon of white vinegar or lemon juice to a 1-cup measuring cup. Fill the rest with milk (any kind works). Let it sit for 5 minutes, and you’ve got homemade buttermilk. It works perfectly in this recipe.
Can I turn these into a cake instead of cupcakes?
Yes! Pour the batter into two greased and floured 8-inch round cake pans. Bake at 350°F for 25-30 minutes, or until a toothpick comes out clean. Let them cool completely before frosting. You’ll need to double the frosting recipe to cover a two-layer cake. It makes for an incredible Halloween birthday cake.
PrintPerfect Black Velvet Halloween Cupcakes with Orange Frosting
These dramatic black velvet cupcakes are rich, tender, and topped with a creamy orange cream cheese frosting. Perfect for Halloween parties or any spooky celebration, they deliver deep Oreo-like chocolate flavor without artificial gimmicks.
- Prep Time: 20 minutes
- Cook Time: 20 minutes
- Total Time: 40 minutes
- Yield: 12 cupcakes 1x
- Category: Dessert
- Cuisine: American
Ingredients
- 1 ½ cups all-purpose flour (spooned and leveled)
- ½ cup black cocoa powder
- 1 teaspoon baking soda
- ½ teaspoon salt
- 1 cup granulated sugar
- ½ cup vegetable oil (or canola/avocado oil)
- 2 large eggs, room temperature
- 1 teaspoon vanilla extract
- 1 cup buttermilk, room temperature
- 1 tablespoon white vinegar
- 1–2 teaspoons black gel food coloring (e.g., Americolor Super Black)
- 8 ounces cream cheese, softened (full-fat)
- ½ cup unsalted butter, softened
- 3–4 cups powdered sugar, sifted
- 2 tablespoons heavy cream (or milk)
- 1 teaspoon vanilla extract
- 1–2 teaspoons orange extract
- Orange gel food coloring (tiny drop)
- Optional: Orange zest
Instructions
- Preheat oven to 350°F (175°C). Line a 12-cup muffin tin with paper liners.
- In a medium bowl, whisk together flour, black cocoa powder, baking soda, and salt until no lumps remain. Set aside.
- In a large bowl, whisk together sugar and vegetable oil until thick and well combined. Add eggs one at a time, whisking well after each. Stir in vanilla extract. Add buttermilk and vinegar, whisk until smooth (batter will be thin).
- Gradually add dry ingredients to wet ingredients, stirring gently with a spatula until just combined (do not overmix; a few lumps are fine). Add black gel food coloring starting with 1 teaspoon, stir, then add more (up to 1½ teaspoons total) for deep black color.
- Divide batter evenly among 12 liners, filling each about ⅔ full. Bake for 18-22 minutes until a toothpick inserted in center comes out clean or with a few moist crumbs. Cool in pan 5 minutes, then transfer to a wire rack to cool completely.
- For frosting: In a large bowl, beat softened cream cheese and butter with an electric mixer until smooth and creamy (about 2 minutes). Add vanilla and orange extracts, beat until combined. Gradually add powdered sugar, 1 cup at a time, beating on low. Add heavy cream, beat on medium-high 2 minutes until light and fluffy. Add a tiny drop of orange gel food coloring, beat until desired Halloween orange color. Taste and add more orange extract if desired.
- Once cupcakes are completely cool, pipe frosting onto each using a large star tip (Wilton 1M) starting from outside and working inward in a swirl. Decorate with candy spiders, black sanding sugar, or candy pumpkins if desired.
Notes
Do not overmix batter to avoid tough cupcakes. Room temperature ingredients ensure proper emulsification. Start checking cupcakes at 16 minutes to avoid overbaking. If frosting gets too soft, chill 10-15 minutes then rebeat. Black gel food coloring stains surfaces—use caution. For best flavor, make cupcakes a day ahead. Unfrosted cupcakes freeze up to 3 months; frosting should be made fresh.
Nutrition
- Serving Size: 1 cupcake
- Calories: 400
- Sugar: 35
- Sodium: 280
- Fat: 22
- Saturated Fat: 9
- Carbohydrates: 48
- Fiber: 2
- Protein: 5
Keywords: Halloween cupcakes, black velvet cupcakes, orange frosting, cream cheese frosting, spooky desserts, black cocoa cupcakes, Halloween baking


