Love this? Save it for later!
Share the inspiration with your friends
Third time this week I’d made this easy cheesy ground beef and rice skillet, and this time I actually remembered to add the smoked paprika before the rice went in. The first two times, the paprika sat on the counter like a forgotten promise. The first version was good—fine, even—but the cheese wasn’t quite right. Too much cheddar, not enough melt. The second version fixed the cheese but the rice was slightly underdone because I got distracted by a three-year-old asking if the cheese was sleeping. By the third attempt, everything clicked. The rice was tender, the beef was perfectly browned, and that cheese pull when I lifted the spoon? That’s the kind of thing you don’t forget. I stood there at the stove, eating straight from the skillet, wondering why it took me three tries to get something so simple right. But honestly, that’s how cooking works sometimes. You don’t nail a recipe until you’ve messed it up enough to know exactly what it needs. This one finally felt like it belonged in the rotation. And it does.
Why You’ll Love This Recipe
This isn’t just another ground beef and rice recipe. It’s the one I kept coming back to because it works every single time—once you get the details right, anyway. Here’s what makes it stand out:
- Quick & Easy: From start to finish, this comes together in about 30 minutes. No fancy techniques, no waiting around. Just chop, brown, simmer, and eat.
- Simple Ingredients: You probably already have most of this in your pantry and fridge. No trips to specialty stores, no hunting for obscure spices.
- Perfect for Busy Weeknights: This is the kind of dinner you make when you’re tired, hungry, and need something that satisfies without a lot of effort. It’s also great for meal prep—the leftovers reheat beautifully.
- Crowd-Pleaser: My kids devour this. My husband asks for seconds. Even my picky neighbor who “doesn’t really like casseroles” asked for the recipe after I brought her a bowl.
- Unbelievably Cheesy: The cheese isn’t just sprinkled on top. It’s stirred into the rice while it’s still hot, creating this creamy, gooey texture that coats every grain. It’s comfort food at its finest.
What makes this recipe different from the dozens of other skillet dinners out there is the technique. Most recipes have you cook the rice separately or add it uncooked and hope for the best. This one uses a specific ratio of broth to rice and simmers everything together in one pan, so the rice absorbs all that savory beef flavor while it cooks. The result is a cohesive, deeply flavorful dish where every component complements the others. It’s not just a pile of ingredients thrown together. It’s a proper one-pan meal that tastes like you spent more time on it than you actually did.
And honestly? There’s something about that first bite—warm, cheesy, a little smoky from the paprika—that just makes you feel better. Like the day wasn’t so bad after all. That’s the kind of dinner this is.
What Ingredients You Will Need
This recipe uses simple, everyday ingredients, but each one plays a role in building flavor and texture. Here’s what you’ll need:
- 1 pound ground beef (80/20 works best—enough fat for flavor, but not greasy)
- 1 tablespoon olive oil (for sautéing; use a neutral oil if you prefer)
- 1 medium yellow onion, diced (about 1 cup; adds sweetness and depth)
- 3 cloves garlic, minced (fresh is best, but jarred works in a pinch)
- 1 cup long-grain white rice (uncooked; basmati or jasmine also work well)
- 2 cups beef broth (low-sodium preferred so you can control the salt)
- 1 can (14.5 oz) diced tomatoes, undrained (fire-roasted adds a nice smoky note)
- 1 teaspoon smoked paprika (this is non-negotiable—it gives the dish its warmth)
- 1/2 teaspoon garlic powder (for extra savory depth)
- 1/2 teaspoon onion powder (rounds out the flavor)
- 1/2 teaspoon dried oregano (adds a subtle herbaceous note)
- Salt and black pepper to taste
- 2 cups shredded cheddar cheese (sharp cheddar melts beautifully; you can also use a Mexican blend)
- 2 tablespoons chopped fresh parsley (optional, for garnish)
Ingredient Tips: I prefer using 80/20 ground beef because it has enough fat to keep the dish moist without being greasy. If you use leaner beef (like 93/7), add an extra tablespoon of olive oil to compensate. For the rice, long-grain white rice gives the best texture—it stays separate and fluffy rather than turning mushy. Avoid using minute rice or instant rice, as they’ll overcook and turn to mush. I recommend using a good quality beef broth like Pacific Foods or Swanson—the flavor really matters here since the rice absorbs it all. If you’re out of beef broth, chicken broth works in a pinch, but the flavor will be slightly lighter.
For the cheese, shred it yourself from a block if you can. Pre-shredded cheese has anti-caking agents that prevent it from melting smoothly. It still works, but the texture won’t be as creamy. Trust me on this one.
Equipment Needed
You don’t need much for this recipe, which is part of its charm. Here’s what you’ll need:
- Large skillet or Dutch oven (12-inch with a lid is ideal; a deep sauté pan also works)
- Wooden spoon or spatula (for browning the beef and stirring)
- Cutting board and knife (for dicing the onion and mincing garlic)
- Measuring cups and spoons
- Can opener
- Cheese grater (if shredding your own cheese)
If you don’t have a lid that fits your skillet, you can use a sheet of aluminum foil tightly crimped around the edges. It’s not pretty, but it works. A cast iron skillet is my go-to for this recipe because it holds heat evenly and gives the beef a nice crust. But any heavy-bottomed pan will do the job. If you’re using a non-stick skillet, just be careful not to scratch it with metal utensils.
Preparation Method
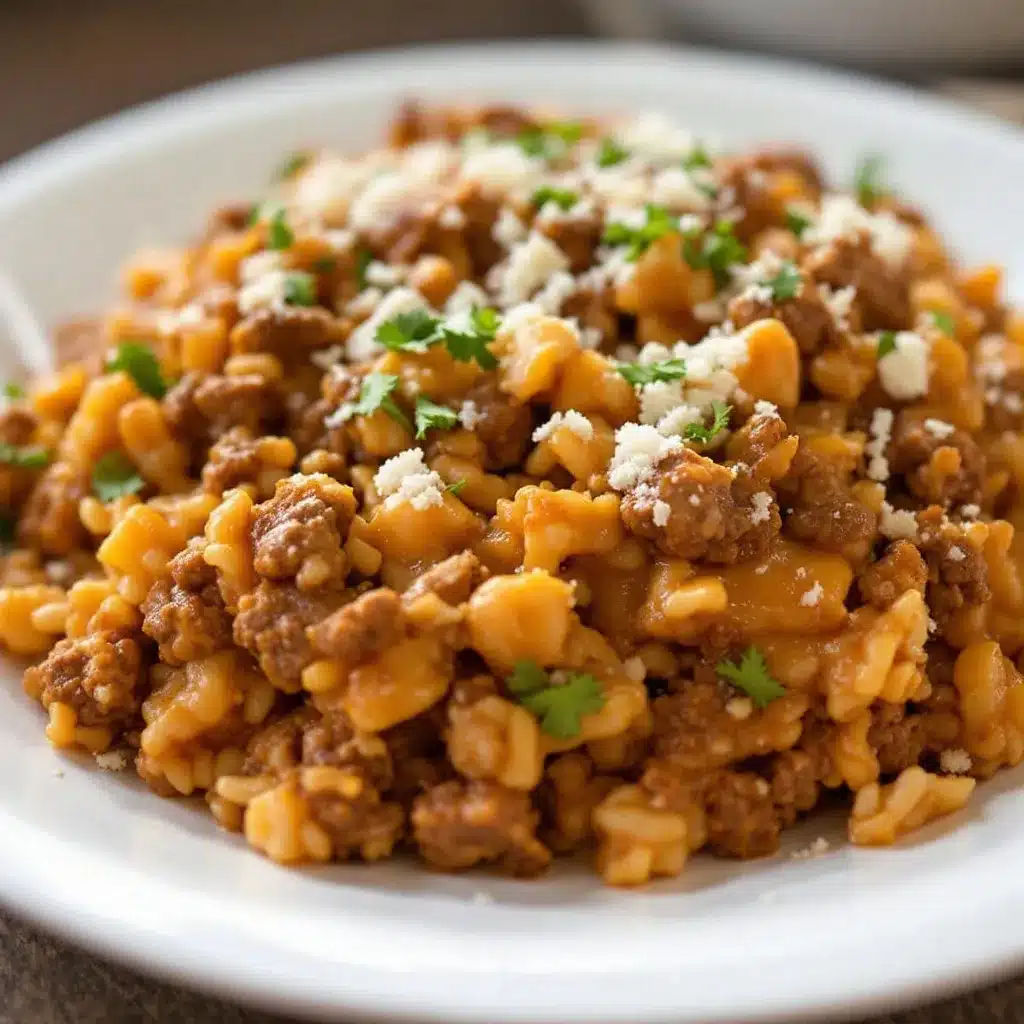
This comes together in one pan, so the order of operations matters. Follow these steps, and you’ll have dinner on the table in about 30 minutes.
- Brown the beef: Heat 1 tablespoon olive oil in your large skillet over medium-high heat. Add the ground beef and cook, breaking it up with a wooden spoon, until browned and no longer pink—about 5-7 minutes. Don’t drain all the fat; leave about a tablespoon in the pan for flavor. If you’re using lean beef, you might need to add a little extra oil here.
- Sauté the aromatics: Add the diced onion to the skillet and cook for 3-4 minutes, stirring occasionally, until softened and translucent. Add the minced garlic and cook for 30 seconds more, until fragrant. (Tip: If the garlic starts to brown too quickly, reduce the heat slightly—burnt garlic is bitter.)
- Toast the rice: Add the uncooked rice to the skillet and stir to coat it in the fat and juices. Cook for 1-2 minutes, stirring constantly, until the rice starts to look slightly translucent at the edges. This step helps the rice stay separate and gives it a nuttier flavor.
- Add the liquids and seasonings: Pour in the beef broth and undrained diced tomatoes. Add the smoked paprika, garlic powder, onion powder, dried oregano, and a generous pinch of salt and black pepper. Stir everything together, scraping up any browned bits from the bottom of the pan. (Those bits are flavor gold.)
- Bring to a simmer: Increase the heat to high and bring the mixture to a boil. Once it’s boiling, reduce the heat to low, cover the skillet with a tight-fitting lid, and let it simmer gently for 15-18 minutes. Resist the urge to lift the lid and peek—every time you do, you let out steam, and the rice needs that steam to cook properly.
- Check the rice: After 15 minutes, remove the lid and check the rice. It should be tender and have absorbed most of the liquid. If it’s still a bit crunchy, replace the lid and cook for another 2-3 minutes. If it’s done but there’s still a little liquid left, let it sit uncovered for a minute or two to absorb.
- Add the cheese: Remove the skillet from the heat. Sprinkle the shredded cheddar cheese evenly over the top of the rice and beef mixture. Don’t stir it in yet—just let it sit on top. Cover the skillet again and let it sit for 2-3 minutes, until the cheese is completely melted and gooey.
- Stir and serve: Once the cheese is melted, stir everything together until the cheese is evenly distributed. The rice will become creamy and luscious. Taste and adjust seasoning if needed. Garnish with fresh parsley if you’re feeling fancy, and serve immediately.
Sensory cues to watch for: When you first add the rice to the pan, you should hear a gentle sizzle. When you stir it, the grains should look slightly glossy. During simmering, you should hear a soft bubbling sound—if it’s too loud, the heat is too high. When you lift the lid after cooking, the steam should smell savory and slightly smoky. The cheese should be fully melted and stretchy when you stir it in, not clumpy or separated.
Cooking Tips & Techniques
I’ve made this recipe enough times to know where things can go wrong. Here are the lessons I learned the hard way so you don’t have to:
Don’t skip toasting the rice. I know it seems like an extra step, but toasting the rice in the fat before adding liquid changes the texture completely. It keeps the grains separate and gives them a slight nuttiness that you can’t get any other way. I skipped it once because I was in a hurry, and the rice turned out sticky and bland. Never again.
Use the right rice-to-liquid ratio. This recipe uses 1 cup of rice to 2 cups of broth plus the liquid from the canned tomatoes. That’s the sweet spot for fluffy, tender rice. If you add too much liquid, you’ll end up with mushy rice. Too little, and it’ll be crunchy. Trust the measurements.
Keep the lid on. I cannot stress this enough. Every time you lift the lid to “check” on the rice, you release steam, and that steam is what’s cooking the rice. If you peek, you’ll likely need to add more liquid, which throws off the whole dish. Set a timer and walk away.
Shred your own cheese. I mentioned this earlier, but it bears repeating. Pre-shredded cheese is coated in potato starch or cellulose to prevent clumping, and that coating prevents it from melting smoothly. When you stir it into hot rice, you want it to disappear into the dish, not sit there in little clumps. A block of sharp cheddar takes two minutes to shred, and the difference is night and day.
Don’t overcook the beef. Brown it until it’s just cooked through, then move on. If you keep cooking it while you sauté the onions, it’ll dry out. The beef will continue to cook as the rice simmers, so it stays tender.
Multitasking tip: While the rice is simmering, use that time to clean up your cutting board and knife, or prep a simple side salad. The 15-18 minutes of hands-off cooking time is perfect for getting ahead on cleanup.
Variations & Adaptations
This recipe is incredibly flexible. Here are some ways to make it your own:
- Make it spicy: Add 1/2 teaspoon of red pepper flakes along with the smoked paprika, or stir in a diced jalapeño with the onions. For even more heat, use pepper jack cheese instead of cheddar.
- Vegetarian version: Swap the ground beef for 1 pound of plant-based ground meat or 2 cups of cooked black beans. Use vegetable broth instead of beef broth. The texture will be slightly different, but it’s still delicious.
- Add vegetables: Stir in 1 cup of frozen peas and carrots during the last 5 minutes of simmering, or add a handful of fresh spinach right before the cheese. The spinach will wilt into the rice beautifully.
- Change the cheese: Try using a mix of mozzarella and cheddar for extra stretchiness, or go full Mexican blend for a different flavor profile. Smoked gouda would be amazing here too.
- Make it gluten-free: This recipe is naturally gluten-free as long as you use certified gluten-free beef broth. Double-check your broth label to be safe.
- Try different grains: If you want to switch things up, use 1 cup of quinoa or farro instead of rice. Adjust the cooking time accordingly—quinoa takes about 15 minutes, farro takes 25-30.
My personal favorite variation is adding a can of drained black beans and a spoonful of salsa along with the broth. It turns this into a quasi-Mexican skillet that’s even more filling. I made it that way for a game day gathering last fall, and it disappeared faster than the chips and dip. Speaking of game day, if you’re looking for another crowd-pleaser, this creamy cheeseburger potato soup is always a hit at our house too.
Serving & Storage Suggestions
This skillet is best served hot, straight from the pan. The cheese is at its stretchiest and the rice is at its fluffiest right after cooking. Serve it in bowls with a side of steamed broccoli or a simple green salad dressed with lemon and olive oil. The acidity of the salad cuts through the richness of the cheese beautifully.
For a heartier meal, serve it alongside warm tortillas or crusty bread to soak up any extra cheesy goodness. If you’re making this for a crowd, it also works well as a filling for stuffed bell peppers—just spoon the mixture into halved bell peppers and bake at 375°F for 20 minutes.
Storage: Leftovers keep well in an airtight container in the refrigerator for up to 4 days. The rice will absorb more liquid as it sits, so the texture will be slightly denser the next day—but it’s still delicious.
Reheating: The best way to reheat this is in a skillet over medium-low heat with a splash of beef broth or water to loosen it up. Stir occasionally until heated through, about 5-7 minutes. You can also microwave it in 30-second bursts, stirring between each, but the texture won’t be as good. If you’re meal prepping, portion it into individual containers and reheat as needed.
Freezing: This recipe freezes surprisingly well. Let it cool completely, then transfer to a freezer-safe container or zip-top bag. It will keep for up to 3 months. Thaw overnight in the refrigerator and reheat in a skillet as directed above. The cheese might lose a little of its creaminess, but the flavor will still be there.
The flavors actually deepen overnight, so leftovers taste even better the next day. I’ve been known to make a double batch just so I have lunch for the rest of the week.
Nutritional Information & Benefits
Here’s an approximate nutritional breakdown per serving (based on 6 servings):
- Calories: 485
- Protein: 28g
- Fat: 22g
- Carbohydrates: 38g
- Fiber: 2g
- Sugar: 4g
- Sodium: 680mg
This dish is a good source of protein from the ground beef and cheese, which helps keep you full and satisfied. The rice provides quick energy, making it a great option for active families or post-workout meals. The tomatoes add a dose of vitamin C and lycopene, an antioxidant linked to heart health. If you use lean ground beef, you can reduce the fat content significantly. For a lower-carb option, swap the rice for cauliflower rice—just reduce the cooking time to 5-7 minutes after adding the “rice.”
Potential allergens include dairy (cheese) and gluten (check your broth). This recipe is nut-free and egg-free.
I’ll be honest—this isn’t a health food. It’s comfort food, pure and simple. But it’s made with real ingredients, and when you pair it with a vegetable side, it’s a balanced meal that doesn’t feel like a sacrifice. That’s the kind of dinner I can get behind.
Conclusion
This easy cheesy ground beef and rice skillet is the kind of recipe that earns a permanent spot in your weekly rotation. It’s fast, it’s satisfying, and it uses ingredients you probably already have on hand. The cheese pulls, the smoky paprika, the tender rice—it all comes together in one pan in about 30 minutes. What’s not to love?
I’ve made this for busy weeknights, lazy Sundays, and everything in between. It’s never let me down. And the best part? You can tweak it to your heart’s content. Add more spice, throw in some veggies, swap the cheese—it’s forgiving and flexible. If you’re looking for another one-pan wonder that’s just as easy, try this cheesy chicken and rice casserole—it’s become a staple in our home too.
I’d love to hear how yours turns out. Did you add something unexpected? Did your kids ask for seconds? Drop a comment below and let me know. And if you’re feeling generous, share this recipe with a friend who needs a quick dinner win. Happy cooking!
Frequently Asked Questions
Can I use brown rice instead of white rice?
You can, but you’ll need to adjust the cooking time and liquid. Brown rice takes about 40-45 minutes to cook and needs more liquid—about 2 1/2 cups of broth instead of 2. You’ll also need to simmer it covered for about 35 minutes before checking. The texture will be chewier and nuttier, which some people prefer.
Can I make this in a slow cooker?
Yes, but the texture will be different. Brown the beef and sauté the onions in a skillet first, then transfer everything except the rice and cheese to a slow cooker. Cook on low for 4-6 hours. About 30 minutes before serving, stir in the rice and increase the heat to high. Once the rice is tender, stir in the cheese. The rice won’t be as fluffy as the stovetop version, but it’s still delicious.
How can I prevent the rice from getting mushy?
Don’t stir the rice too much after you add the liquid. Stirring releases starch, which can make the rice gummy. Also, make sure you’re using long-grain rice, which stays separate better than medium- or short-grain varieties. And whatever you do, don’t lift the lid while it’s simmering!
Can I use ground turkey instead of beef?
Absolutely. Ground turkey works well here, though it’s leaner, so you’ll want to add an extra tablespoon of olive oil to compensate. The flavor will be slightly milder, so you might want to bump up the smoked paprika and garlic powder. If you’re looking for another ground turkey recipe, this cheesy ground beef quesadillas are a fun twist on a classic.
What can I serve with this to make it a complete meal?
A simple green salad with a tangy vinaigrette is perfect—the acidity cuts through the richness of the cheese. Steamed broccoli or roasted green beans also work well. If you want something heartier, serve it with warm cornbread or crusty bread. For a lighter option, try it with a side of roasted vegetables like zucchini or bell peppers.
Pin This Recipe!

Easy Cheesy Ground Beef and Rice Skillet: Best 30-Minute Dinner

This easy cheesy ground beef and rice skillet is a quick, one-pan dinner that comes together in about 30 minutes. With tender rice, savory beef, and gooey melted cheddar, it’s the perfect comfort food for busy weeknights.
- Prep Time: 10 minutes
- Cook Time: 20 minutes
- Total Time: 30 minutes
- Yield: 6 servings 1x
- Category: Main Course
- Cuisine: American
Ingredients
- 1 pound ground beef (80/20 works best)
- 1 tablespoon olive oil
- 1 medium yellow onion, diced (about 1 cup)
- 3 cloves garlic, minced
- 1 cup long-grain white rice, uncooked
- 2 cups beef broth, low-sodium preferred
- 1 can (14.5 oz) diced tomatoes, undrained (fire-roasted recommended)
- 1 teaspoon smoked paprika
- 1/2 teaspoon garlic powder
- 1/2 teaspoon onion powder
- 1/2 teaspoon dried oregano
- Salt and black pepper to taste
- 2 cups shredded cheddar cheese (sharp cheddar recommended)
- 2 tablespoons chopped fresh parsley (optional, for garnish)
Instructions
- Heat 1 tablespoon olive oil in a large skillet over medium-high heat. Add the ground beef and cook, breaking it up with a wooden spoon, until browned and no longer pink, about 5-7 minutes. Leave about a tablespoon of fat in the pan.
- Add the diced onion to the skillet and cook for 3-4 minutes, stirring occasionally, until softened and translucent. Add the minced garlic and cook for 30 seconds more until fragrant.
- Add the uncooked rice to the skillet and stir to coat in the fat and juices. Cook for 1-2 minutes, stirring constantly, until the rice starts to look slightly translucent at the edges.
- Pour in the beef broth and undrained diced tomatoes. Add the smoked paprika, garlic powder, onion powder, dried oregano, and a generous pinch of salt and black pepper. Stir everything together, scraping up any browned bits from the bottom of the pan.
- Increase the heat to high and bring the mixture to a boil. Once boiling, reduce the heat to low, cover the skillet with a tight-fitting lid, and let it simmer gently for 15-18 minutes. Do not lift the lid during this time.
- After 15 minutes, remove the lid and check the rice. It should be tender and have absorbed most of the liquid. If still crunchy, replace the lid and cook for another 2-3 minutes. If done but with excess liquid, let it sit uncovered for a minute or two.
- Remove the skillet from the heat. Sprinkle the shredded cheddar cheese evenly over the top of the rice and beef mixture. Cover the skillet again and let it sit for 2-3 minutes until the cheese is completely melted and gooey.
- Stir everything together until the cheese is evenly distributed. Taste and adjust seasoning if needed. Garnish with fresh parsley if desired, and serve immediately.
Notes
For best results, shred your own cheese from a block to avoid anti-caking agents that prevent smooth melting. Do not lift the lid while the rice is simmering to ensure proper cooking. If using lean ground beef (93/7), add an extra tablespoon of olive oil. Leftovers keep in the refrigerator for up to 4 days and reheat well in a skillet with a splash of broth.
Nutrition
- Serving Size: 1 serving (about 1.5
- Calories: 485
- Sugar: 4
- Sodium: 680
- Fat: 22
- Saturated Fat: 10
- Carbohydrates: 38
- Fiber: 2
- Protein: 28
Keywords: ground beef, rice, cheese, skillet dinner, 30-minute meal, one-pan dinner, weeknight dinner, comfort food


