Love this? Save it for later!
Share the inspiration with your friends
The way the chocolate pudding just barely quivers when you set the cup down—that’s the thing I couldn’t stop looking at. It’s not jello, not quite mousse, but something in between that holds the perfect wobble before it settles. I made these for a Halloween party a few years back, mostly because I wanted to see if grown adults would actually get excited about eating crushed cookies and gummy worms out of a plastic cup. They did. Honestly, they went nuts for them.
There’s this moment when you hand someone a dirt cup and they look at it, then look at you, and you can see the exact second their inner child takes over. The gummy worms peeking out of the “dirt” do all the work. I don’t even have to explain anything. It’s the kind of dessert that makes people laugh before they even take a bite. And that first bite—cold, creamy, with that little crunch from the crushed cookies—it’s pure comfort.
These Easy Halloween Dirt Cups with Gummy Worms are no-bake, which means no turning on the oven, no complicated steps, and absolutely no stress. You can make them in under fifteen minutes of active time, and then the fridge does the rest. I’ve brought them to school parties, Halloween potlucks, and even just made them on a random Tuesday in October because the kids were bouncing off the walls. Every single time, they disappear. I think that’s the real magic of this recipe—it’s not fancy, but it works every single time.
Why You’ll Love This Recipe
I’ve tested quite a few versions of dirt cups over the years. Some used instant pudding that turned out too runny. Others called for cool whip that made the texture too airy. This version hits that sweet spot—creamy, rich, and stable enough that the gummy worms stay put without sliding all over the place. Here’s why I keep coming back to this one:
- No-Bake and Quick: You don’t need an oven, a mixer, or any special equipment. Just a whisk, a bowl, and about 10 minutes of hands-on time. The hardest part is waiting for them to chill.
- Simple Ingredients: Chocolate pudding mix, milk, cream cheese, whipped topping, Oreos, and gummy worms. That’s it. No weird stuff you have to hunt down at a specialty store.
- Perfect for Halloween Parties: These are the star of any Halloween spread—kids love them, adults sneak them, and they fit right in next to the football sugar cookies or a bowl of pumpkin chili for a full spooky spread.
- Totally Customizable: You can make them gluten-free, swap the pudding flavor, or add extra layers. I’ve even made a pumpkin spice version by swapping the chocolate pudding for vanilla and adding a little pumpkin puree.
- Make-Ahead Friendly: These actually taste better after sitting overnight. The flavors meld together, the cookies soften just slightly, and the whole thing becomes one cohesive, creamy bite.
What really sets these dirt cups apart is the cream cheese layer. Most recipes just use pudding and cool whip, but adding a little softened cream cheese gives it a subtle tang and a much richer mouthfeel. It’s not cheesecake, but it’s definitely not just pudding either. It’s that little upgrade that makes people ask “what did you put in this?” and then you get to feel smug about it.
What Ingredients You Will Need
This recipe keeps things simple, but each ingredient plays a specific role. I’ve tested swaps and substitutions, so I’ll share what works and what doesn’t based on my own kitchen experiments.
- 1 (3.9 oz) box instant chocolate pudding mix: Go with the instant kind, not cook-and-serve. Instant sets up quickly in the fridge and gives you that smooth, creamy texture. I’ve tried sugar-free versions, and they work fine, but the texture is slightly less silky. Jell-O brand is my go-to, but store brands work just as well.
- 2 cups cold whole milk: Whole milk gives the richest result. I’ve made these with 2% and it’s fine, but the pudding won’t be as thick. For a dairy-free version, oat milk works surprisingly well—just make sure it’s cold. Almond milk can be a little thin, so I don’t recommend it unless you’re okay with a softer set.
- 4 oz cream cheese, softened to room temperature: This is my secret weapon. It adds richness and a slight tang that balances the sweetness. Let it sit out for about 30 minutes before mixing, or microwave it for 10 seconds if you’re in a hurry. Full-fat cream cheese gives the best texture, but Neufchâtel (lower fat) works too.
- 1/4 cup powdered sugar: Just a little to sweeten the cream cheese without making it grainy. If you skip this, the cream cheese layer will be too tangy and throw off the balance.
- 1/2 teaspoon vanilla extract: Pure vanilla if you have it, imitation is fine too. It rounds out the flavors nicely.
- 1 (8 oz) container frozen whipped topping, thawed: Cool Whip or a store brand version works. If you want to go the homemade route, you can whip 1 cup of heavy cream with 2 tablespoons of powdered sugar until stiff peaks form. Just know that homemade whipped cream won’t hold up as long in the fridge—use it within 24 hours.
- 1 (14.3 oz) package Oreo cookies (about 36 cookies): You’ll crush these into fine crumbs for the “dirt.” Regular Oreos work best, but Double Stuf is fine too—just expect slightly sweeter dirt. For a gluten-free version, use gluten-free chocolate sandwich cookies. I’ve also used chocolate graham crackers in a pinch, and they work but don’t look quite as dark.
- 1 (4.5 oz) bag gummy worms: The classic choice. Get the sour ones if you want a little tang, or the regular ones for pure sweetness. I like to use a mix of colors and sizes for visual interest. If you’re making these for a party, buy an extra bag because someone will definitely eat them before you assemble the cups.
- Optional: Small Halloween-themed decorations: Little plastic spiders, skeleton bones, or candy eyeballs. Totally unnecessary but adds a fun touch if you’re serving these at a party.
Equipment Needed
You don’t need much for this recipe, which is part of the appeal. Here’s what I use:
- Two medium mixing bowls: One for the pudding, one for the cream cheese mixture. Glass or stainless steel works best because they chill faster.
- Whisk: For the pudding. A hand whisk is fine, but if you have a balloon whisk, it incorporates the milk faster.
- Hand mixer or stand mixer: For beating the cream cheese until smooth. You can do it by hand with a wooden spoon, but it takes elbow grease and you might end up with small lumps.
- Rubber spatula: For folding the whipped topping into the cream cheese mixture. A silicone spatula is ideal because it doesn’t scratch your bowls.
- Food processor or zip-top bag and rolling pin: For crushing the Oreos. A food processor gives you the finest, most uniform crumbs. If you don’t have one, put the cookies in a zip-top bag and go to town with a rolling pin. It’s a great stress reliever.
- 6-8 small cups or glasses: Clear plastic cups are classic because you can see the layers. I’ve used small mason jars, shot glasses (for mini versions), and even paper cups. Just make sure they’re clear so the dirt and worm layers are visible.
- Small spoon or piping bag: For layering. A spoon works fine, but a piping bag makes it neater and faster if you’re making a big batch.
Preparation Method
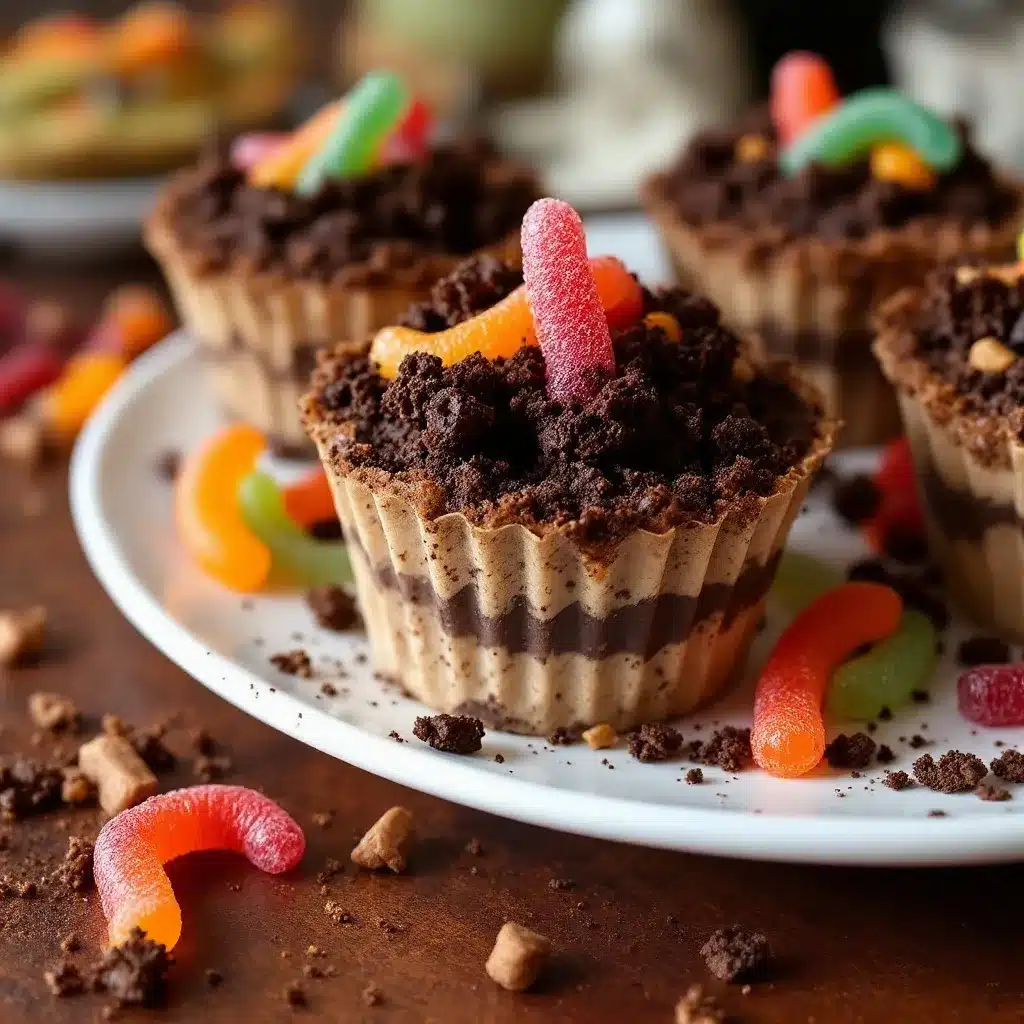
Let me walk you through this step by step. I’ve included all the little details I’ve learned from making these dozens of times.
- Crush the Oreos: Place the entire package of Oreos (filling and all) into a food processor. Pulse until you get fine, dark crumbs that look like potting soil. You want them fine enough that there are no large chunks, but not so fine that they turn into powder. If you’re using a bag and rolling pin, take your time and make sure you crush every cookie evenly. Set the crumbs aside in a bowl.
- Make the chocolate pudding: In a medium mixing bowl, whisk together the instant chocolate pudding mix and 2 cups of cold whole milk. Whisk for about 2 minutes until the pudding starts to thicken. It will still be a little loose at this point—that’s normal. It sets up in the fridge. Set it aside. If you see small lumps, keep whisking; they usually disappear.
- Beat the cream cheese: In a separate bowl, beat the softened cream cheese with an electric hand mixer until it’s completely smooth and fluffy—about 1-2 minutes. Scrape down the sides of the bowl with a rubber spatula. Add the powdered sugar and vanilla extract, then beat again until everything is combined and silky. No lumps allowed here.
- Fold in the whipped topping: Add the entire container of thawed whipped topping to the cream cheese mixture. Use a rubber spatula to gently fold it in—don’t stir aggressively or you’ll deflate the whipped topping. Fold until you can’t see any white streaks and the mixture is uniform. It should be light, creamy, and spreadable.
- Combine the pudding and cream cheese mixture: Pour the chocolate pudding into the cream cheese mixture. Fold gently until everything is fully combined. The color should be an even, rich chocolate brown. Taste it here if you want—it’s already delicious, but resist the urge to eat it all before assembling the cups.
- Assemble the cups: Take your clear cups or glasses. Start with a layer of the chocolate pudding mixture—about 2-3 tablespoons, depending on the size of your cups. Spread it evenly with the back of a spoon or a small offset spatula. Next, add a layer of crushed Oreos—about 1-2 tablespoons. Repeat the layers: pudding, then cookies, until you reach the top. I like to end with a layer of Oreo crumbs on top so it looks like real dirt.
- Add the gummy worms: This is the fun part. Take a few gummy worms and gently press them into the top layer of Oreo crumbs. Let some of them dangle over the edge of the cup so it looks like the worms are crawling out of the dirt. You can also bury a few halfway so it looks like they’re emerging. Don’t overthink it—just place them in a way that looks natural and playful.
- Chill: Place the assembled dirt cups in the refrigerator for at least 2 hours, but overnight is even better. The pudding needs time to fully set, and the cookies will soften just a bit, creating that perfect dirt-like texture. I know it’s hard to wait, but trust me—the texture is worth it.
- Serve cold: Take them out of the fridge right before serving. If you’re adding any extra decorations like plastic spiders or candy eyeballs, do that now. Serve them straight from the fridge—they’re best cold.
Cooking Tips & Techniques
I’ve made my share of mistakes with these dirt cups. Here’s what I’ve learned so you don’t have to repeat them:
Don’t overmix the pudding. I once whisked the pudding for almost five minutes because I got distracted, and it ended up too thick and almost gluey. Two minutes of steady whisking is all you need. Stop when it starts to thicken, even if it still looks a little loose.
Soften the cream cheese completely. Cold cream cheese will leave lumps in your mixture that you can’t get rid of. I learned this the hard way when I served lumpy dirt cups to my neighbor’s kids and they politely said “it’s good” while making faces. Set the cream cheese out 30 minutes before you start, or microwave it in 10-second bursts until it’s soft to the touch.
Use clear cups for the full effect. The layers are what make these dirt cups so visually fun. If you use opaque cups, you lose that wow factor. I’ve used small mason jars and even clear plastic shot glasses for mini versions—both work great.
Crush the Oreos finely but not to dust. If the crumbs are too fine, they turn into a paste when they mix with the moisture from the pudding. If they’re too chunky, they don’t look like dirt. Aim for the texture of coarse sand. A food processor gives you the most control, but a rolling pin and a bag work if you’re patient.
Layer strategically. I like to do three layers of pudding and two layers of cookies. That gives you a good balance of creamy and crunchy. If you do too many cookie layers, the cup gets too dry. Too many pudding layers, and it’s just pudding with a sprinkle on top.
Let them sit overnight if you can. The flavor improves dramatically after 12-24 hours in the fridge. The cookies soften just enough to blend with the pudding, and the cream cheese flavor mellows out. If you serve them too early, the texture is still a little separate. Patience pays off here.
Variations & Adaptations
One of the best things about this recipe is how easy it is to adapt. Here are some variations I’ve tried and loved:
Pumpkin Dirt Cups: Swap the chocolate pudding for vanilla or butterscotch instant pudding. Add 1/2 cup of pumpkin puree and 1 teaspoon of pumpkin pie spice to the pudding mixture before folding in the whipped topping. Use crushed graham crackers instead of Oreos for the “dirt.” Top with candy corn or small candy pumpkins. This version is perfect for Thanksgiving or a fall-themed party, and it pairs beautifully with homemade pumpkin chai lattes.
Gluten-Free Dirt Cups: Use gluten-free chocolate sandwich cookies (Kinnikinnick makes a good one) and make sure your pudding mix is labeled gluten-free. Most instant pudding mixes are, but double-check the label. Everything else in the recipe is naturally gluten-free.
Dairy-Free Dirt Cups: Use oat milk or coconut milk for the pudding, dairy-free cream cheese (like Kite Hill or Tofutti), and a dairy-free whipped topping (Coconut Whipped Cream or So Delicious CocoWhip works well). The texture will be slightly less rich, but it’s still delicious.
Mini Dirt Cups: Use clear shot glasses or small condiment cups for a party. These are perfect for Halloween parties where people want to grab and go. You can make 12-16 mini cups from one batch. They’re also great for school parties because they’re less messy.
Peanut Butter Dirt Cups: Add 1/4 cup of creamy peanut butter to the cream cheese mixture before folding in the whipped topping. The peanut butter adds a savory note that balances the sweetness. Use peanut butter cookies crushed on top instead of Oreos for extra peanut butter flavor.
Ghost Dirt Cups: Instead of gummy worms, use gummy ghosts or gummy skeletons. You can find them at most grocery stores during the Halloween season. They give the cups a slightly different vibe—less creepy crawly and more spooky cute.
Serving & Storage Suggestions
These dirt cups are best served cold, straight from the fridge. The contrast between the cold, creamy pudding and the slightly crunchy cookie dirt is what makes them so satisfying. I like to serve them on a tray with a few extra gummy worms scattered around for decoration. If you’re feeling fancy, you can add a small plastic spider or skeleton bone to each cup.
For storage, keep the dirt cups covered in the refrigerator. If you have cups with lids, great. Otherwise, cover each cup with plastic wrap or aluminum foil. They’ll stay fresh for up to 4 days. The texture actually improves after the first day as the cookies soften and the flavors meld. I wouldn’t recommend freezing them—the texture of the pudding and whipped topping gets grainy and watery when thawed.
If you’re making these for a party, you can assemble them up to 2 days in advance. Just wait to add the gummy worms until the day you serve them. The gummy worms can get a little sticky and soft if they sit in the fridge for too long. I usually add them about an hour before serving.
These dirt cups pair well with other Halloween treats like fudgy double chocolate zucchini muffins for a full dessert spread. For a savory balance, serve them alongside cheesy ground beef quesadillas with avocado salsa for a Halloween dinner that covers all the bases.
Nutritional Information & Benefits
Here’s an approximate nutritional breakdown per serving (based on 8 servings, using whole milk and full-fat cream cheese):
- Calories: 380
- Total Fat: 18g
- Saturated Fat: 10g
- Cholesterol: 35mg
- Sodium: 380mg
- Total Carbohydrates: 52g
- Dietary Fiber: 1g
- Sugars: 36g
- Protein: 6g
These are definitely a treat, not an everyday snack. But there are a few redeeming qualities. The cream cheese adds a small amount of protein and calcium. The chocolate pudding contains a little iron (about 4% of your daily value per serving). And honestly, sometimes you just need a dessert that makes you smile. These dirt cups are more about the experience and the joy than about nutritional density.
If you want to lighten them up, use low-fat milk, Neufchâtel cream cheese, and a sugar-free pudding mix. You can also use a lighter whipped topping. The texture will be slightly less rich, but you’ll save about 80 calories per serving.
Conclusion
These Easy Halloween Dirt Cups with Gummy Worms are the kind of recipe that proves you don’t need complicated techniques or fancy ingredients to make something memorable. They’re fun, they’re fast, and they bring out that childlike excitement in everyone who eats them. I’ve made them for Halloween parties, school events, and just because it was a Tuesday in October and I wanted to see my kids smile. Every single time, they work.
What I love most about this recipe is how forgiving it is. You can swap ingredients, change the layers, use different candies—it’s hard to mess up. And honestly, even if the layers get a little messy, it still looks like dirt, so it still works. That’s the beauty of a dirt cup. It’s supposed to look a little rough around the edges.
I’d love to hear how yours turn out. Did you try a variation? Did your kids go crazy for them? Drop a comment below and let me know. And if you’re looking for more easy no-bake desserts, stick around—I’ve got plenty more where these came from.
Frequently Asked Questions
Can I make these dirt cups ahead of time?
Yes, absolutely. You can assemble them up to 2 days in advance. Just wait to add the gummy worms until the day you serve them so they don’t get sticky and soft.
Can I use homemade whipped cream instead of Cool Whip?
You can, but the texture will be lighter and less stable. Homemade whipped cream is best if you’re serving the cups within 24 hours. For longer storage, stick with frozen whipped topping.
How do I crush the Oreos without a food processor?
Put the cookies in a large zip-top bag, seal it, and use a rolling pin to crush them. You can also use a meat mallet or even a heavy skillet. Just make sure you crush them evenly.
Can I use sugar-free pudding mix?
Yes, sugar-free instant pudding works fine. The texture is slightly less creamy, but it’s a good option if you’re watching your sugar intake. Use a 1:1 replacement.
How long do these dirt cups last in the fridge?
They’ll stay fresh for up to 4 days if stored covered. The texture gets better after the first day as the cookies soften and the flavors meld together.
PrintEasy No-Bake Halloween Dirt Cups with Gummy Worms

These no-bake Halloween dirt cups feature layers of creamy chocolate pudding, crushed Oreos, and gummy worms for a fun and spooky treat that kids and adults love.
- Prep Time: 15 minutes
- Cook Time: 0 minutes
- Total Time: 2 hours 15 minutes (includes chilling)
- Yield: 8 servings 1x
- Category: Dessert
- Cuisine: American
Ingredients
- 1 (3.9 oz) box instant chocolate pudding mix
- 2 cups cold whole milk
- 4 oz cream cheese, softened to room temperature
- 1/4 cup powdered sugar
- 1/2 teaspoon vanilla extract
- 1 (8 oz) container frozen whipped topping, thawed
- 1 (14.3 oz) package Oreo cookies (about 36 cookies)
- 1 (4.5 oz) bag gummy worms
- Optional: Small Halloween-themed decorations
Instructions
- Crush the Oreos: Place the entire package of Oreos (filling and all) into a food processor. Pulse until you get fine, dark crumbs that look like potting soil. Set aside.
- Make the chocolate pudding: In a medium mixing bowl, whisk together the instant chocolate pudding mix and 2 cups of cold whole milk. Whisk for about 2 minutes until the pudding starts to thicken. Set aside.
- Beat the cream cheese: In a separate bowl, beat the softened cream cheese with an electric hand mixer until smooth and fluffy, about 1-2 minutes. Add the powdered sugar and vanilla extract, then beat again until combined.
- Fold in the whipped topping: Add the entire container of thawed whipped topping to the cream cheese mixture. Gently fold with a rubber spatula until uniform.
- Combine the pudding and cream cheese mixture: Pour the chocolate pudding into the cream cheese mixture. Fold gently until fully combined.
- Assemble the cups: In clear cups or glasses, layer about 2-3 tablespoons of the chocolate pudding mixture, then 1-2 tablespoons of crushed Oreos. Repeat layers until the cup is full, ending with a layer of Oreo crumbs on top.
- Add the gummy worms: Gently press a few gummy worms into the top layer of Oreo crumbs, letting some dangle over the edge.
- Chill: Refrigerate for at least 2 hours, preferably overnight, to allow the pudding to set and the cookies to soften.
- Serve cold: Take out of the fridge right before serving. Add any extra decorations if desired.
Notes
For best results, let the dirt cups chill overnight. The texture improves as the cookies soften and the flavors meld. Add gummy worms just before serving to prevent them from getting sticky.
Nutrition
- Serving Size: 1 cup
- Calories: 380
- Sugar: 36
- Sodium: 380
- Fat: 18
- Saturated Fat: 10
- Carbohydrates: 52
- Fiber: 1
- Protein: 6
Keywords: Halloween dirt cups, no-bake dessert, chocolate pudding, gummy worms, Oreo dirt cups, easy Halloween treat


