Love this? Save it for later!
Share the inspiration with your friends
The oven timer buzzed at 7:15 AM on Thanksgiving morning, right when I realized the turkey was still frozen solid in the sink. I stared at that block of ice, then at the clock, and honestly, panic started to set in. My family was going to be home in two hours, and the main course was a no-go. I had no idea what to do with a frozen bird and a kitchen full of hungry people.
So, I did what any desperate cook does. I grabbed the leftover cake mix from last weekend’s birthday party, some chocolate frosting, and a bag of chocolate chips. I wasn’t planning on making dessert first, but I needed to keep everyone occupied. I crumbled the cake, mixed it with frosting, and rolled them into balls. Then, I got silly. I used orange candy melts for the beards and tiny chocolate chips for the eyes.
When my sister walked in and saw the little turkey-shaped treats on the counter, she stopped complaining about the delayed dinner. She grabbed one immediately. It turned out those adorable turkey chocolate cake pops saved the morning. They became the highlight of the day, honestly, even before the turkey (which I eventually thawed and roasted, just in time).
That chaotic morning taught me that sometimes the best recipes come from stress and improvisation. These cake pops aren’t just cute; they are reliable. You know they will disappear fast, so make extra. They offer a sweet comfort when things get hectic, and that’s exactly why I keep coming back to them.
Why You’ll Love This Recipe
Let’s be real for a second. Baking can be intimidating, especially when you’re trying to make something look professional for a holiday party. But these adorable turkey chocolate cake pops change the game completely. I’ve tested dozens of cake pop recipes over the years, from dense fudgy ones to airy vanilla swirls, and this specific combination hits the sweet spot. It’s not just about the taste; it’s about the experience of making them.
- Quick & Easy: You can have these ready in under an hour if you use store-bought cake. This is perfect for busy weeknights or last-minute Thanksgiving prep when you’re already juggling a million dishes.
- Simple Ingredients: No fancy grocery trips needed. You likely already have cake mix, frosting, and chocolate chips in your pantry. It’s the ultimate “use what you have” recipe.
- Perfect for Thanksgiving: Great for holiday mornings, post-dinner dessert tables, or even as a fun treat for kids helping in the kitchen.
- Crowd-Pleaser: Always gets rave reviews from kids and adults alike. The turkey shape is a hit with children, while the rich chocolate flavor satisfies adult sweet teeth.
- Unbelievably Delicious: The texture is moist and tender, coated in a crunchy chocolate shell. It’s next-level comfort food that feels homemade but is actually very simple.
What makes this recipe different from the rest is the visual appeal without the stress. Many cake pop recipes require tempering chocolate or special molds. This one relies on simple dipping and candy accessories. It’s your best version because it balances effort with impact. This recipe isn’t just good—it is the kind that makes you close your eyes after the first bite. It’s comfort food reimagined—healthier (okay, not really), faster, but with the same soul-soothing satisfaction. Perfect for impressing guests without stress, or turning a simple meal into something memorable.
What Ingredients You Will Need
This recipe uses simple, wholesome ingredients to deliver bold flavor and satisfying texture without the fuss. You don’t need expensive gourmet items to make these look professional. The magic lies in the ratio of cake to frosting and the quality of the chocolate coating. Here is what you need to gather before you start.
For the Cake Balls
- Yellow or Vanilla Cake Mix (15.25 oz): I recommend Duncan Hines for a consistent crumb. Bake according to package directions.
- Chocolate Frosting (16 oz): Use a canned frosting like Betty Crocker Rich & Fudge. It has the right consistency to bind the cake. Do not use whipped frosting; it’s too airy.
- Salt (1/2 tsp): A pinch of salt balances the sweetness of the cake and frosting.
For the Turkey Coating & Details
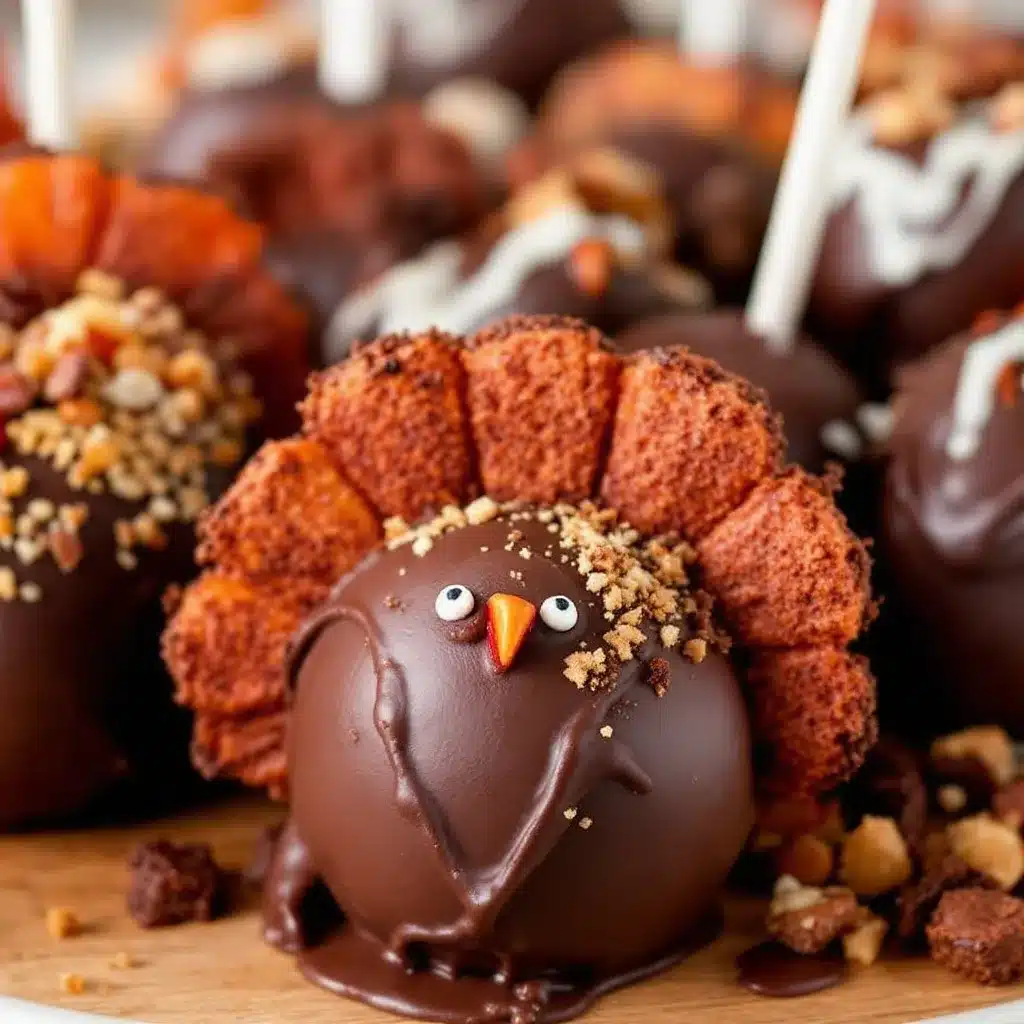
- Orange Candy Melts or White Chocolate (4 oz): Used for the beak and wattle. Candy melts are easier to work with because they set quickly.
- Dark or Semi-Sweet Chocolate Chips (8 oz): These form the body of the turkey. I prefer Ghirardelli for a richer flavor.
- White Candy Melts or White Chocolate Chips (2 oz): For the eyes and feather details.
- Chocolate Sprinkles or Crushed Nuts (Optional): To create the feather texture on the back.
Substitutions
If you want a gluten-free option, swap the cake mix for a gluten-free vanilla cake mix. You can also use homemade vanilla cake crumbs if you have leftovers from a previous bake. For a dairy-free version, use dairy-free frosting and chocolate chips. The technique remains exactly the same.
Equipment Needed
You don’t need a lot of fancy gear to make these adorable turkey chocolate cake pops. A few basic tools will get you 95% of the way there.
- Muffin Tin: Essential for holding the cake balls while they dip. A standard 12-cup tin works perfectly.
- Microwave-Safe Bowls: You’ll need two or three small bowls for melting the different chocolates. Glass or ceramic works best.
- Cookie Scoop or Tablespoon: For portioning the cake mixture evenly. Uniform size ensures they look professional.
- Piping Bags (or Ziploc Bags): For applying the orange and white details. A small hole cut in the corner works as a makeshift piping bag.
- Freezer: You need space to chill the cake balls and the dipped pops. A freezer-safe tray is helpful.
If you don’t have a cookie scoop, just use two tablespoons. It’s not a big deal. Also, investing in a few reusable piping bags saves money and waste compared to single-use ones. Keep your tools clean and dry; even a drop of water can ruin melting chocolate.
Preparation Method
Let’s get into the nitty-gritty. Making these adorable turkey chocolate cake pops is straightforward, but timing is everything. Follow these steps closely to avoid common pitfalls.
- Bake the Cake (20 mins + cooling): Preheat your oven to 350°F (175°C). Bake the cake mix according to the box instructions in a round or square pan. Let it cool completely in the pan. If the cake is even slightly warm, it will make the frosting greasy and the balls won’t hold their shape. This is crucial.
- Crumble the Cake (5 mins): Once cool, crumble the cake into a large bowl. Use your hands or a fork to break it down into fine crumbs. Aim for a texture similar to wet sand. Remove any large chunks of frosting from the box mix if there are any.
- Mix with Frosting (5 mins): Add the chocolate frosting to the crumbs. Start with 1 cup and mix. Add more gradually until the mixture holds together when squeezed. It should feel like playdough. If it’s too dry, add more frosting. If it’s too wet, add more cake crumbs.
- Roll the Balls (10 mins): Portion the mixture into 1-inch balls. Roll them tightly between your palms. Place them on a parchment-lined baking sheet. Put them in the freezer for at least 30 minutes. They need to be rock hard before dipping.
- Melt the Chocolate (5 mins): Melt the dark chocolate chips in 30-second intervals in the microwave, stirring in between. Do not overheat. It should be smooth and fluid. Do the same with the orange and white chocolates in separate bowls.
- Dip the Pops (10 mins): Insert a lollipop stick into the bottom of each frozen cake ball. Dip the ball into the melted dark chocolate, coating it completely. Tap the excess off against the side of the bowl. Place it back in the muffin tin to set.
- Add Details (10 mins): While the chocolate is still wet, use a toothpick or piping bag to add the orange beak and wattle. Add the white eyes. Sprinkle with chocolate sprinkles for feathers. If the chocolate sets before you can add details, you’ll have a mess. Work quickly.
- Set and Serve: Let the pops sit at room temperature until the chocolate is fully hardened. This takes about 15-20 minutes. Once set, they are ready to eat or store.
Troubleshooting Tips
If the cake balls crack when you dip them, they weren’t cold enough. If the chocolate is too thick, add a teaspoon of coconut oil to thin it out. If the beak slides off, make sure to press it into the wet chocolate firmly.
Cooking Tips & Techniques
I’ve made a lot of cake pops over the years, and I’ve learned a few hard lessons. The biggest mistake people make is not chilling the cake balls enough. Warm cake balls melt the chocolate instantly, causing the ball to slide off the stick. Always freeze them for at least 30 minutes.
Another tip is to temper your chocolate slightly. If your chocolate is too hot, it will seize. If it’s too cold, it will take forever to set. The goal is a smooth, glossy finish. You can add a tiny bit of vegetable shortening to the melted chocolate to help it flow better and shine.
Multitasking is key here. While the cake is baking, have your bowls and sticks ready. While the cake cools, set up your dipping station. This prevents panic later. Also, keep a paper towel nearby for spills. Chocolate is sticky and messy.
For consistency, use a cookie scoop for the cake balls. This ensures they are all the same size, which makes decorating easier. If you roll them by hand, try to keep them round. Irregular shapes are harder to dip evenly.
Don’t skip the salt in the cake mixture. It enhances the chocolate flavor. It sounds odd, but trust me on this one. It balances the sugar overload.
Variations & Adaptations
These adorable turkey chocolate cake pops are versatile. You can tweak them to fit different dietary needs or flavor preferences.
- Gluten-Free: Use a gluten-free cake mix and ensure your chocolate chips are certified gluten-free. The process is identical.
- Vegan: Use a vegan cake mix and dairy-free frosting. For the coating, use vegan chocolate chips and candy melts. They melt and set just like regular chocolate.
- Flavor Twist: Swap the chocolate frosting for cream cheese frosting for a cheesecake flavor. Or use red velvet cake mix for a festive look, though the turkey shape might be harder to see.
- Seasonal: For Christmas, change the colors to red and green. For Easter, use pastel colors. The technique stays the same.
I once tried making these with pumpkin spice cake mix for fall. It was delicious, but the orange frosting made the turkey look a bit muddy. Stick to neutral cake flavors for the best contrast with the chocolate coating.
Serving & Storage Suggestions
Serve these adorable turkey chocolate cake pops at room temperature. Cold chocolate can taste waxy. If you store them in the fridge, let them come to room temperature before eating for the best texture.
They pair well with coffee or milk. The bitterness of coffee cuts through the sweetness of the chocolate. For a Thanksgiving table, place them on a tiered stand for visual impact.
Storage: Store in an airtight container at room temperature for up to one week. If your kitchen is very hot, store them in the fridge. Place parchment paper between layers to prevent sticking. They can also be frozen for up to three months. Thaw in the fridge overnight before serving.
The flavors develop over time. The cake absorbs moisture from the frosting, making the interior even softer after a day or two. This is why they often taste better the next day.
Nutritional Information & Benefits
These cake pops are a treat, so enjoy them in moderation. Each pop contains approximately 150-200 calories, depending on size. They are high in sugar and carbohydrates, so consider them an occasional indulgence.
However, they provide a quick energy boost, which is useful for holiday baking sessions. The chocolate offers a small amount of antioxidants. For those with dietary restrictions, the gluten-free and vegan adaptations make this treat accessible to more people.
From a wellness perspective, I view these as a “joy food.” They bring happiness to gatherings and reduce stress. That emotional benefit is valuable too. Just balance them with plenty of vegetables and protein during the meal.
Conclusion
Making these adorable turkey chocolate cake pops is a fun, stress-free way to add some personality to your holiday table. They are easy to make, delicious to eat, and always a hit. I encourage you to try this recipe and customize it to your liking. Add your own twist with different sprinkles or flavors.
I love this recipe because it turns a chaotic morning into a happy memory. It’s simple, reliable, and always brings a smile to people’s faces. Please share your creations in the comments below. I’d love to see how you decorated your turkeys. Don’t forget to share this recipe with friends who need a easy dessert idea.
Happy baking, and enjoy your holiday treats!
FAQs
Can I use homemade cake instead of cake mix?
Yes, you can. Use about 2.5 to 3 cups of cooled, crumbled homemade cake. Just ensure it is completely dry and crumbly before mixing with frosting.
Why did my cake balls slide off the sticks?
This usually happens if the cake balls are not cold enough or if the chocolate is too thin. Always freeze the balls for 30 minutes and ensure the chocolate is thick enough to coat but not runny.
How long do cake pops last?
They last up to one week at room temperature in an airtight container. They can be frozen for up to three months for longer storage.
Can I make these ahead of time?
Yes, they are perfect for making ahead. Make the cake balls and freeze them. Dip them just before the event to keep the chocolate fresh and glossy.
What can I use instead of candy melts?
You can use white chocolate chips or regular chocolate chips. You may need to add a teaspoon of coconut oil to help them melt smoothly and set properly.
Pin This Recipe!
Adorable Turkey Chocolate Cake Pops
These easy turkey-shaped chocolate cake pops are a festive and delicious Thanksgiving treat made with simple ingredients like cake mix and frosting. They are perfect for holiday parties, kids, and last-minute dessert needs.
- Prep Time: 30 minutes
- Cook Time: 20 minutes
- Total Time: 50 minutes
- Yield: 12 servings 1x
- Category: Dessert
- Cuisine: American
Ingredients
- 15.25 oz Yellow or Vanilla Cake Mix
- 16 oz Chocolate Frosting (canned, not whipped)
- 1/2 tsp Salt
- 4 oz Orange Candy Melts or White Chocolate
- 8 oz Dark or Semi-Sweet Chocolate Chips
- 2 oz White Candy Melts or White Chocolate Chips
- Chocolate Sprinkles or Crushed Nuts (Optional, for feathers)
- Lollipop sticks
Instructions
- Preheat oven to 350°F (175°C) and bake the cake mix according to package directions. Let it cool completely.
- Crumble the cooled cake into fine crumbs in a large bowl.
- Mix in the chocolate frosting gradually until the mixture holds together like playdough.
- Roll the mixture into 1-inch balls and place them on a parchment-lined baking sheet.
- Freeze the cake balls for at least 30 minutes until rock hard.
- Melt the dark chocolate chips, orange candy melts, and white chocolate chips separately in the microwave in 30-second intervals, stirring until smooth.
- Insert a lollipop stick into the bottom of each frozen cake ball.
- Dip each ball into the melted dark chocolate, coating completely, and place in a muffin tin to set.
- While the chocolate is still wet, use a toothpick or piping bag to add orange beak/wattle and white eyes.
- Sprinkle with chocolate sprinkles for feathers if desired.
- Let the pops sit at room temperature for 15-20 minutes until the chocolate is fully hardened before serving.
Notes
Ensure cake balls are completely cold before dipping to prevent sliding. If chocolate is too thick, add a teaspoon of coconut oil. For gluten-free, use GF cake mix. For vegan, use dairy-free frosting and chocolate.
Nutrition
- Serving Size: 1 cake pop
- Calories: 175
- Sugar: 18
- Sodium: 150
- Fat: 10
- Saturated Fat: 6
- Carbohydrates: 22
- Fiber: 1
- Protein: 2
Keywords: Thanksgiving dessert, cake pops, turkey treats, easy baking, holiday cookies, chocolate cake pops, kid-friendly recipes


