Love this? Save it for later!
Share the inspiration with your friends
Halloween treats usually fall into one of two camps—either they’re adorable to look at but taste like cardboard, or they’re delicious but look like a five-year-old decorated them. For a while, I just accepted that cute Halloween snacks weren’t going to taste like something I’d actually want to eat again. The candy corn and store-bought cookies were fine for the kids, but I wanted something that felt a little more grown-up without being complicated. Something that looked impressive but didn’t require a pastry degree or a trip to a specialty baking store.
These chocolate-covered strawberry ghosts came about on a random Tuesday afternoon in October. My daughter had a Halloween party at school, and I was staring at a pint of fresh strawberries in the fridge, wondering if I could make something that wasn’t another pumpkin-shaped sugar cookie (no offense to the classic). I had some white melting wafers left over from a failed attempt at cake pops, and a bag of mini chocolate chips that seemed destined for something more interesting than just cookies. The idea just clicked—dip the strawberries in white chocolate, add two tiny chocolate chip eyes, and suddenly you have a ghost that’s actually delicious.
The first batch was a little messy, honestly. The chocolate was too thick, the eyes slid off, and I had a few strawberries that looked more like sad snowmen than spooky ghosts. But by the third try, I figured out the rhythm. And when my daughter took one bite and said, “Mom, these are way better than the cupcakes,” I knew I had stumbled onto something worth sharing. These little ghosts are proof that you don’t need elaborate decorating skills to make a Halloween treat that’s both adorable and genuinely tasty.
Why You’ll Love This Recipe
Let me tell you why these chocolate-covered strawberry ghosts have become my go-to Halloween recipe every single year. They’re ridiculously easy to make, but they look like you spent hours on them. That’s the kind of magic we all need in our lives, especially during the busy Halloween season.
- Super Quick to Make: You can have a whole platter of these ghosts done in about 20 minutes of active time. No baking, no complicated decorating, just dipping and dotting. Perfect for those last-minute school parties or surprise guests.
- Simple Ingredients: You only need three main ingredients—fresh strawberries, white chocolate or candy melts, and mini chocolate chips. Chances are, you already have the chocolate chips in your pantry right now.
- Actually Healthy-ish: I mean, it’s fruit covered in chocolate, so we’re not talking kale salad here. But compared to a handful of candy corn or a frosted cookie, you’re getting real fruit with antioxidants and vitamin C. That’s a win in my book.
- Kid-Friendly Activity: This is one of those recipes where kids can actually help without making a massive mess. My seven-year-old loves placing the chocolate chip eyes on the ghosts. Just be prepared for a few ghosts with three eyes or lopsided smiles—those are the character ones.
- Perfect for Halloween Parties: These little ghosts are absolute showstoppers on a dessert table. They’re cute, they’re photogenic, and they disappear faster than anything else you put out. I’ve brought them to multiple Halloween gatherings, and people always ask for the recipe.
What makes this recipe different from other Halloween treats is that it actually tastes good. So many holiday recipes prioritize looks over flavor, but these strawberries are naturally sweet and juicy, and the white chocolate adds a creamy richness that pairs perfectly with the tartness of the berry. It’s not just a cute treat—it’s a genuinely delicious one that you’ll want to eat yourself.
What Ingredients You Will Need
This recipe keeps things simple with just a handful of ingredients, which is exactly what you want when you’re juggling Halloween costumes and last-minute decorations. Here’s what you’ll need to gather before you start.
For the Ghosts:
- Fresh strawberries, 1 pound (about 16-20 medium strawberries): Look for strawberries that are firm, bright red, and relatively uniform in size. You want them to be on the drier side, so avoid any that look mushy or have soft spots. The shape matters too—try to find strawberries that are slightly pointed at the top, as they’ll look more like little ghost bodies once dipped. I prefer strawberries that are medium-sized rather than huge, as they’re easier to dip and eat in one or two bites.
- White chocolate chips or candy melts, 10 ounces (about 1 ½ cups): This is where you have a choice. White chocolate chips have a richer, creamier flavor, but they can be a little finicky to melt. Candy melts are more stable and give a smoother finish, but they don’t taste as good. I usually go with a high-quality white chocolate like Ghirardelli or Guittard for the best flavor. If you’re using white chocolate chips, make sure they’re real white chocolate (contains cocoa butter) and not just white baking chips, which are more waxy.
- Mini chocolate chips, ¼ cup: These become the ghost’s eyes. You want mini chips rather than regular-sized ones because they look more proportional on the strawberries. If you only have regular chocolate chips, you can cut them in half with a sharp knife, but honestly, just buy the mini ones—they’re worth it for the cute factor.
- Coconut oil or vegetable shortening, 1 teaspoon (optional): This is my secret weapon for getting that perfectly smooth, glossy white chocolate coating. Adding a tiny bit of oil or shortening to the melted chocolate helps thin it out just enough for easy dipping and prevents it from seizing up. You don’t need much—just a teaspoon will do the trick.
For Decorating (Optional but Fun):
- Black gel food coloring or edible marker: If you want to add little ghost mouths or extra details, a black edible marker is the easiest way to go. You can find them at most craft stores or online.
- Orange or black sprinkles: For a little extra Halloween flair, you can add some sprinkles on top of the white chocolate before it sets. Just don’t overdo it—you want the ghost to still look like a ghost.
A quick note on ingredient selection—I’ve tried this recipe with both store-brand white chocolate and the fancy stuff, and honestly, the difference is noticeable. The cheaper white chocolate tends to be grainy and doesn’t melt as smoothly, which makes the dipping process frustrating. Spend the extra dollar or two on a good brand, and you’ll thank me later.
Equipment Needed
You don’t need a lot of fancy equipment for this recipe, which is part of why I love it so much. Here’s what you’ll want to have on hand.
- Microwave-safe bowl or double boiler: A glass measuring cup or a small mixing bowl works perfectly for melting the white chocolate. If you have a double boiler, great, but a microwave is honestly faster and easier.
- Baking sheet lined with parchment paper or wax paper: This is where your dipped strawberries will set. The parchment prevents them from sticking and makes cleanup a breeze.
- Fork or dipping tool: A regular dinner fork works fine for dipping the strawberries, but if you have a dipping tool or a skewer, it can make the process a little cleaner. I’ve also used a toothpick to hold the strawberry while I drizzle chocolate over it.
- Small piping bag or zip-top bag: If you want to pipe extra white chocolate details (like little ghost arms or swirls), a small piping bag or even a zip-top bag with a tiny corner snipped off works perfectly.
- Tweezers (yes, really): Okay, this isn’t essential, but I find that using tweezers to place the mini chocolate chip eyes is way easier than using my fingers. The chocolate chips are tiny, and my fingers are clumsy. Tweezers give you precision placement every time.
If you don’t have a microwave, you can melt the white chocolate in a heatproof bowl set over a pot of simmering water. Just make sure the bowl doesn’t touch the water, and stir constantly until smooth. It takes a few extra minutes but works just as well.
Preparation Method
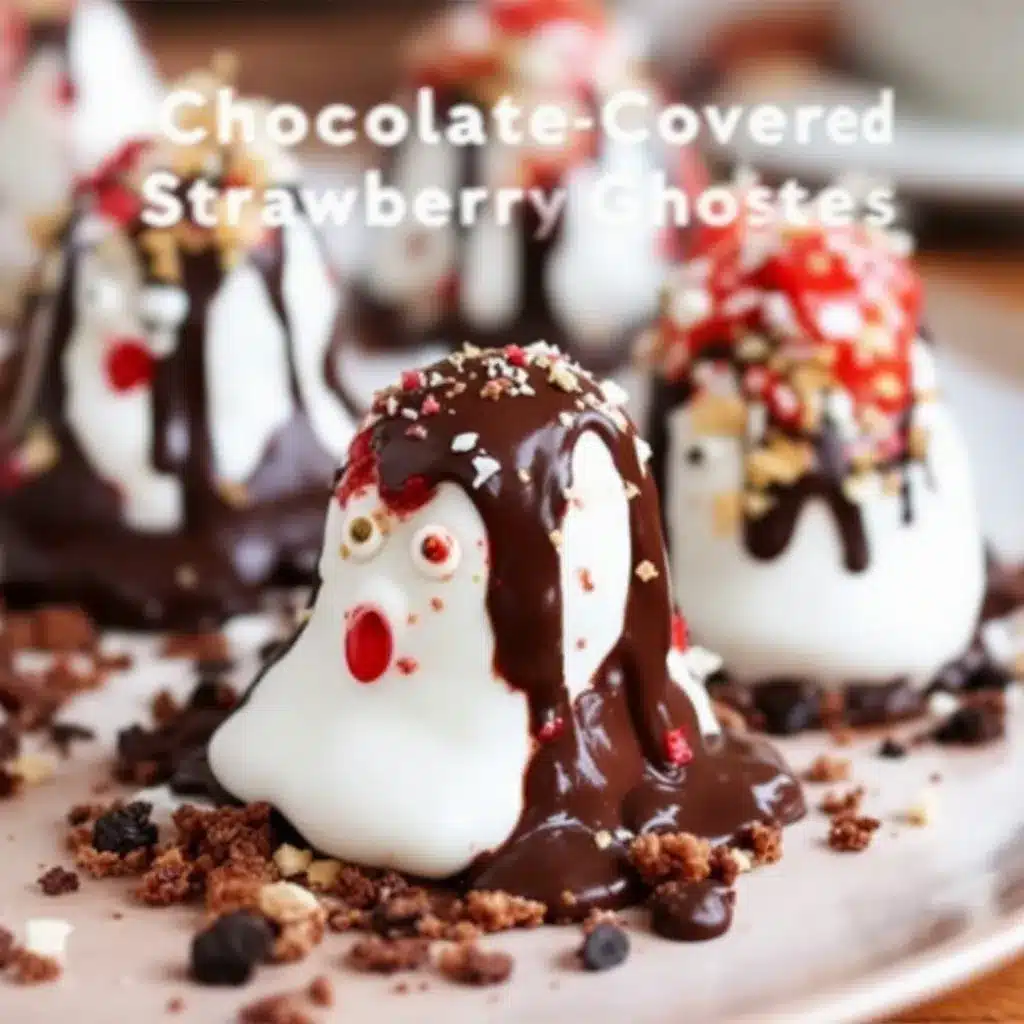
Alright, let’s get to the fun part—making these adorable little ghosts. I’ll walk you through every step so you don’t end up with a melted mess like I did on my first attempt.
Step 1: Wash and Dry the Strawberries
Start by washing your strawberries thoroughly under cold water. Then—and this is crucial—dry them completely. I mean completely. Any water on the surface of the strawberry will cause the white chocolate to seize up and become grainy. Pat them dry with paper towels, then let them sit on a clean kitchen towel for about 10 minutes to air dry. You want them to be at room temperature too, so don’t use cold strawberries straight from the fridge.
Step 2: Prepare Your Workspace
Line a baking sheet with parchment paper or wax paper. Make sure the sheet fits in your refrigerator, because you’ll need to chill the finished ghosts. Set up your mini chocolate chips in a small bowl so they’re easy to grab. If you’re using tweezers, have them ready. Trust me, you don’t want to be fumbling for tools while your chocolate is setting.
Step 3: Melt the White Chocolate
Place your white chocolate chips or candy melts in a microwave-safe bowl. Microwave in 30-second intervals, stirring well after each interval. White chocolate burns easily, so don’t try to rush this. After about 1-2 minutes, the chocolate should be mostly melted. Stir until completely smooth. If the chocolate seems too thick, add a teaspoon of coconut oil or vegetable shortening and stir until combined. The consistency should be thin enough to coat the strawberry easily but not so thin that it runs off completely.
Step 4: Test the Temperature
Here’s a tip I learned the hard way—test the chocolate temperature on your wrist before dipping. It should feel warm but not hot. If it’s too hot, it will cook the strawberry slightly and cause the chocolate to slide off. Let it cool for a minute or two if needed.
Step 5: Dip the Strawberries
Hold a strawberry by the green stem (or use a toothpick if the stem is too short) and dip it into the melted white chocolate. Submerge it about three-quarters of the way, leaving the top of the strawberry exposed. This is what gives the ghost its little head shape. Lift the strawberry out and let the excess chocolate drip off. You can gently tap your hand on the side of the bowl to help the chocolate settle. Place the dipped strawberry on the parchment-lined baking sheet.
Step 6: Add the Eyes Immediately
While the white chocolate is still wet, place two mini chocolate chips on the strawberry to create the ghost’s eyes. Use your tweezers or fingers to position them about halfway down the strawberry, spaced evenly apart. Don’t press too hard—you want them to sit on top of the chocolate, not sink into it. If you want a scared or surprised expression, place the eyes closer together. For a friendlier ghost, space them a little wider.
Step 7: Create the Ghost Mouth (Optional)
If you want to add a mouth, you have a few options. You can use a black edible marker to draw a little “O” shape (for a surprised ghost) or a wavy line (for a friendly ghost). You can also pipe a tiny bit of melted dark chocolate using a toothpick or a small piping bag. I personally love the surprised “O” mouth—it makes them look so cute and clueless.
Step 8: Chill to Set
Place the baking sheet in the refrigerator for about 15-20 minutes, or until the white chocolate is completely firm. Don’t leave them in there too long, or condensation can form on the chocolate when you take them out. About 20 minutes is the sweet spot.
Step 9: Serve and Enjoy
Once the chocolate is set, your strawberry ghosts are ready to serve. Arrange them on a platter and watch them disappear. They’re best enjoyed within a few hours of making them, but they’ll keep in the refrigerator for up to 24 hours.
Cooking Tips & Techniques
After making these ghosts more times than I can count (and messing up plenty along the way), I’ve picked up a few tricks that make the process smoother and the results cuter.
The Seized Chocolate Disaster:
My first attempt at this recipe ended in disaster when my white chocolate seized up into a thick, grainy mess. The culprit? A single drop of water that fell into the bowl. White chocolate is incredibly sensitive to moisture, so make sure your bowl and utensils are completely dry. If your chocolate does seize, you can try adding a teaspoon of vegetable shortening and stirring vigorously, but honestly, it’s usually better to just start over.
The Right Strawberry Shape:
Not all strawberries are created equal when it comes to ghost-making. Look for strawberries that are slightly tapered at the top, almost like a teardrop shape. The pointed end becomes the ghost’s head, and the wider bottom becomes the body. If your strawberries are too round or flat, they’ll look more like blobs than ghosts. I’ve also found that smaller to medium strawberries work better than the giant ones, which can look a little comical.
Temperature Control is Everything:
If your white chocolate is too warm, it will run off the strawberry and create a puddle at the bottom. If it’s too cool, it will be too thick to dip smoothly. The ideal temperature is around 90-95°F, which is just slightly warm to the touch. I check by dabbing a tiny bit on my wrist—it should feel like a warm bath, not hot water.
Multitasking Strategy:
I like to melt my white chocolate while the strawberries are air-drying after washing. That way, everything is ready at the same time. I also set up my parchment-lined baking sheet and mini chocolate chips before I start dipping, so I’m not scrambling to find things with chocolate-covered hands.
The Drip Problem:
Sometimes the white chocolate pools at the bottom of the strawberry and creates a thick, uneven base. To avoid this, hold the dipped strawberry over the bowl for a few extra seconds after dipping, letting the excess drip off. You can also gently scrape the bottom of the strawberry against the rim of the bowl to remove any excess chocolate.
Variations & Adaptations
One of the best things about this recipe is how easy it is to customize. Here are some variations I’ve tried and loved.
Dark Chocolate Ghosts:
If you’re not a fan of white chocolate (I know, hard to believe, but some people aren’t), you can use dark or milk chocolate instead. The ghosts will look a little less ghostly, but you can still add white chocolate eyes or use white candy melts for the eyes. The dark chocolate version is actually my husband’s favorite—he says it’s less sweet and more sophisticated.
Vegan Version:
Use dairy-free white chocolate or dark chocolate and make sure your chocolate chips are vegan-friendly. Coconut oil works great for thinning the chocolate. The strawberries are naturally vegan, so you’re just swapping out the chocolate. I’ve made these for a vegan Halloween party, and they were a hit.
Gluten-Free Adaptation:
This recipe is naturally gluten-free, as long as your white chocolate and chocolate chips are certified gluten-free. Some brands add wheat-based ingredients, so always check the label if you’re serving someone with celiac disease.
Spooky Skull Variation:
Instead of just eyes, you can pipe a little skull face on the strawberry using melted dark chocolate. Draw a tiny nose (a small triangle) and some teeth lines below the eyes. This takes a steady hand, but the result is seriously impressive. I tried this for a Halloween party last year, and people thought I bought them from a bakery.
Ghost Family:
Make different sizes of ghosts using different-sized strawberries. The little ones look like baby ghosts, and the big ones look like mama and papa ghosts. Arrange them on a platter as a ghost family for an extra-cute presentation. My kids love this version.
Drizzled Ghosts:
After the white chocolate sets, drizzle a little melted dark chocolate over the top for a marbled effect. This adds visual interest and a little extra chocolate flavor. Just make sure the white chocolate is fully set before you add the drizzle, or you’ll end up with a muddy mess.
Serving & Storage Suggestions
These strawberry ghosts are best served chilled, straight from the refrigerator. The cold strawberry contrasts beautifully with the creamy white chocolate, and the texture is just perfect. I like to arrange them on a white platter (to keep with the ghost theme) with a few black and orange sprinkles scattered around for color.
Presentation Ideas:
For a Halloween party, I’ve arranged these ghosts on a bed of black sesame seeds or crushed Oreos to look like a spooky graveyard. You can also stick them on skewers and arrange them in a vase filled with candy corn for a festive centerpiece. If you’re serving them at a school party, individual cupcake liners make them easy to grab and go.
Complementary Dishes:
These ghosts pair beautifully with other Halloween treats. I love serving them alongside a batch of chewy pumpkin snickerdoodle cookies for a fall-themed dessert spread. The combination of fresh fruit and spiced cookies is just perfect. You could also serve them with a warm mug of pumpkin chai latte for a cozy Halloween evening.
Storage Instructions:
These ghosts are best eaten within 24 hours of making them. Store them in an airtight container in the refrigerator. Don’t stack them on top of each other, or the chocolate will get scratched and the eyes will fall off. I like to arrange them in a single layer with a piece of parchment paper between layers if I need to stack them.
Freezing Notes:
You can freeze these ghosts for up to a month, but the texture of the strawberry will change slightly once thawed. The strawberries will be a little softer and more watery. If you do freeze them, place them on a baking sheet in the freezer until solid, then transfer to a freezer-safe container. Thaw in the refrigerator for about 30 minutes before serving.
Flavor Development:
Interestingly, these ghosts actually taste best about an hour after you make them. The white chocolate has fully set, but the strawberry hasn’t started to release too much moisture yet. After 24 hours, the strawberry might start to soften and release juice, which can make the chocolate a little sticky. So plan to make them the same day you’re serving them for the best results.
Nutritional Information & Benefits
Let’s be real—these are a treat, not a health food. But compared to most Halloween candy, they’re actually a pretty good option. Here’s the rough nutritional breakdown for one strawberry ghost (based on using real white chocolate):
- Calories: Approximately 80-100 calories per ghost
- Fat: 5-6 grams
- Carbohydrates: 10-12 grams
- Sugar: 8-10 grams
- Protein: 1-2 grams
- Fiber: 1 gram
Health Benefits:
Strawberries are packed with vitamin C, antioxidants, and fiber. They’re one of the few fruits that are relatively low in sugar while still being naturally sweet. The white chocolate adds some calcium and a little protein, though let’s be honest—the main benefit here is that you’re eating fruit instead of a handful of candy corn.
Dietary Considerations:
This recipe is naturally gluten-free and can be made vegan by using dairy-free chocolate. It’s also nut-free as written, though you should always check your chocolate labels for potential cross-contamination if allergies are a concern. The main allergens here are dairy (from the white chocolate) and potentially soy (some white chocolates contain soy lecithin).
My Wellness Perspective:
I love that this recipe lets me give my kids a Halloween treat that isn’t just pure sugar and artificial colors. Yes, there’s chocolate involved, but it’s portion-controlled (one strawberry is a serving) and the fruit base adds some actual nutrition. It’s the kind of treat I feel good about serving at a party or packing in a lunchbox for a special occasion.
Conclusion
These adorable chocolate-covered strawberry ghosts have become a Halloween tradition in my house, and I have a feeling they’ll become one in yours too. They’re proof that you don’t need fancy decorating skills or complicated techniques to make something that looks impressive and tastes amazing. Just three ingredients, a little bit of patience, and you’ve got a treat that will steal the show at any Halloween gathering.
What I love most about this recipe is how flexible it is. You can make them as simple or as fancy as you want. Keep them classic with just two chocolate chip eyes, or go all out with piped details and colorful sprinkles. They’re perfect for kids to help with, they’re a crowd-pleaser at parties, and honestly, they’re just fun to make. There’s something deeply satisfying about dipping a strawberry into melted chocolate and watching it transform into a little ghost.
So go ahead—grab some strawberries, melt some chocolate, and make a batch of these little ghosts. They’re guaranteed to make you smile, and they might just become your new favorite Halloween tradition. And if you come up with your own creative variation, I’d love to hear about it. Drop a comment below and share your ghost-making adventures!
Frequently Asked Questions
Can I make these strawberry ghosts ahead of time?
Yes, you can make them up to 24 hours in advance. Store them in an airtight container in the refrigerator, arranged in a single layer so the chocolate doesn’t get scratched. They’re best within the first 12 hours, but they’ll still be delicious the next day.
Why did my white chocolate become grainy and lumpy?
This usually happens when water or moisture gets into the chocolate. Make sure your bowl and utensils are completely dry, and don’t wash your strawberries right before dipping them—they need to be fully dry. You can try adding a teaspoon of vegetable shortening to smooth it out, but sometimes it’s better to just start fresh.
Can I use frozen strawberries instead of fresh?
I wouldn’t recommend it. Frozen strawberries release too much water as they thaw, which will make the white chocolate seize up and become grainy. Fresh, firm strawberries are essential for this recipe to work properly.
How do I get the chocolate chip eyes to stay in place?
The key is to place the eyes while the white chocolate is still wet. If the chocolate has started to set, the eyes won’t stick. Work quickly after dipping each strawberry, and don’t press too hard—just gently place them on the surface. If they still fall off, you can dab a tiny bit of melted chocolate on the back of the chip to act as glue.
Can I use candy melts instead of white chocolate?
Absolutely. Candy melts are actually easier to work with because they’re more stable and less prone to seizing. The trade-off is that they don’t taste as good as real white chocolate. If you’re prioritizing looks over flavor, go with candy melts. If you want the best taste, use high-quality white chocolate like Ghirardelli or Guittard.
Adorable Chocolate-Covered Strawberry Ghosts: Easy Halloween Treat
These adorable chocolate-covered strawberry ghosts are a fun and delicious Halloween treat that’s surprisingly easy to make. With just three main ingredients, you can create a spooky snack that’s both cute and tasty.
- Prep Time: 20 minutes
- Cook Time: 0 minutes
- Total Time: 40 minutes
- Yield: 16-20 servings 1x
- Category: Dessert
- Cuisine: American
Ingredients
- 1 pound fresh strawberries (about 16–20 medium)
- 10 ounces white chocolate chips or candy melts (about 1 ½ cups)
- ¼ cup mini chocolate chips
- 1 teaspoon coconut oil or vegetable shortening (optional)
- Black gel food coloring or edible marker (optional)
- Orange or black sprinkles (optional)
Instructions
- Wash and dry the strawberries thoroughly. Pat them dry with paper towels and let them air dry on a clean kitchen towel for about 10 minutes. They should be at room temperature.
- Line a baking sheet with parchment paper or wax paper. Set up your mini chocolate chips in a small bowl for easy access.
- Place the white chocolate chips or candy melts in a microwave-safe bowl. Microwave in 30-second intervals, stirring well after each, until mostly melted. Stir until completely smooth. If too thick, add 1 teaspoon of coconut oil or vegetable shortening and stir.
- Test the chocolate temperature on your wrist—it should feel warm but not hot. Let cool if needed.
- Hold a strawberry by the green stem (or use a toothpick) and dip it into the melted white chocolate, submerging about three-quarters of the way. Lift out and let excess drip off. Place on the parchment-lined baking sheet.
- Immediately place two mini chocolate chips on the strawberry for eyes, using tweezers or fingers. Position them about halfway down, spaced evenly. For a scared expression, place them closer together; for a friendly ghost, space them wider.
- Optional: Use a black edible marker or melted dark chocolate to draw a mouth—a small ‘O’ for surprised or a wavy line for friendly.
- Place the baking sheet in the refrigerator for 15-20 minutes, or until the white chocolate is completely firm.
- Serve chilled. Best enjoyed within a few hours, but can be stored in the refrigerator for up to 24 hours.
Notes
Make sure strawberries are completely dry before dipping to prevent white chocolate from seizing. Work quickly when adding eyes so they stick. For best results, serve within 24 hours.
Nutrition
- Serving Size: 1 strawberry ghost
- Calories: 90
- Sugar: 9
- Sodium: 15
- Fat: 5.5
- Saturated Fat: 3.5
- Carbohydrates: 11
- Fiber: 1
- Protein: 1.5
Keywords: Halloween treats, chocolate-covered strawberries, ghost strawberries, easy Halloween dessert, white chocolate strawberries, kid-friendly Halloween


