Love this? Save it for later!
Share the inspiration with your friends
Rummaging through the fridge at six o’clock on a Tuesday, wondering if I could convince my family that cereal counted as a balanced meal. That’s when I found the pack of chicken thighs I’d bought on a whim, buried behind a wilting bag of spinach. I had zero energy for a messy, oil-splattered stovetop dinner, but the thought of another sad, dry chicken breast made me want to cry. Honestly, I almost closed the fridge door and reached for the box of crackers.
But then I remembered the air fryer sitting on my counter like a silent, patient little robot. I’d been using it mostly for frozen fries and reheating pizza, but I figured, why not try chicken thighs? I tossed them with some salt, pepper, and garlic powder—the most basic pantry items I could find—and shoved them in. Twenty minutes later, I pulled out the crispiest, juiciest chicken I had made in months. The skin was crackling like glass, and the meat underneath was so tender it practically fell off the bone. My family inhaled them before I even got the salad on the table.
That accidental weeknight experiment turned into a permanent fixture in our dinner rotation. This recipe for crispy air fryer chicken thighs is now my go-to when I need a fast, satisfying meal that feels way more impressive than the effort it requires. It’s the kind of cooking win that makes you feel like you’ve hacked the system, you know? No fuss, no mess, just perfect chicken every single time.
Why You’ll Love This Recipe
I’ve tested this method more times than I can count, and I can tell you with confidence: this is the easiest path to perfect chicken skin you will ever find. It’s not just another air fryer recipe—it’s the one that will make you finally trust your appliance for more than just sides.
- Quick & Easy: From fridge to plate in just 20 minutes. This is faster than ordering takeout and way better for you.
- Simple Ingredients: You likely have everything in your pantry right now. No fancy marinades or hard-to-find spices required.
- Perfect for Busy Weeknights: When you’re short on time but still want a real, home-cooked dinner that the whole family will actually eat.
- Crowd-Pleaser: Kids love the crispy skin, adults love the juicy meat, and everyone loves how fast it disappears.
- Unbelievably Delicious: The contrast between the shatteringly crisp skin and the tender, flavorful meat is pure comfort food magic.
What makes this different from other versions is the technique. I don’t bother with complicated brines or buttermilk soaks. Instead, I use a simple dry rub and a quick pat-down that ensures the skin gets maximally crispy in the hot circulating air. It’s the kind of recipe that proves you don’t need a dozen ingredients to make something truly memorable. This isn’t just good chicken—it’s the kind that makes you close your eyes after the first bite and forget about whatever stressful thing happened at work.
What Ingredients You Will Need
This recipe relies on a handful of pantry staples to deliver bold flavor and that signature crispy texture without any fuss. The magic is in the simplicity and the technique, not a long list of exotic items.
- Bone-in, skin-on chicken thighs (4-6 thighs, about 1.5-2 lbs): This is non-negotiable for the crispiest results. The bone keeps the meat moist, and the skin is what gets that amazing crackling texture. I prefer thighs because they’re forgiving and stay juicy even if you cook them a minute or two too long. Look for thighs that are roughly the same size for even cooking.
- Olive oil or avocado oil (1 tablespoon): Just enough to help the seasoning stick and encourage browning. Avocado oil has a higher smoke point, which is great for the air fryer, but regular olive oil works perfectly fine.
- Garlic powder (1 teaspoon): Adds that savory backbone without burning like fresh garlic can in the air fryer. I always use garlic powder here, not granulated garlic, for better distribution.
- Onion powder (1 teaspoon): Rounds out the flavor profile with a subtle sweetness. It pairs beautifully with the garlic.
- Paprika (1 teaspoon): For color and a gentle warmth. Smoked paprika adds a deeper, richer flavor if you have it on hand.
- Salt (1 teaspoon, or to taste): Essential for drawing out moisture from the skin, which helps it crisp up. Don’t skimp here.
- Black pepper (½ teaspoon, freshly ground): Adds a little bite and complexity.
- Optional: Cayenne pepper or red pepper flakes (¼ teaspoon): For a touch of heat. This is completely optional but adds a nice kick if you like spice.
That’s it. Seven ingredients, most of which are probably sitting in your spice cabinet right now. The real star is the air fryer and the technique, which we’ll get into next. If you want to switch things up, you can add dried herbs like thyme or rosemary to the rub, but honestly, this simple version is so good you might not want to.
Equipment Needed
You don’t need a lot of fancy gear for this one, which is part of the beauty. Here’s what you’ll need:
- Air Fryer: Any model will work, whether it’s a basket-style or an oven-style. I use a 5.8-quart basket model, and it fits 4-6 thighs perfectly without overcrowding. If yours is smaller, cook in batches.
- Paper Towels: Absolutely essential for patting the chicken skin completely dry. This step is not optional—it’s the secret to crispy skin.
- Mixing Bowl: A medium bowl for tossing the chicken with the oil and spices.
- Tongs: For flipping the chicken halfway through without burning your fingers.
- Meat Thermometer: Not strictly necessary if you trust your air fryer, but it’s the best way to guarantee perfectly cooked chicken every time. Chicken thighs are done at 175°F (80°C) internal temperature.
If you don’t have a meat thermometer, don’t worry. You can tell the chicken is done when the juices run clear and the skin is deeply golden and crispy. I’ve used a cheap instant-read thermometer for years, and it’s one of the best investments I’ve made for my kitchen.
Preparation Method
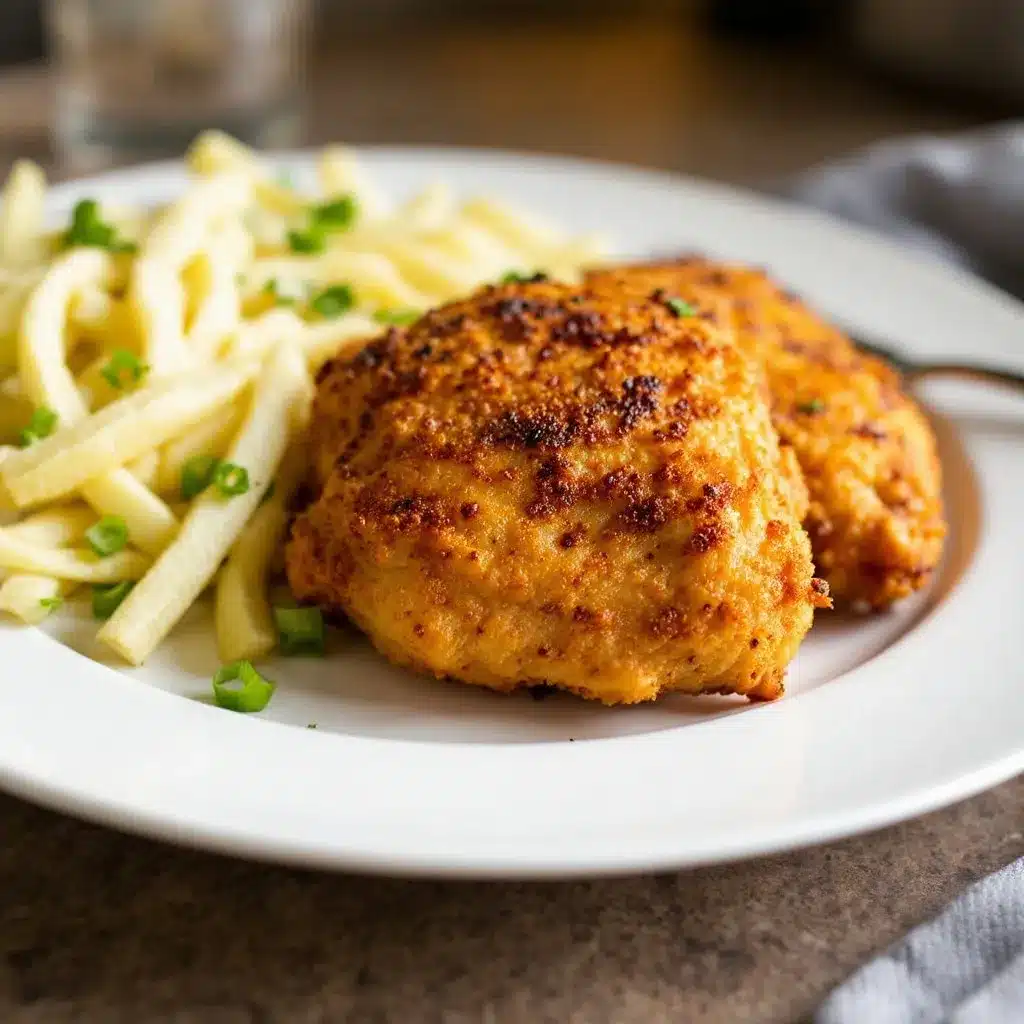
Let’s get cooking. This whole process takes about 20 minutes from start to finish, and I promise it’s easier than you think.
- Preheat your air fryer to 400°F (200°C). Most air fryers need about 3-5 minutes to preheat. While it’s heating up, prepare the chicken. This ensures the hot air starts working immediately when the chicken goes in.
- Pat the chicken thighs completely dry with paper towels. This is the most important step. Moisture is the enemy of crispy skin. Take your time and really press those paper towels into the skin to absorb as much moisture as possible. Don’t skip this—I learned the hard way after making soggy chicken the first time I tried this.
- In a medium bowl, combine the olive oil, garlic powder, onion powder, paprika, salt, pepper, and cayenne (if using). Mix into a paste. Add the chicken thighs and toss well to coat evenly. Make sure every bit of skin gets some seasoning love.
- Place the chicken thighs skin-side down in the air fryer basket in a single layer. Don’t overcrowd the basket. If the thighs are touching, they won’t crisp evenly. Cook in batches if needed. I usually fit 4-5 thighs in my basket comfortably.
- Air fry at 400°F (200°C) for 10 minutes. The skin will start to render and crisp up. You’ll hear a nice sizzling sound—that’s the sound of success.
- Carefully flip the chicken thighs using tongs. The skin should be starting to turn golden. Flip them over so the skin side is now facing up.
- Continue air frying for another 8-10 minutes. The total cooking time is 18-20 minutes. The skin should be deep golden brown and incredibly crispy. If you’re using a meat thermometer, the internal temperature should reach 175°F (80°C) for perfectly tender meat.
- Let the chicken rest for 5 minutes before serving. This allows the juices to redistribute, ensuring every bite is moist and flavorful. I know it’s hard to wait, but it makes a difference.
Pro tip: If your air fryer runs hot or cool, check the chicken at the 16-minute mark. Every air fryer is a little different, and you’ll get to know yours over time. The first time you make these, you might want to keep an eye on them.
Cooking Tips & Techniques
After making these chicken thighs more times than I can count, I’ve picked up a few tricks that make a real difference. Let me share them with you so you can nail it on your first try.
The drying step is everything. I cannot stress this enough. The first time I made air fryer chicken, I skipped the pat-drying step because I was in a hurry. The result was pale, rubbery skin that was deeply disappointing. Now, I use three or four paper towels and really press them into the skin. It takes 30 seconds and makes the difference between good chicken and life-changing chicken.
Don’t overcrowd the basket. Air fryers work by circulating hot air around the food. If you cram too many thighs in there, they’ll steam instead of crisp. Cook in batches if you need to. The extra 10 minutes is worth it for that perfect crunch.
Use bone-in, skin-on thighs. Boneless, skinless thighs will not give you the same result. The bone keeps the meat moist, and the skin is what gets crispy. If you only have boneless thighs, reduce the cooking time to about 12-14 minutes total, but expect a different texture.
Let the chicken rest. I know you’re hungry. I know it smells amazing. But cutting into the chicken right away will cause all those beautiful juices to run out onto the plate, leaving you with drier meat. Give it five minutes. Use that time to make a quick salad or set the table.
Season generously. Chicken thighs can handle a lot of flavor. Don’t be shy with the salt and spices. The skin will only crisp up if it’s well-seasoned, so make sure every inch is coated.
Variations & Adaptations
One of the best things about this recipe is how easy it is to customize. Here are a few variations I’ve tried and loved:
- Spicy Honey Garlic: After cooking, toss the hot chicken thighs in a mixture of 2 tablespoons honey, 1 tablespoon soy sauce, and ½ teaspoon red pepper flakes. The combination of sweet, salty, and spicy is absolutely addictive. I made this for a game day gathering, and they disappeared in minutes.
- Lemon Herb: Add 1 teaspoon dried thyme, 1 teaspoon dried rosemary, and the zest of one lemon to the spice rub. Squeeze fresh lemon juice over the cooked chicken before serving. It’s bright, fresh, and perfect for spring.
- BBQ Glazed: Brush the chicken thighs with your favorite barbecue sauce during the last 5 minutes of cooking. The sauce will caramelize and create a sticky, sweet crust. This is my go-to when I’m craving something smoky.
- Dairy-Free & Gluten-Free: This recipe is naturally both! No modifications needed. Just make sure your spice blends don’t contain any hidden gluten or dairy.
- Oven Method: If you don’t have an air fryer, you can bake these on a wire rack set over a baking sheet at 425°F (220°C) for 25-30 minutes. The skin won’t be quite as crispy, but it’s still delicious.
If you love this kind of quick, crispy chicken, you might also enjoy my crispy boneless skinless chicken thighs with garlic herb butter for another fast weeknight win. And if you’re in the mood for something cozy and comforting, this cheesy chicken and rice casserole is a 30-minute dinner that always hits the spot.
Serving & Storage Suggestions
These chicken thighs are incredibly versatile and pair well with almost anything. Here’s how to serve and store them.
Serving: Serve the chicken hot, straight from the air fryer. The skin is at its crispiest right after cooking. I love pairing them with a simple side salad dressed with lemon vinaigrette, or with roasted vegetables like asparagus or broccoli. They’re also amazing over rice or mashed potatoes to soak up all the juices. For a lighter meal, try them with a grilled peach and burrata salad for a sweet and savory combo.
Storage: Leftover chicken thighs can be stored in an airtight container in the refrigerator for up to 4 days. The skin will lose some of its crispiness, but the meat will stay juicy.
Reheating: The best way to reheat is in the air fryer at 375°F (190°C) for 3-4 minutes. This will bring back much of the original crispiness. You can also reheat in a 350°F (175°C) oven for 10 minutes. Avoid the microwave, as it will make the skin soggy.
Freezing: Cooked chicken thighs freeze well for up to 3 months. Let them cool completely, then wrap individually in plastic wrap and place in a freezer-safe bag. Thaw in the refrigerator overnight and reheat as directed above.
The flavors actually deepen a bit overnight, so leftovers are great for lunch the next day. I often shred the leftover meat and use it in salads or wraps.
Nutritional Information & Benefits
Chicken thighs are a fantastic source of protein and essential nutrients. Here’s a rough estimate per serving (based on 4 servings):
- Calories: Approximately 350-400
- Protein: 28-32g
- Fat: 25-30g (mostly healthy monounsaturated and polyunsaturated fats)
- Carbohydrates: 1-2g
- Iron: 10% of daily value
- Zinc: 15% of daily value
- B Vitamins: Rich in B6 and B12, which support energy metabolism
Chicken thighs are higher in fat than chicken breasts, but much of that fat is the skin, which you can remove if you’re watching your intake. The dark meat is also richer in iron and zinc, which are important for immune function. This recipe is naturally low-carb, gluten-free, and dairy-free, making it suitable for a variety of dietary needs. If you’re looking for a balanced meal, pair these thighs with a generous portion of vegetables and a whole grain.
For a healthier twist, you can remove the skin after cooking (though you’ll miss out on the crispy goodness!). The meat itself is still incredibly flavorful and moist.
Conclusion
If you’ve been using your air fryer just for frozen snacks, this recipe will change everything. These crispy air fryer chicken thighs are proof that you can have a restaurant-quality dinner on the table in 20 minutes with almost zero cleanup. The skin is shatteringly crisp, the meat is tender and juicy, and the flavor is simple enough to please everyone at the table.
I love how forgiving this recipe is—even if you overcook them by a minute or two, the thighs stay moist thanks to their higher fat content. It’s the kind of recipe that builds confidence in the kitchen, especially if you’re new to air frying. Don’t be afraid to experiment with different spice blends or glazes to make it your own.
I’d love to hear how yours turn out! Drop a comment below and let me know what variations you tried, or tag me in your photos if you share them online. Happy cooking, and enjoy every crispy, juicy bite!
Frequently Asked Questions
Can I use boneless, skinless chicken thighs?
Yes, but the cooking time will be shorter (about 12-14 minutes total) and you won’t get the same crispy skin. The meat will still be juicy and flavorful, though. Just season them well and keep an eye on the internal temperature.
Do I need to flip the chicken halfway through?
Yes, flipping ensures even cooking and helps the skin crisp up on both sides. I flip at the 10-minute mark, but if you forget, the chicken will still cook through—the skin just might be a little less even.
Can I cook frozen chicken thighs in the air fryer?
I don’t recommend it for this recipe. Frozen chicken will release too much moisture, preventing the skin from crisping. Thaw the thighs completely in the refrigerator overnight before cooking for the best results.
How do I know when the chicken is fully cooked?
The safest way is to use a meat thermometer. Chicken thighs are done at 175°F (80°C) internal temperature. If you don’t have a thermometer, cut into the thickest part—the juices should run clear, and the meat should no longer be pink.
Why is my chicken skin not crispy?
The most common culprit is moisture. Make sure you pat the skin completely dry before seasoning. Also, avoid overcrowding the air fryer basket, as this traps steam and prevents crisping. If your chicken still isn’t crispy, try cooking it for an extra 2-3 minutes at 400°F (200°C).
PrintCrispy Air Fryer Chicken Thighs: Easy 20-Minute Dinner

Crispy, juicy air fryer chicken thighs ready in just 20 minutes. This simple recipe uses pantry staples for a quick, delicious weeknight dinner that the whole family will love.
- Prep Time: 5 minutes
- Cook Time: 18-20 minutes
- Total Time: 23-25 minutes
- Yield: 4 servings 1x
- Category: Main Course
- Cuisine: American
Ingredients
- 4–6 bone-in, skin-on chicken thighs (about 1.5–2 lbs)
- 1 tablespoon olive oil or avocado oil
- 1 teaspoon garlic powder
- 1 teaspoon onion powder
- 1 teaspoon paprika
- 1 teaspoon salt (or to taste)
- ½ teaspoon freshly ground black pepper
- ¼ teaspoon cayenne pepper or red pepper flakes (optional)
Instructions
- Preheat your air fryer to 400°F (200°C).
- Pat the chicken thighs completely dry with paper towels.
- In a medium bowl, combine olive oil, garlic powder, onion powder, paprika, salt, pepper, and cayenne (if using). Mix into a paste. Add chicken thighs and toss to coat evenly.
- Place chicken thighs skin-side down in the air fryer basket in a single layer. Do not overcrowd.
- Air fry at 400°F (200°C) for 10 minutes.
- Carefully flip the chicken thighs using tongs.
- Continue air frying for another 8-10 minutes, until skin is deep golden brown and internal temperature reaches 175°F (80°C).
- Let the chicken rest for 5 minutes before serving.
Notes
Patting the chicken dry is crucial for crispy skin. Do not overcrowd the air fryer basket. Let chicken rest before serving to retain juices. For boneless thighs, reduce cooking time to 12-14 minutes. Reheat leftovers in air fryer at 375°F for 3-4 minutes.
Nutrition
- Serving Size: 1 chicken thigh
- Calories: 375
- Sodium: 650
- Fat: 28
- Saturated Fat: 8
- Carbohydrates: 1
- Protein: 30
Keywords: air fryer chicken thighs, crispy chicken thighs, easy chicken dinner, quick chicken recipe, weeknight dinner, air fryer recipe


