Love this? Save it for later!
Share the inspiration with your friends
The Halloween party was in four hours and I’d completely forgotten. I mean, I’d remembered to buy the candy for the trick-or-treaters, picked out my daughter’s costume, even carved a pumpkin that looked more like a lopsided ghost than a jack-o-lantern. But the “spooky snacks” signup sheet? Yeah, that slipped my mind completely. I got a text from my neighbor, Jen, around 2 PM: “Don’t forget the creepy appetizers for tonight!” My heart sank. Everyone else would be bringing elaborate witch’s finger cookies or graveyard dirt cakes that took all weekend. I had a pack of hot dogs, a can of crescent rolls, and about twenty minutes before I had to pick up the kids from school. Honestly, I almost gave up and just grabbed a bag of chips.
But then I remembered a trick my mom used to pull for my brother’s birthday parties. She’d wrap hot dogs in breadsticks and call them “sleeping snakes.” It was silly, but we loved it. So I thought, what if I took that same idea and gave it a Halloween twist? I grabbed the crescent rolls, sliced the hot dogs, and started wrapping. I didn’t even have time to think—I just moved. The dough was sticky, my fingers were covered in flour, and I’m pretty sure I used the wrong end of the rolling pin. But ten minutes later, I had a baking sheet full of little wrapped “mummies.” A quick dab of mustard for eyes, and they actually looked… cute? Spooky-cute.
When I walked into the party with my tray of these Easy Halloween Mummy Hot Dog Bites, I was ready to apologize for my last-minute effort. But you know what happened? They were the first thing to disappear. The kids swarmed them, the adults snuck them when they thought no one was looking, and Jen asked me for the recipe before the night was over. These little mummies have become a tradition at our house ever since. Maybe you’ve been there—scrambling at the last minute, feeling like you’re failing at the holiday spirit. Well, let me tell you, this is the recipe that saves the day. It’s simple, it’s fast, and it’s honestly more fun than anything fancy.
Why You’ll Love This Recipe
Let’s face it—Halloween can be stressful. Between the costumes, the decorations, and the constant sugar rush, the last thing you need is a complicated appetizer that takes hours. These Easy Halloween Mummy Hot Dog Bites are the perfect solution. I’ve tested this recipe at three different parties now, and it never fails. They are the kind of snack that makes people think you put in way more effort than you actually did.
- Quick & Easy: From fridge to table in under 20 minutes. Seriously, you can make these while the kids are still arguing over which candy bar they want.
- Simple Ingredients: You only need four things—hot dogs, crescent roll dough, mustard, and a little melted butter. No special trips to the grocery store required.
- Perfect for Halloween Parties: Whether it’s a school party, a neighborhood gathering, or just a spooky movie night at home, these are always a hit.
- Crowd-Pleaser: Kids absolutely love them, but I’ve seen grown adults go back for thirds. They’re just fun to eat.
- Unbelievably Delicious: The flaky, buttery dough wrapped around a juicy hot dog is a combination that never gets old. Add a little mustard “face,” and you’ve got a snack that’s both adorable and tasty.
What makes these different from every other hot dog recipe out there? It’s the technique. Instead of using full-length hot dogs, I cut them in half. This makes them the perfect bite-sized portion for little hands (or for adults who want to eat six without feeling guilty). Plus, by using refrigerated crescent roll dough, you get that beautiful, golden-brown, flaky texture without any of the fuss of homemade dough. This isn’t just another version of pigs in a blanket—it’s the best version. The kind that makes you close your eyes after the first bite and think, “Why haven’t I been making these all year?”
What Ingredients You Will Need
This recipe uses simple, everyday ingredients to create something that feels special. You probably already have most of these in your kitchen, which is exactly the point. Here is everything you need to make these adorable mummy bites.
- Hot Dogs (1 package, 8-count): Use your favorite brand. I personally recommend all-beef hot dogs for the best flavor and texture—they hold up better when baked and have a richer taste. You can also use turkey or chicken hot dogs for a lighter option. (Pro tip: Look for hot dogs that are on the shorter side, as they are easier to wrap.)
- Refrigerated Crescent Roll Dough (1 can, 8-count): This is the secret weapon of this recipe. The dough is perfectly flaky and buttery, and it wraps around the hot dogs like a dream. I always use Pillsbury Original Crescents, but any brand works. If you want to get fancy, you can find crescent dough sheets that don’t have the perforations, which makes wrapping even easier.
- Yellow Mustard (for the eyes): You only need a tiny bit, but it makes all the difference visually. The bright yellow dots look like little mummy eyes peeking out from the wrappings. You can use spicy brown mustard if you prefer a bolder flavor, but the classic yellow gives the best “spooky” look.
- Melted Butter (2 tablespoons): Brushing the dough with melted butter before baking gives the mummies that gorgeous golden-brown color and adds a rich, savory flavor. You can use salted or unsalted butter—just adjust the salt in the rest of your meal accordingly.
- Optional: Everything Bagel Seasoning or Sesame Seeds: If you want to add a little extra texture and flavor, sprinkle a pinch of everything bagel seasoning on top before baking. It adds a nice crunch and a savory note that pairs surprisingly well with the hot dogs.
That’s it! Four ingredients for the base recipe, plus one optional garnish. The beauty of this recipe is its simplicity. You don’t need any fancy spices or hard-to-find items. Everything is available at your local grocery store, and you can have these on the table in less time than it takes to watch a Halloween episode of your favorite show.
Equipment Needed
You don’t need a lot of fancy equipment to make these mummy bites, which is another reason I love this recipe. Here is what you’ll need:
- Baking Sheet: A standard half-sheet pan works perfectly. Line it with parchment paper or a silicone baking mat for easy cleanup.
- Sharp Knife or Pizza Cutter: You’ll need this to cut the hot dogs in half and to slice the crescent roll dough into thin strips. A pizza cutter makes the dough-cutting step much faster and cleaner.
- Pastry Brush: For brushing the melted butter onto the dough. If you don’t have one, you can use a paper towel or even your fingers (just make sure they are clean!).
- Cutting Board: A sturdy cutting board gives you a good surface for cutting the hot dogs and dough.
- Small Bowl: For melting the butter. You can do this in the microwave in 10-second increments.
- Toothpick (optional): If you have trouble getting the mustard eyes to look right, dip a toothpick in the mustard and use it to dot the eyes. It gives you more control.
I’ve made these in a friend’s kitchen with a dull knife and a random spatula, and they still turned out great. The only thing I’d say is non-negotiable is the baking sheet. Everything else can be improvised. If you are just starting out and don’t have a pastry brush, don’t worry—you can still make this recipe work.
Preparation Method

Alright, let’s get to the fun part. This is where the magic happens. Follow these steps, and you’ll have a tray of adorable mummy bites that will steal the show at any Halloween gathering.
- Preheat your oven to 375°F (190°C). Line a baking sheet with parchment paper or a silicone mat. This step is important—it prevents the dough from sticking and makes cleanup a breeze. While the oven is heating, you can prep everything else.
- Cut the hot dogs in half. Take each hot dog and slice it crosswise into two equal pieces. You should end up with 16 mini hot dog pieces. I like to cut them on a slight diagonal—it makes them look a little more “mummy-like” when wrapped. Set them aside on a plate.
- Prepare the crescent roll dough. Open the can of crescent rolls carefully—I always get startled by the pop, even though I know it’s coming. Unroll the dough and separate it along the perforated lines into 8 triangles. Then, take each triangle and cut it lengthwise into 3 thin strips. You’ll have 24 strips total. (Don’t worry if they aren’t perfectly even—mummies are supposed to look a little messy!)
- Wrap the mummies. Take one strip of dough and wrap it around a hot dog piece, starting at one end and working your way to the other. Leave a small gap near the top of the hot dog where the “face” will go. The dough should look like bandages wrapped around a mummy. Don’t wrap too tightly—the dough will expand as it bakes, and you want those gaps to show. Repeat with the remaining hot dog pieces and dough strips. You’ll use about 1.5 strips per mummy, which is perfect.
- Place on the baking sheet. Arrange the wrapped mummies on the prepared baking sheet, leaving about an inch of space between each one. They will puff up a bit as they bake, so give them some room to breathe.
- Brush with melted butter. Melt 2 tablespoons of butter in a small bowl (about 15 seconds in the microwave). Using a pastry brush, gently brush the melted butter over each mummy. This is what gives them that beautiful golden-brown color. If you are using everything bagel seasoning or sesame seeds, sprinkle it on now.
- Bake for 10-12 minutes. Place the baking sheet in the preheated oven and bake until the dough is golden brown and puffed up. The hot dogs should be heated through. Keep an eye on them after the 10-minute mark—ovens can vary, and you don’t want the dough to burn. The mummies should look like little golden-brown logs with pale gaps where the hot dog peeks through.
- Add the eyes. Remove the baking sheet from the oven and let the mummies cool for 2-3 minutes. They will be very hot! Once they are cool enough to handle, use a toothpick or the tip of a knife to dab two small dots of yellow mustard on the exposed hot dog section near the top. These are the mummy’s eyes. Don’t make them too big—a little dot goes a long way. If you want a spookier look, you can make the eyes slightly uneven or “wonky.”
- Serve immediately. These are best enjoyed warm, right out of the oven. The dough is flaky, the hot dog is juicy, and the mustard adds a tangy pop of flavor. Arrange them on a platter and watch them disappear!
A quick note: If you are making these for a party and want to prep ahead, you can wrap the mummies up to the baking step and refrigerate them for up to 4 hours. Just add an extra minute or two to the baking time since the dough will be cold. This is a lifesaver when you are juggling a million other things on Halloween night.
Cooking Tips & Techniques
I’ve made this recipe more times than I can count, and I’ve learned a few tricks along the way. Here are my best tips to ensure your mummy bites turn out perfect every time.
Don’t overwork the dough. Crescent roll dough is delicate. When you cut it into strips, try to handle it as little as possible. If the dough gets too warm and sticky, it will tear when you try to wrap it. If this happens, just pop the dough strips in the fridge for 5 minutes to firm up.
Leave gaps in the wrapping. I made the mistake of wrapping my first batch too tightly—the dough expanded and covered the entire hot dog, leaving no “skin” visible. They looked like dough balls, not mummies! Make sure you leave small gaps between the strips so the hot dog shows through. This is what gives them that mummy look.
Use a pizza cutter for the dough. A sharp pizza cutter makes cutting the crescent roll strips so much easier than a knife. The dough won’t drag or tear, and you get clean, even strips. If you don’t have a pizza cutter, a sharp chef’s knife works well too.
Watch the baking time. These little guys bake fast. Check them at the 10-minute mark. You want the dough to be golden brown, not dark brown. Every oven runs a little differently, so trust your eyes more than the timer. The first time I made these, I left them in for 14 minutes and they came out a bit too crispy. Still tasty, but not as pretty.
Customize the “bandages.” For a fun variation, try wrapping the dough strips in a crisscross pattern instead of straight across. It gives the mummies a different look and keeps things interesting if you are making a big batch.
Make them ahead for a party. I learned this the hard way: trying to wrap 48 mummy bites while guests are arriving is a recipe for stress. Do the wrapping and arrange them on the baking sheet earlier in the day. Keep them covered in the fridge, and then pop them in the oven right before the party starts. Your future self will thank you.
Variations & Adaptations
One of the best things about this recipe is how easy it is to adapt. Here are some of my favorite variations that I’ve tried over the years.
Cheesy Mummy Bites: Before wrapping the hot dog, cut a small slit lengthwise and stuff it with a thin strip of cheddar or mozzarella cheese. The cheese will melt and ooze out slightly as it bakes, giving the mummies a gooey, delicious surprise inside. I tried this for a party last year, and it was a game-changer.
Spicy Mummy Bites: Swap the regular hot dogs for spicy chorizo or jalapeño cheddar sausages. The extra kick pairs wonderfully with the buttery dough. If you are serving adults, this is a fantastic way to elevate the recipe. Just make sure to cut the sausages into bite-sized pieces first.
Vegetarian Mummy Bites: Use plant-based hot dogs or even pre-cooked vegetarian sausages. I’ve tested this with MorningStar Farms veggie dogs, and they work perfectly. The flavor is a little different, but the texture and appearance are spot-on. Your vegetarian friends will love you for this.
Pizza Mummy Bites: Before wrapping, brush a little pizza sauce onto the hot dog and sprinkle with shredded mozzarella. The result tastes like a mini pizza wrapped in dough. Serve with a side of warm marinara sauce for dipping. This was a happy accident when I ran out of mustard and improvised!
Sweet Mummy Bites: For a dessert version, replace the hot dogs with cocktail sausages (just kidding!). Actually, try this: wrap strips of crescent dough around pieces of banana or apple slices, brush with melted butter and cinnamon sugar, and bake. Add a dot of icing for the eyes. It’s a fun, sweet twist that kids absolutely love.
Serving & Storage Suggestions
These mummy bites are best served warm, but they are still delicious at room temperature. Here is how to serve and store them like a pro.
How to Serve: Arrange the mummy bites on a large platter or wooden board. For a fun Halloween touch, serve them on a black or orange plate. I like to add a small bowl of extra mustard or ketchup for dipping. You can also serve them with a side of ranch dressing or spicy sriracha mayo for an adult twist. If you are feeling extra festive, scatter some candy corn or pumpkin-shaped crackers around the platter for color.
What to Pair Them With: These mummy bites are perfect as part of a larger Halloween spread. They go great with a bowl of creamy pumpkin soup, a plate of spiderweb guacamole with tortilla chips, or a tray of witch hat cookies for dessert. For drinks, serve them with apple cider, pumpkin punch, or a fun Halloween-themed cocktail for the adults.
Storage Instructions: If you have leftovers (unlikely, but it happens!), store them in an airtight container in the refrigerator for up to 3 days. The dough will soften a bit, but they will still taste great. To reheat, place them on a baking sheet in a 350°F (175°C) oven for 5-7 minutes, or until warmed through. You can also reheat them in an air fryer at 350°F for 3-4 minutes—this actually crisps the dough back up nicely.
Freezer Tips: You can freeze these mummy bites either before or after baking. To freeze before baking, wrap the mummies and place them on a baking sheet in the freezer for 1 hour, then transfer them to a freezer bag. Bake directly from frozen, adding 2-3 minutes to the baking time. To freeze after baking, let them cool completely, then store in a freezer bag for up to 2 months. Reheat from frozen in a 350°F oven for 8-10 minutes.
Flavor Development: Honestly, these are best fresh out of the oven. The dough is at its flakiest and the hot dog is perfectly juicy. However, I have eaten them cold the next day straight from the fridge, and they are still pretty darn good. The flavors meld together, and the mustard eyes soften into a tangy spread. Not bad for a leftover snack!
Nutritional Information & Benefits
Let’s be real—these are a treat, not a health food. But here is a rough estimate of what you are getting in each mummy bite (based on using standard hot dogs and crescent roll dough).
Per Mummy Bite (approximate):
Calories: 120-140 | Fat: 8g | Carbohydrates: 9g | Protein: 4g | Sodium: 320mg
Health Benefits: While these are indulgent, there are a few bright spots. Hot dogs provide a decent amount of protein, which helps keep you full. The crescent roll dough offers quick energy from carbohydrates. And the mustard? Well, mustard seeds are a good source of selenium and have anti-inflammatory properties. (Okay, I’m stretching a bit, but it’s Halloween—give yourself a break!)
Dietary Considerations: This recipe is not gluten-free unless you use gluten-free crescent roll dough (which is available at most grocery stores now). It is also not dairy-free unless you use a dairy-free butter alternative. For a lower-sodium option, choose low-sodium hot dogs. For a lower-fat option, use turkey or chicken hot dogs. And if you are watching your sugar intake, note that crescent roll dough does contain a small amount of added sugar.
Allergen Notes: This recipe contains wheat (gluten) and dairy (butter). It may also contain traces of soy, depending on the hot dog brand you choose. Always check labels if you are serving someone with allergies.
My personal take? These are a once-a-year treat. They are meant to be fun, festive, and delicious. Don’t stress about the nutritional stats—just enjoy the moment and the smiles on your family’s faces.
Conclusion
So there you have it—the easiest, cutest, and most delicious Halloween appetizer you will ever make. These Easy Halloween Mummy Hot Dog Bites are proof that you don’t need hours in the kitchen or a list of fancy ingredients to create something memorable. They are quick, they are fun, and they always, always disappear first.
I love this recipe because it reminds me that sometimes the best things come from a little bit of panic and a lot of improvisation. That frantic afternoon in my kitchen, wondering how I was going to show up to the party with something decent, turned into a tradition that my family looks forward to every single year. And honestly? That’s what Halloween is all about—having fun, being a little silly, and sharing good food with the people you care about.
Now I want to hear from you! Have you tried making these mummy bites? Did you add your own twist? Maybe you stuffed them with cheese or used a different type of sausage. Drop a comment below and let me know how they turned out. And if you have a photo, share it—I love seeing your creations. Don’t forget to pin this recipe for later and share it with your friends who are still scrambling for last-minute Halloween ideas. Happy Halloween, and happy snacking!
Frequently Asked Questions
Can I use puff pastry instead of crescent roll dough?
Absolutely! Puff pastry will give you a flakier, more buttery texture. Just thaw the pastry sheets, cut them into strips, and wrap the hot dogs the same way. The baking time might be slightly longer—around 12-15 minutes—so keep an eye on them.
How do I keep the dough from unraveling while baking?
Make sure you tuck the end of the dough strip under the mummy when you place it on the baking sheet. The weight of the mummy and the heat of the oven will seal it. If you are still worried, you can press the end gently to secure it.
Can I make these in an air fryer?
Yes! Air fryers work great for these mummy bites. Preheat your air fryer to 350°F (175°C). Place the wrapped mummies in the basket in a single layer (you may need to work in batches). Cook for 6-8 minutes, or until golden brown. No need to flip them halfway through.
What can I use instead of mustard for the eyes?
You have several options! Ketchup works well and gives a red “angry eye” look. You can also use small dots of sriracha for a spicy kick, or even little pieces of black olive or nori (seaweed) for a more natural look. For a sweet version, use icing or melted white chocolate.
How far in advance can I prepare these?
You can wrap the mummies up to 4 hours ahead of time and keep them covered in the refrigerator. If you need to prep even further ahead, you can freeze them (unbaked) for up to 2 months. Just bake from frozen, adding 2-3 minutes to the cooking time.
Pin This Recipe!
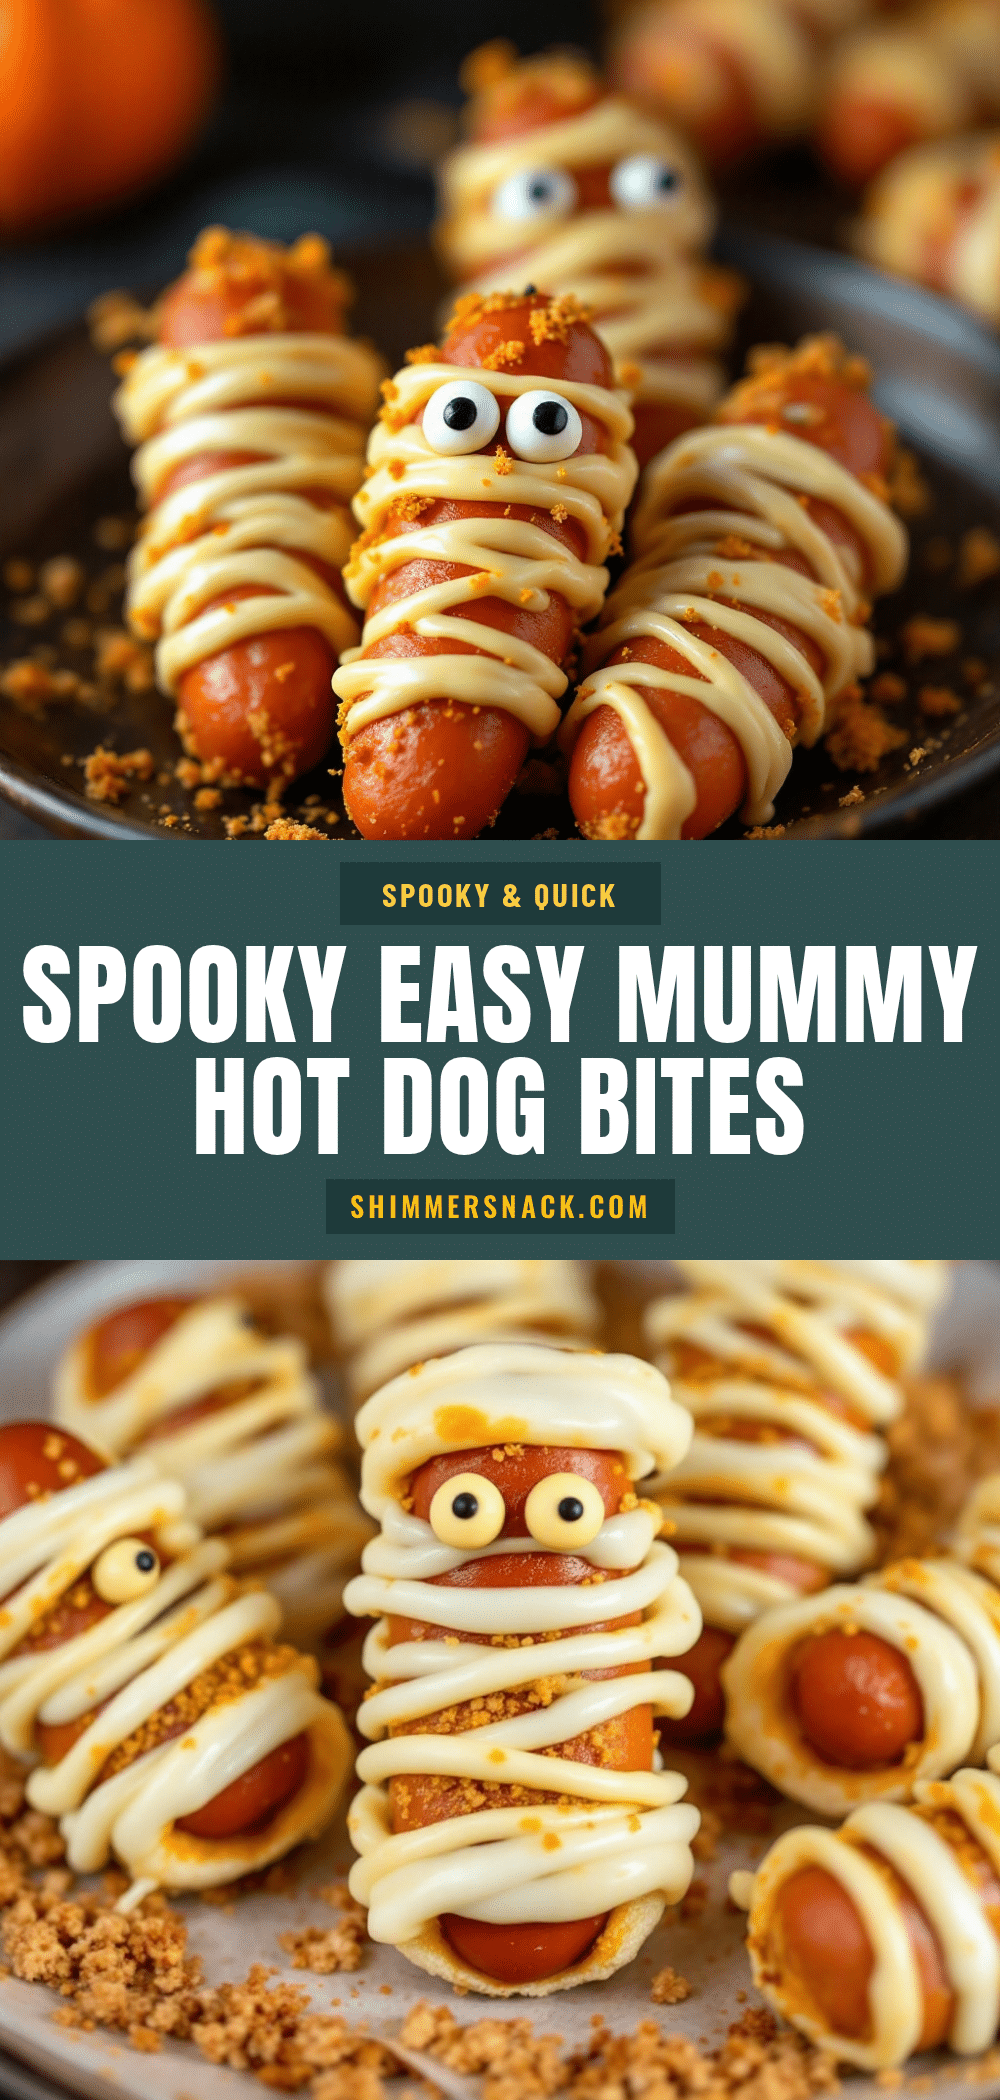
Easy Halloween Mummy Hot Dog Bites: Best 20-Minute Recipe
These adorable mummy hot dog bites are wrapped in flaky crescent roll dough and baked to golden perfection. Perfect for last-minute Halloween parties, they come together in under 20 minutes with just four simple ingredients.
- Prep Time: 10 minutes
- Cook Time: 12 minutes
- Total Time: 22 minutes
- Yield: 16 mummy bites 1x
- Category: Appetizer
- Cuisine: American
Ingredients
- 1 package (8-count) hot dogs
- 1 can (8-count) refrigerated crescent roll dough
- Yellow mustard (for the eyes)
- 2 tablespoons melted butter
- Optional: Everything bagel seasoning or sesame seeds
Instructions
- Preheat your oven to 375°F (190°C). Line a baking sheet with parchment paper or a silicone mat.
- Cut the hot dogs in half crosswise (on a slight diagonal if desired) to make 16 mini hot dog pieces.
- Open the can of crescent rolls and separate into 8 triangles. Cut each triangle lengthwise into 3 thin strips (24 strips total).
- Take one strip of dough and wrap it around a hot dog piece, starting at one end and working to the other. Leave a small gap near the top for the face. Repeat with remaining hot dogs and dough strips (about 1.5 strips per mummy).
- Arrange the wrapped mummies on the prepared baking sheet, leaving about an inch of space between each.
- Melt 2 tablespoons of butter and brush over each mummy. Sprinkle with everything bagel seasoning or sesame seeds if desired.
- Bake for 10-12 minutes, until the dough is golden brown and puffed up.
- Remove from the oven and let cool for 2-3 minutes. Use a toothpick or knife tip to dab two small dots of yellow mustard on the exposed hot dog section near the top for eyes.
- Serve immediately.
Notes
For best results, leave gaps in the wrapping so the hot dog shows through. If the dough gets too warm and sticky, refrigerate for 5 minutes. To make ahead, wrap the mummies and refrigerate for up to 4 hours before baking. For freezing, freeze unbaked mummies on a baking sheet, then transfer to a freezer bag; bake from frozen, adding 2-3 minutes.
Nutrition
- Serving Size: 1 mummy bite
- Calories: 130
- Sugar: 2
- Sodium: 320
- Fat: 8
- Saturated Fat: 3
- Carbohydrates: 9
- Protein: 4
Keywords: Halloween, mummy hot dogs, pigs in a blanket, easy appetizer, party snack, crescent roll, hot dog bites


