Love this? Save it for later!
Share the inspiration with your friends
Last summer, while prepping for an impromptu backyard celebration, my neighbor Sarah watched me struggling to frost a batch of plain sugar cookies. She didn’t say a word at first, just smiled quietly as I fumbled with my piping bag and royal icing that was way too runny. Then, without missing a beat, she leaned over and said, “You know, the trick is all in the sparkle and the simple firework design.” That casual comment sparked a whole new way of thinking about sugar cookies — not as a chore but as a festive conversation starter.
Sarah’s recipe for these Easy Sparkling Firework Sugar Cookies with Royal Icing came to me through the kind of kitchen exchange that feels less like a lesson and more like sharing a moment over a cup of tea. I adapted her method a bit, adding my own twist to the icing colors and sprinkling choices. Honestly, the first time I made these, my piping wasn’t perfect (I even dropped a cookie mid-decorating!), but the joyful pop of color and shimmer made the cookies an instant hit. Maybe you’ve been there—trying to make party treats that look fun but feeling overwhelmed by fancy techniques.
This recipe stuck with me because it captures that feeling of celebration without fuss, offering a way to make cookies that look like tiny fireworks bursting on a plate. It’s the kind of recipe you keep coming back to for birthdays, summer nights, or anytime you want to add a little sparkle to your day.
Why You’ll Love This Recipe
- Quick & Easy: Ready in under an hour, these cookies suit busy days or last-minute party plans.
- Simple Ingredients: No need for specialty stores—most ingredients are pantry staples you probably already have.
- Perfect for Celebrations: Whether it’s a Fourth of July cookout or a festive birthday, these cookies bring a colorful burst of fun.
- Crowd-Pleaser: Kids and adults alike are drawn to the bright sparkle and playful firework design, making them a hit at any gathering.
- Unbelievably Delicious: The buttery sugar cookie base combined with smooth royal icing offers a delightful texture and flavor that’s both nostalgic and fresh.
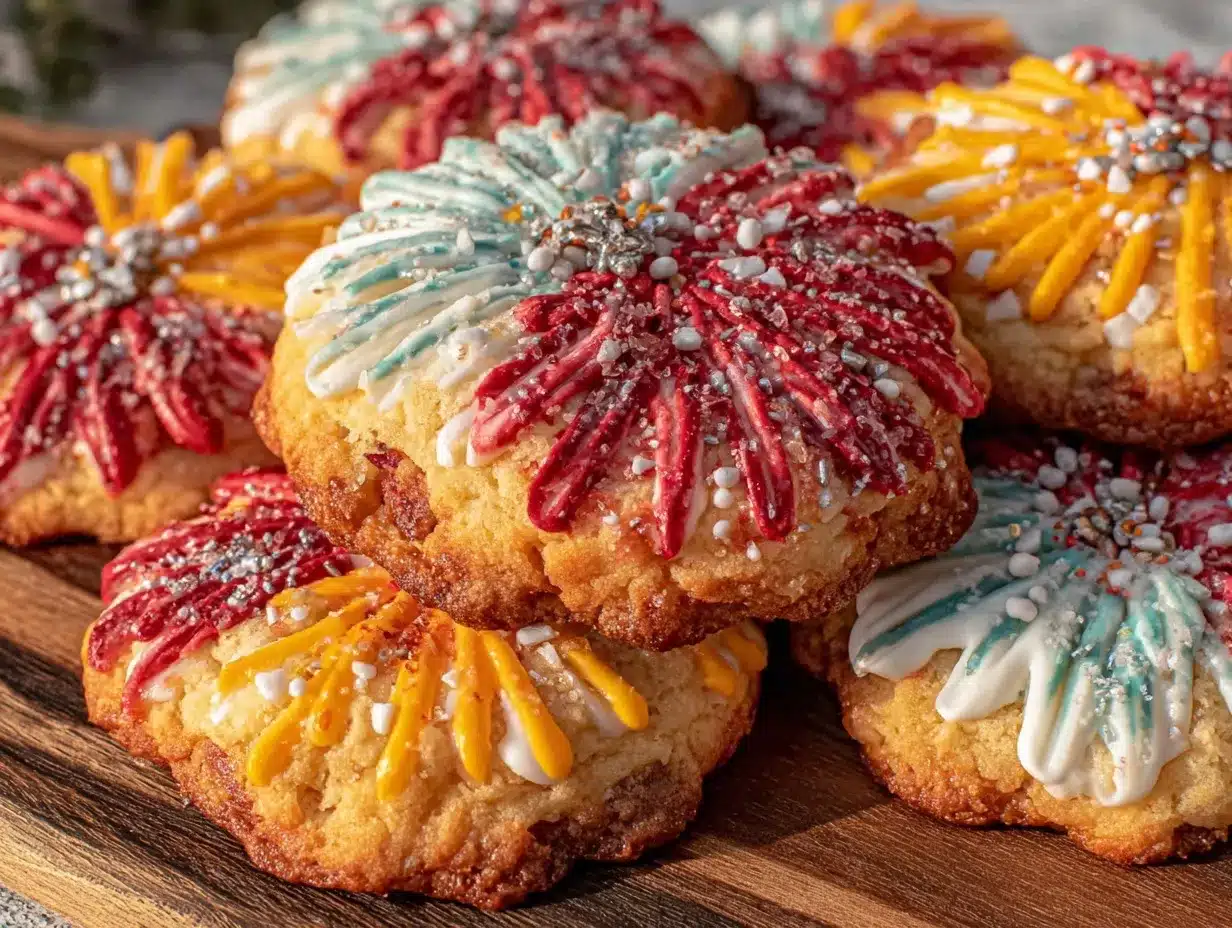
What makes these cookies stand out is the way the royal icing is handled—piped just right to create clean firework bursts, then finished with sparkling sugar that actually shines under light. The balance of sweet and buttery, and the slightly crisp edges with a tender center, make these cookies a step above the usual. This isn’t just another sugar cookie recipe; it’s a fun craft and treat rolled into one.
Plus, if you’re like me and sometimes feel overwhelmed by decorating, this recipe offers just enough structure to guide you without making you feel like you need a degree in pastry arts. Let me tell you, closing your eyes after biting into one of these is kind of magical—and you don’t even have to spend hours in the kitchen to pull it off.
What Ingredients You Will Need
This recipe uses simple, wholesome ingredients to deliver bold flavor and satisfying texture without the fuss. Most are pantry staples, and there’s plenty of room for substitutions if needed.
- For the Sugar Cookies:
- All-purpose flour – 2 ¾ cups (345 g), sifted for a light texture
- Baking powder – 1 teaspoon, to give a slight rise
- Salt – ½ teaspoon, balances the sweetness
- Unsalted butter – 1 cup (227 g), softened for richness (I like Kerrygold for its creamy flavor)
- Granulated sugar – 1 ¼ cups (250 g), provides sweetness and crunch
- Large egg – 1, room temperature for better mixing
- Pure vanilla extract – 1 teaspoon, adds depth
- Milk – 2 tablespoons (30 ml), to help bind the dough
- For the Royal Icing:
- Powdered sugar – 4 cups (480 g), sifted for smooth icing
- Egg whites or meringue powder – 3 tablespoons (or equivalent meringue powder as per package)
- Fresh lemon juice – 1 tablespoon, brightens the flavor
- Water – 2 to 3 tablespoons (30-45 ml), to adjust consistency
- Gel food coloring – assorted colors (red, blue, yellow) for the firework effect (I prefer AmeriColor gels for vibrant, stable hues)
- Sparkling sugar or coarse sanding sugar – for that final shimmering touch
For a gluten-free option, swapping the all-purpose flour with a 1-to-1 gluten-free baking flour blend works well. If you need dairy-free, use coconut oil or vegan butter alternatives, and swap milk for almond or oat milk. The royal icing also adapts if you use pasteurized egg whites or meringue powder for safety and ease.
Equipment Needed
- Mixing bowls – For combining dry and wet ingredients separately.
- Electric mixer or stand mixer – Makes creaming butter and sugar effortless. Hand mixers work fine but take a bit longer.
- Rolling pin – Essential for rolling dough evenly to about ¼-inch thickness.
- Cookie cutters – Star or round shapes work great for firework designs. I use a set from Wilton for consistent sizes.
- Baking sheets lined with parchment paper or silicone mats – Prevents sticking and promotes even baking.
- Piping bags and tips – Small round tips (#2 or #3) for precise royal icing lines. If you don’t have piping bags, zip-top bags with a tiny cut corner can work in a pinch.
- Spatula – For mixing and scraping bowls clean.
- Cooling rack – To let cookies rest and icing set properly.
Personally, investing in a quality stand mixer was a game-changer for me—it cuts down mixing time and makes the dough smoother. For budget-friendly alternatives, hand mixers and simple kitchen shears for trimming piping bags do just fine. Keep your piping tips clean with a quick rinse between colors to avoid clumps during decorating.
Preparation Method
- Mix Dry Ingredients: In a medium bowl, whisk together the all-purpose flour (345 g), baking powder (1 tsp), and salt (½ tsp). Set aside. This step takes about 5 minutes. It’s important to sift the flour to avoid lumps and ensure a tender cookie texture.
- Cream Butter and Sugar: Using a stand or hand mixer, beat the softened butter (227 g) and granulated sugar (250 g) on medium speed until light and fluffy, about 3 to 4 minutes. This aerates the dough, giving you a tender crumb.
- Add Egg and Vanilla: Beat in the egg (1 large) and vanilla extract (1 tsp) until fully combined. Scrape the bowl sides to incorporate everything evenly—takes about 2 minutes.
- Combine Wet and Dry: Gradually add the flour mixture to the butter mixture, alternating with milk (2 tbsp). Mix on low speed just until a dough forms. Overmixing can make cookies tough, so stop as soon as it comes together. This step is about 3-4 minutes.
- Chill the Dough: Wrap the dough in plastic wrap and refrigerate for at least 1 hour. This firms up the dough, making it easier to roll and cut. I usually prep this in the morning for evening baking.
- Preheat Oven and Prep Surface: Preheat your oven to 350°F (175°C). Line baking sheets with parchment or silicone mats. Lightly flour your work surface to prevent sticking.
- Roll and Cut: Roll the chilled dough to about ¼-inch (6 mm) thickness. Use your cookie cutters to stamp out shapes, dipping cutters in flour between uses. Arrange cookies about 1-inch (2.5 cm) apart on the baking sheets. This takes around 15 minutes depending on batch size.
- Bake Cookies: Bake for 8 to 10 minutes or until edges are just golden. Watch closely—overbaking dries them out. They should feel slightly firm but still soft in the center. Cool for 2 minutes on the sheet then transfer to a wire rack.
- Prepare Royal Icing: In a clean bowl, beat powdered sugar (480 g), egg whites or meringue powder (3 tbsp), lemon juice (1 tbsp), and water (2-3 tbsp) until smooth and glossy. Adjust water to get a thick but pipeable consistency. Divide icing into bowls and tint with gel food coloring.
- Decorate Cookies: Fill piping bags fitted with small round tips (#2 or #3) with each color. Pipe firework bursts by drawing lines radiating from the center of each cookie. Quickly sprinkle sparkling sugar on the wet icing for that signature shimmer. Let the icing dry completely, about 2-3 hours, before stacking or serving.
Quick tip: If your icing is too runny, add more powdered sugar; too thick, add a few drops of water. Also, keep the icing covered when not in use to prevent drying out. I’ve learned that prepping the piping bags ahead of time saves a lot of stress during decorating.
Cooking Tips & Techniques
- Chilling the Dough: Don’t skip this step! Cold dough is easier to handle and prevents cookies from spreading too much during baking.
- Flouring the Surface: Light dusting is key—too much flour can dry out your dough, but too little and it sticks like crazy.
- Royal Icing Consistency: For piping fine lines, aim for a thicker icing—almost like toothpaste. If it’s too thin, the lines will bleed and lose their shape.
- Piping Technique: Hold the bag steady, and try to use your wrist rather than your fingers for smoother movements. Practice on parchment paper to build confidence before decorating the cookies.
- Timing: Let cookies cool fully before icing. Warm cookies will cause icing to melt and lose definition.
- Storage: Store decorated cookies in an airtight container once the icing is dry to keep them fresh and crisp.
I once tried to rush the icing drying and ended up with smudged designs—a total bummer! Patience is honestly the secret to those picture-perfect firework lines.
Variations & Adaptations
- Flavor Twists: Add a teaspoon of almond or lemon extract to the dough for a new flavor dimension without changing texture.
- Color Variations: Swap the classic red, blue, and yellow icing for pastel shades for a spring party or neon colors for a glow-in-the-dark theme.
- Dietary Adjustments: Use gluten-free flour blends and dairy-free butter/milk substitutes to make these cookies allergy-friendly without sacrificing taste.
- Cooking Methods: Try baking smaller bite-sized cookies to speed baking time and make decorating easier for kids.
- Personal Variation: I once experimented with a metallic edible dust brushed lightly over the icing after it dried—it gave the cookies a subtle shimmer that guests loved at a New Year’s Eve party.
Serving & Storage Suggestions
These cookies are best served at room temperature so the royal icing stays firm but not hard. Present them on a simple white platter to let the colors pop or arrange them on a festive themed tray for parties.
They pair wonderfully with a cold glass of milk, sparkling lemonade, or even a light tea. For a more grown-up touch, try serving alongside a fruity sparkling wine during celebrations.
Store cookies in an airtight container at room temperature for up to 5 days. For longer storage, layer them between parchment and freeze for up to 3 months. When you’re ready, thaw at room temperature and avoid refrigeration, which can make the icing sticky.
Flavors tend to mellow and settle after a day, so if you can resist, letting them rest overnight improves the taste and texture.
Nutritional Information & Benefits
Each cookie (assuming a batch of 24) provides approximately:
| Calories | 150 kcal |
|---|---|
| Carbohydrates | 22 g |
| Fat | 6 g |
| Protein | 2 g |
| Sugar | 12 g |
While these sugar cookies are an enjoyable treat, they also provide quick energy thanks to the carbohydrates. The use of real butter adds a touch of richness and fat-soluble vitamins. The lemon juice in the royal icing gives a subtle vitamin C boost and balances sweetness.
This recipe can be adapted for gluten-free or dairy-free diets, making it accessible for various dietary needs. Just be mindful of egg allergies when using royal icing; meringue powder is a safer option for some.
Conclusion
These Easy Sparkling Firework Sugar Cookies with Royal Icing are a joyful way to bring a pop of color and festivity into your kitchen—and honestly, they make party prep feel less like work and more like a moment to share. Whether you’re decorating with kids or impressing friends with your piping skills, this recipe has a little something for everyone.
Feel free to customize the colors, shapes, and flavors to reflect your own celebrations. I keep coming back to this recipe because it’s approachable, fun, and always brings smiles. If you try it, I’d love to hear how your firework cookies turned out—drop me a comment or share your favorite decorating hacks!
Remember, the best cookies are made with a bit of patience, a sprinkle of creativity, and plenty of joy. Happy baking!
FAQs
- Can I make the dough ahead of time? Yes! The dough can be refrigerated for up to 3 days or frozen for up to 2 months. Just thaw before rolling out.
- How do I fix royal icing that’s too runny? Add more powdered sugar slowly until it reaches the desired consistency. If too thick, add a few drops of water.
- Can I use store-bought royal icing? You can, but homemade icing offers better control over texture and flavor.
- What if I don’t have piping bags? Use a resealable plastic bag with a tiny corner snipped off for easy decorating.
- How long do decorated cookies last? Stored properly in an airtight container, they stay fresh about 5 days at room temperature.
Pin This Recipe!
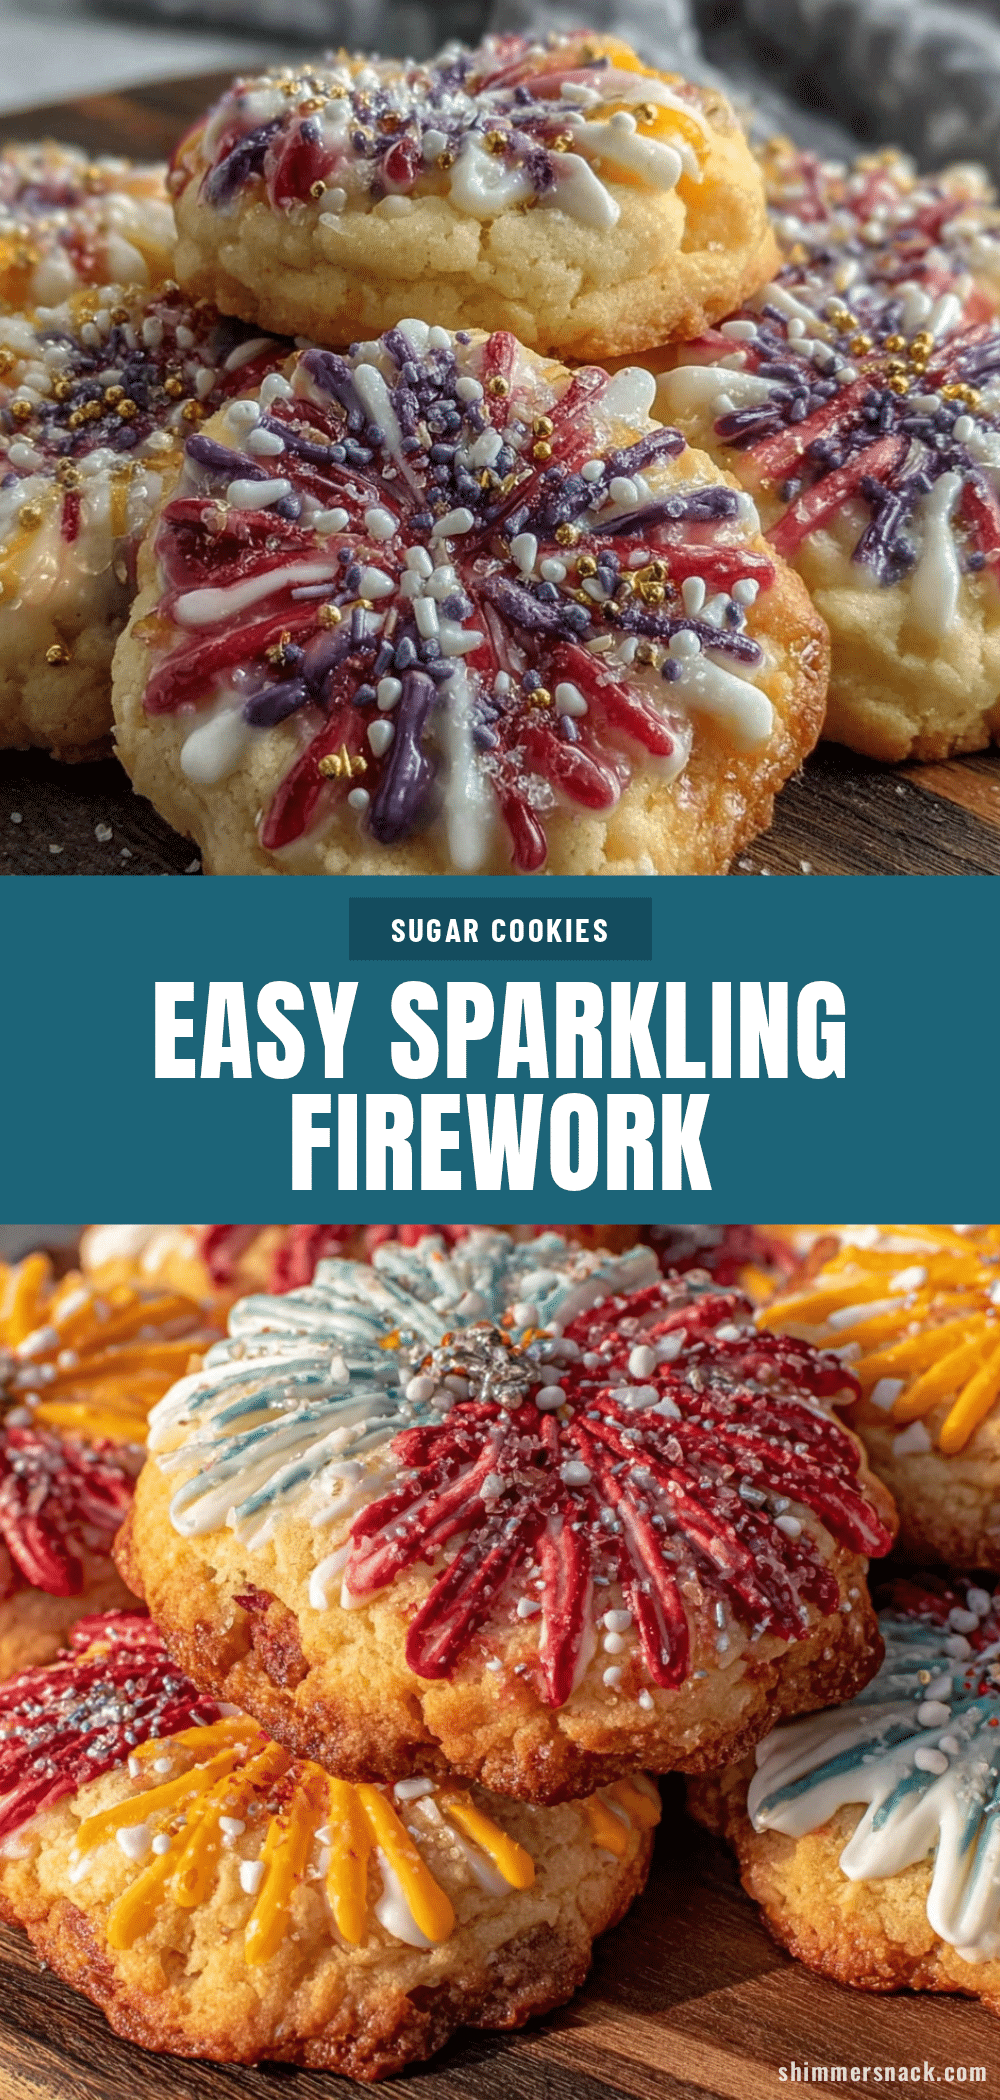
Easy Sparkling Firework Sugar Cookies Recipe for Perfect Party Treats
These festive sugar cookies feature a buttery base and vibrant royal icing decorated with sparkling sugar to resemble fireworks. Perfect for celebrations, they are quick to make and delight both kids and adults.
- Prep Time: 15 minutes
- Cook Time: 10 minutes
- Total Time: 1 hour 25 minutes
- Yield: 24 servings 1x
- Category: Dessert
- Cuisine: American
Ingredients
- 2 ¾ cups all-purpose flour (345 g), sifted
- 1 teaspoon baking powder
- ½ teaspoon salt
- 1 cup unsalted butter (227 g), softened
- 1 ¼ cups granulated sugar (250 g)
- 1 large egg, room temperature
- 1 teaspoon pure vanilla extract
- 2 tablespoons milk (30 ml)
- 4 cups powdered sugar (480 g), sifted
- 3 tablespoons egg whites or meringue powder
- 1 tablespoon fresh lemon juice
- 2 to 3 tablespoons water (30–45 ml)
- Gel food coloring (red, blue, yellow)
- Sparkling sugar or coarse sanding sugar
Instructions
- Mix Dry Ingredients: In a medium bowl, whisk together the all-purpose flour, baking powder, and salt. Set aside.
- Cream Butter and Sugar: Using a stand or hand mixer, beat the softened butter and granulated sugar on medium speed until light and fluffy, about 3 to 4 minutes.
- Add Egg and Vanilla: Beat in the egg and vanilla extract until fully combined, scraping the bowl sides as needed.
- Combine Wet and Dry: Gradually add the flour mixture to the butter mixture, alternating with milk. Mix on low speed just until a dough forms, about 3-4 minutes.
- Chill the Dough: Wrap the dough in plastic wrap and refrigerate for at least 1 hour.
- Preheat Oven and Prep Surface: Preheat oven to 350°F (175°C). Line baking sheets with parchment paper or silicone mats. Lightly flour work surface.
- Roll and Cut: Roll chilled dough to about ¼-inch thickness. Use cookie cutters to cut shapes, dipping cutters in flour between uses. Arrange cookies 1 inch apart on baking sheets.
- Bake Cookies: Bake for 8 to 10 minutes until edges are just golden. Cool on baking sheet for 2 minutes, then transfer to a wire rack.
- Prepare Royal Icing: Beat powdered sugar, egg whites or meringue powder, lemon juice, and water until smooth and glossy. Adjust water for pipeable consistency. Divide and tint with gel food coloring.
- Decorate Cookies: Fill piping bags with colored icing and pipe firework bursts radiating from the center of each cookie. Sprinkle sparkling sugar on wet icing. Let dry completely for 2-3 hours before serving or stacking.
Notes
Chill dough for at least 1 hour to prevent spreading. Use a light dusting of flour on the surface to avoid sticking. For piping, use a thicker royal icing consistency to maintain sharp lines. Let cookies cool completely before icing to prevent melting. Store decorated cookies in an airtight container at room temperature for up to 5 days or freeze for up to 3 months.
Nutrition
- Serving Size: 1 cookie
- Calories: 150
- Sugar: 12
- Fat: 6
- Carbohydrates: 22
- Protein: 2
Keywords: sugar cookies, royal icing, party treats, firework cookies, easy cookies, sparkling sugar cookies, festive cookies