Love this? Save it for later!
Share the inspiration with your friends
Introduction
The power went out halfway through a late Sunday brunch experiment, and honestly, I thought the whole thing was a disaster. I was trying to whip up something sweet but a little daring—something that would surprise my friends who usually expect the usual cinnamon rolls or fruit salad. I grabbed the maple syrup and bacon on a whim, thinking, why not mix a little salty with sweet? The lights flickered, my mixer stopped mid-whip, and I was left staring down at a half-mixed batter with a cracked bowl in hand. But you know what? When the power came back, I finished the job, and that first bite of these maple bacon cheesecake bars was like a tiny fireworks show in my mouth.
Maybe you’ve been there—stuck with limited ingredients or a last-minute craving that just won’t quit. This recipe isn’t just about cheesecake bars; it’s about that unexpected joy of combining smoky bacon with creamy, sweet maple-infused cheesecake, all resting on a buttery crust that somehow feels both indulgent and homey. This recipe has stuck with me ever since, not only because it tastes incredible but because it tells a story of turning a kitchen mishap into a crowd favorite (even with a kitchen in semi-chaos!). If you’re ready for a dessert that’s genuinely irresistible and a little bit playful, keep reading—I promise it’s worth it.
Why You’ll Love This Recipe
Let me tell you, these maple bacon cheesecake bars have been tested on a variety of crowds—friends, family, and even the neighborhood’s toughest dessert critics. They always ask for seconds, and I’m pretty sure it’s because of the balance of flavors and textures that just works every time.
- Quick & Easy: You can have these bars ready in under an hour, making them perfect for last-minute dessert needs or a casual gathering.
- Simple Ingredients: No need to hunt down obscure items—maple syrup, bacon, cream cheese, and pantry staples are all you need.
- Perfect for Brunch or Potlucks: Their unique blend of savory and sweet makes them stand out on any table.
- Crowd-Pleaser: Both kids and adults rave about these bars. I mean, who can resist bacon with cheesecake?
- Unbelievably Delicious: The creamy, rich texture paired with crispy, smoky bacon and a hint of maple is pure comfort food magic.
What makes this recipe different? Honestly, it’s the way the maple syrup is incorporated right into the cheesecake filling instead of just drizzled on top. It infuses the entire bar with that cozy sweetness. Plus, the crust is buttery and slightly crunchy, giving you that perfect base to contrast the creamy filling and the bacon’s crispiness. This isn’t just another cheesecake bar—it’s the maple bacon cheesecake bars version you’ll want to make again and again.
What Ingredients You Will Need
This recipe uses simple, wholesome ingredients to deliver bold flavor and a satisfying texture without fuss. Most of these are kitchen staples, but the combination is what really shines.
- For the crust:
- 1 ½ cups graham cracker crumbs (about 12 full sheets) – I prefer Honey Maid for best texture
- ⅓ cup unsalted butter, melted (adds richness and holds the crust together)
- 2 tablespoons granulated sugar (balances the buttery crust)
- For the filling:
- 16 oz (450 g) cream cheese, softened (use full-fat for the creamiest texture)
- ⅔ cup pure maple syrup (not maple-flavored syrup—real maple makes a difference)
- 2 large eggs, room temperature
- 1 teaspoon vanilla extract (adds aroma and depth)
- ¼ teaspoon salt (balances sweetness)
- For the topping:
- 6 slices thick-cut bacon, cooked until crisp and chopped (use Applewood smoked for a nice smoky flavor)
- Optional: a light drizzle of extra maple syrup after baking for added shine and sweetness
Substitution tips: For a gluten-free crust, swap graham cracker crumbs with almond flour or gluten-free cookie crumbs. If you need a dairy-free option, try a cream cheese alternative like cashew-based cream cheese and coconut oil instead of butter. And if you can’t find thick-cut bacon, regular bacon works too—just watch the cooking time to avoid burning.
Equipment Needed
- 8×8 inch (20×20 cm) baking pan – glass or metal works, but I prefer glass for even baking
- Mixing bowls – one large for filling, one for crust
- Electric mixer or stand mixer – speeds up the cream cheese blending, but a hand whisk works if you’re patient
- Measuring cups and spoons
- Spatula – for scraping sides of the bowl and smoothing the batter
- Cooling rack – to rest the bacon and bars after baking
If you don’t have a mixer, just make sure your cream cheese is super soft to avoid lumps. For bacon, a skillet or oven-baking tray lined with foil works well; I usually bake mine on a wire rack over a sheet tray to let the fat drip and keep bacon crispy. Budget-friendly tip: use parchment paper to line your pan for easier cleanup.
Preparation Method
- Preheat your oven to 325°F (163°C). Line your 8×8 inch baking pan with parchment paper, leaving some overhang for easy removal later. This should take about 10 minutes.
- Prepare the crust: In a medium bowl, combine 1 ½ cups graham cracker crumbs, ⅓ cup melted unsalted butter, and 2 tablespoons granulated sugar. Stir until the crumbs are evenly coated and look like wet sand.
- Press the crust mixture firmly and evenly into the bottom of the prepared pan. I usually use the bottom of a glass to pack it down tight. Bake for 10 minutes to set the crust. This step prevents sogginess later.
- Cook the bacon: While the crust bakes, cook 6 slices of thick-cut bacon until crisp. Drain on paper towels, then chop into small pieces. Set aside.
- Make the filling: In a large bowl, beat 16 oz softened cream cheese with an electric mixer until smooth and creamy, about 2-3 minutes. Scrape the sides as you go to avoid lumps.
- Add ⅔ cup pure maple syrup gradually, beating at low speed until combined. Then mix in 2 large eggs one at a time, followed by 1 teaspoon vanilla extract and ¼ teaspoon salt. The batter should be silky and slightly thick.
- Pour the filling over the warm crust and smooth the top with a spatula. Sprinkle the chopped bacon evenly over the surface—don’t be shy, this is where the magic happens!
- Bake for 40-45 minutes, or until the edges are slightly puffed and the center is just set but still jiggles a touch. You don’t want it dry; that creamy texture is key.
- Cool completely on a wire rack for at least an hour, then refrigerate for a minimum of 2 hours to let everything firm up nicely.
- Slice into bars using a sharp knife dipped in hot water for clean cuts. Optionally, drizzle a little extra maple syrup on top before serving for that glossy finish.
Pro tip: If the edges start browning too quickly, loosely cover the pan with foil halfway through baking. Also, don’t rush the chilling step—it really helps the bars hold their shape and intensifies the flavors.
Cooking Tips & Techniques
When it comes to making these maple bacon cheesecake bars, a few cooking tricks make all the difference between “meh” and “wow.” First, always use room temperature cream cheese. Cold cream cheese will create lumps and make mixing a nightmare. I learned that the hard way after a rushed morning prep where chunks survived the mixer.
Baking the crust beforehand is a must to avoid a soggy base. Press it firmly—think of it like a sturdy foundation for a house. Also, don’t skip cooking your bacon until it’s crisp; chewy bacon just doesn’t hold up well on these bars.
Another tip is to avoid overbaking the cheesecake filling. It should still have a little jiggle in the center when you pull it out. This prevents dryness and keeps the texture smooth and creamy. I usually set a timer for 40 minutes and then check every 3-5 minutes after.
While the bars chill, resist the urge to cut into them immediately. Patience here pays off with neat slices and better flavor melding. And if you want to speed things up, you can pop the bars into the freezer for about 30 minutes, but be careful not to freeze them solid.
Lastly, multitasking in the kitchen can save you time. While the crust bakes, cook your bacon and prep the filling ingredients. This way, you’re not just standing around waiting for one thing to finish.
Variations & Adaptations
These maple bacon cheesecake bars are super flexible if you want to tweak them for different tastes or dietary needs.
- Vegetarian version: Skip the bacon and add chopped toasted pecans or walnuts for a crunchy topping with a bit of saltiness.
- Seasonal twist: Swap maple syrup for honey or agave nectar, and add a handful of fresh or frozen cranberries into the filling for a tart contrast.
- Chocolate lovers: Sprinkle mini chocolate chips over the filling before baking or swirl melted dark chocolate into the batter for a marbled effect.
- Gluten-free option: Use almond flour or gluten-free graham cracker crumbs for the crust. I’ve tried this with Bob’s Red Mill almond flour with great results.
Personally, I once made a batch where I swapped out the bacon for candied pecans and drizzled with a pinch of smoked sea salt. It was a surprising hit at a holiday party—sweet, salty, smoky, and crunchy all at once.
Serving & Storage Suggestions
Serve these bars chilled or at room temperature—both ways are fantastic. I like to plate them with a small dollop of whipped cream or a scoop of vanilla ice cream, plus a fresh sprig of thyme for a pop of color and aroma.
They pair wonderfully with a cup of strong black coffee or a maple-spiced latte if you’re serving them for brunch. For something boozy, a glass of bourbon or maple whiskey complements the smoky-sweet flavor profile nicely.
Store leftover bars in an airtight container in the refrigerator for up to 4 days. They keep their texture and flavor beautifully, but if you need to keep them longer, freeze them wrapped tightly in plastic wrap and aluminum foil for up to 2 months.
To reheat, let frozen bars thaw in the fridge overnight and then warm slightly in a microwave or oven to bring back that creamy softness. Fun fact: the flavors actually deepen after a day, so if you can wait, the next day’s bars taste even better.
Nutritional Information & Benefits
Each maple bacon cheesecake bar (based on 12 servings) roughly contains:
| Calories | 320 |
|---|---|
| Fat | 22 g |
| Carbohydrates | 22 g |
| Protein | 6 g |
| Sugar | 16 g |
The cream cheese provides a good amount of protein and calcium, while the maple syrup offers antioxidants and minerals like manganese and zinc. Bacon adds protein and richness, but watch portion sizes if you’re mindful of sodium and fat intake.
For those avoiding gluten, the recipe is easily adaptable to be gluten-free. Just be sure your graham crackers or substitute crumbs are certified gluten-free. Also, this recipe is not suitable for vegans, but dairy-free cream cheese alternatives can be used for a plant-based twist.
From a wellness perspective, this dessert is best enjoyed as an occasional treat. I like to think of it as a satisfying way to indulge without guilt when made with quality ingredients and shared with good company.
Conclusion
If you’re looking for a dessert that’s both comforting and surprising, these irresistible maple bacon cheesecake bars should be your go-to. They bring together creamy, sweet, and smoky flavors in a way that’s honestly hard to put into words until you taste them yourself.
Feel free to customize the topping or crust to make it your own, because that’s the fun part about homemade desserts—you get to add your personality. I keep coming back to this recipe because it’s not just delicious but also reminds me that sometimes, the best kitchen moments come from a little chaos and a lot of creativity.
Give these bars a try, and don’t forget to share your own twists or stories in the comments—I love hearing how you make recipes your own. Happy baking and maple bacon loving!
FAQs about Maple Bacon Cheesecake Bars
Can I make these bars ahead of time?
Yes! They taste even better after chilling overnight. Just keep them covered in the fridge and slice before serving.
How do I keep the bacon crispy on top?
Cook the bacon until very crisp and drain on paper towels. Sprinkle it on the cheesecake just before baking to maintain some crunch.
Can I use artificial maple flavoring instead of real maple syrup?
Real maple syrup is highly recommended for the best flavor and texture. Artificial flavoring won’t give you the same depth or sweetness.
Is there a vegan alternative to the cream cheese in this recipe?
You can try plant-based cream cheese substitutes made from cashews or coconut. Keep in mind the texture and flavor will differ slightly.
What’s the best way to cut the bars cleanly?
Use a sharp knife dipped in hot water, wiping it clean between cuts. This helps create smooth edges without crumbling.
Pin This Recipe!

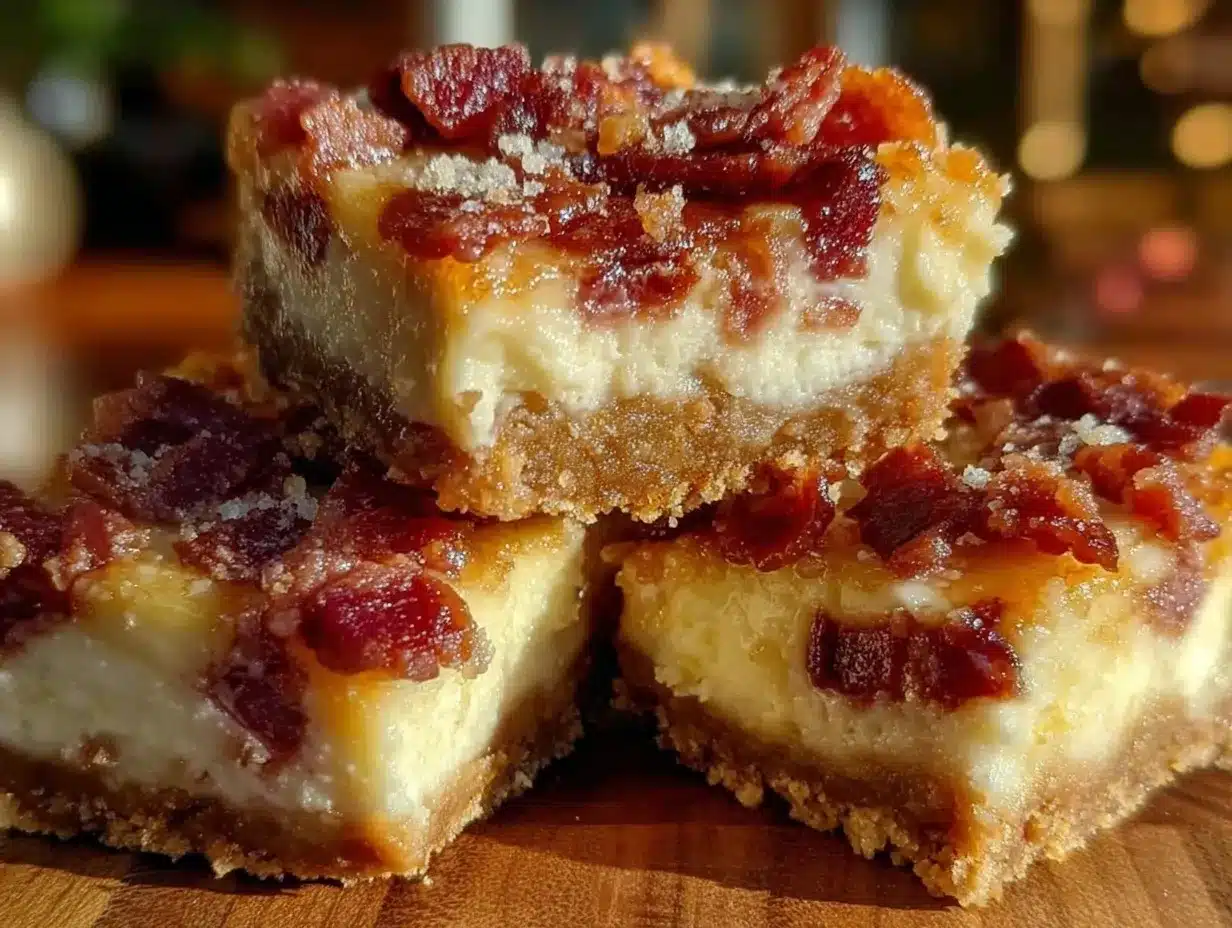
Irresistible Maple Bacon Cheesecake Bars
These maple bacon cheesecake bars combine smoky bacon with creamy, sweet maple-infused cheesecake on a buttery crust, creating a crowd-pleasing dessert perfect for brunch or potlucks.
- Prep Time: 20 minutes
- Cook Time: 55 minutes
- Total Time: 1 hour 15 minutes
- Yield: 12 servings 1x
- Category: Dessert
- Cuisine: American
Ingredients
- 1 ½ cups graham cracker crumbs (about 12 full sheets)
- ⅓ cup unsalted butter, melted
- 2 tablespoons granulated sugar
- 16 oz (450 g) cream cheese, softened
- ⅔ cup pure maple syrup
- 2 large eggs, room temperature
- 1 teaspoon vanilla extract
- ¼ teaspoon salt
- 6 slices thick-cut bacon, cooked until crisp and chopped
- Optional: extra maple syrup for drizzling after baking
Instructions
- Preheat your oven to 325°F (163°C). Line an 8×8 inch baking pan with parchment paper, leaving some overhang for easy removal.
- In a medium bowl, combine graham cracker crumbs, melted butter, and granulated sugar. Stir until crumbs are evenly coated.
- Press the crust mixture firmly and evenly into the bottom of the prepared pan. Bake for 10 minutes to set the crust.
- Cook the bacon until crisp, drain on paper towels, then chop into small pieces and set aside.
- In a large bowl, beat softened cream cheese with an electric mixer until smooth and creamy, about 2-3 minutes.
- Gradually add maple syrup, beating at low speed until combined. Mix in eggs one at a time, then add vanilla extract and salt. Batter should be silky and slightly thick.
- Pour the filling over the warm crust and smooth the top with a spatula. Sprinkle chopped bacon evenly over the surface.
- Bake for 40-45 minutes, until edges are slightly puffed and center is just set but still jiggles slightly.
- Cool completely on a wire rack for at least an hour, then refrigerate for a minimum of 2 hours.
- Slice into bars using a sharp knife dipped in hot water for clean cuts. Optionally, drizzle extra maple syrup on top before serving.
Notes
Use room temperature cream cheese to avoid lumps. Bake crust before adding filling to prevent sogginess. Cook bacon until very crisp. Avoid overbaking the filling; it should jiggle slightly when done. Chill bars for at least 2 hours before slicing. For gluten-free, substitute graham cracker crumbs with almond flour or gluten-free crumbs. For dairy-free, use plant-based cream cheese and coconut oil instead of butter.
Nutrition
- Serving Size: 1 bar (1/12 of recip
- Calories: 320
- Sugar: 16
- Fat: 22
- Carbohydrates: 22
- Protein: 6
Keywords: maple bacon cheesecake bars, cheesecake bars, maple syrup dessert, bacon dessert, easy cheesecake recipe, brunch dessert, homemade dessert